|
S |
M |
T |
W |
T |
F |
S |
|
|
1
|
2
|
3
|
4
|
5
|
6
|
|
7
|
8
|
9
|
10
|
11
|
12
|
13
|
|
14
|
15
|
16
|
17
|
18
|
19
|
20
|
|
21
|
22
|
23
|
24
|
25
|
26
|
27
|
|
28
|
29
|
30
|
|
|
|
|
|
|
Forums10
Topics38,443
Posts544,799
Members14,405
| |
Most Online1,258
Mar 29th, 2024
|
|
|
|
Joined: Jan 2004
Posts: 6,702 Likes: 405
Sidelock
|

Sidelock
Joined: Jan 2004
Posts: 6,702 Likes: 405 |
Yes, glued up with all hardware in place. Required for a perfect fit. Great. I was looking at the photo you had above with the green elastic bands, and I did not see any hardware, thus the question.
_________ BrentD, (Professor - just for Stan) ![[Linked Image from i.imgur.com]](https://i.imgur.com/qclHjMQ.jpg)
|
|
|
|
|
Joined: Dec 2019
Posts: 271 Likes: 20
Sidelock
|
|
OP
Sidelock
Joined: Dec 2019
Posts: 271 Likes: 20 |
Now that I am getting near the stage of staining and applying a new finish to the wood I would appreciate advice on the various stains and oil finishes on the market. I want a satin eggshell oil finish no gloss at all. I have used a Linseed oil type (adapted from violin finish) in the past that I really like but I would like to get close to what Lefever had back in the day. My experience in stain is using Pilkington pre 64 (Brownells). Also I will have a slight epoxy line where the stock split has been repaired. Experience tells me this will not take stain. Thanks.
|
|
|
|
|
Joined: Dec 2019
Posts: 271 Likes: 20
Sidelock
|
|
OP
Sidelock
Joined: Dec 2019
Posts: 271 Likes: 20 |
Ok, one more requirement prior to staining and finishing wood. The frame to stock head gap was too much at +0.006 on the left side. As you probably know and I have observed, on these Lefever guns there is precious little contact from frame to the meat in the head of the stock. I am not clear as to why they cut that deep vertical mortise in the center as it does not appear to house any part of the cocking mechanism. I measured my frame to wood contact and it was clear that all that light coming through was why the horns had so much recoil impact. So out comes the AcraGlas Gel and the gap is now +0.000 where it counts. After this cures I am back to thinking about the wood finish. April Quail is just a short time away. Frame to wood AcraGlas bedding setup 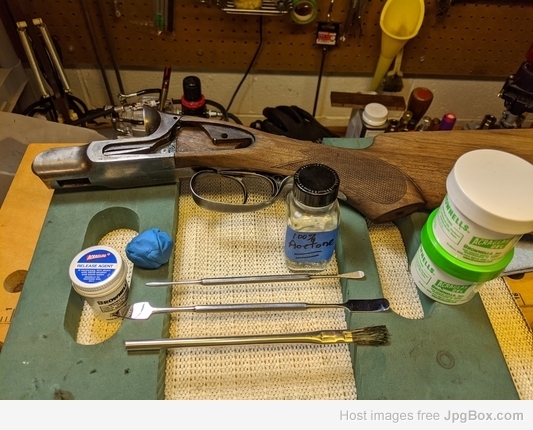 Frame to wood AcraGlas bed (left) 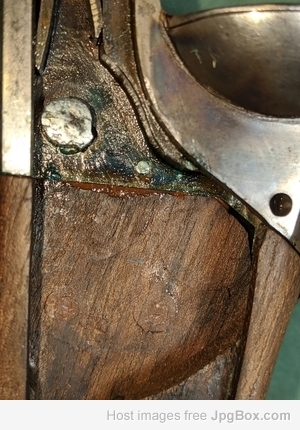 Frame to wood AcraGlas bed (right) 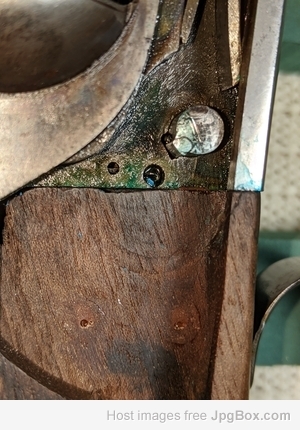
|
|
|
|
|
Joined: Dec 2019
Posts: 271 Likes: 20
Sidelock
|
|
OP
Sidelock
Joined: Dec 2019
Posts: 271 Likes: 20 |
Update on Lefever project. The final fit of metal to wood is now completed. Very snug and solid at this point. 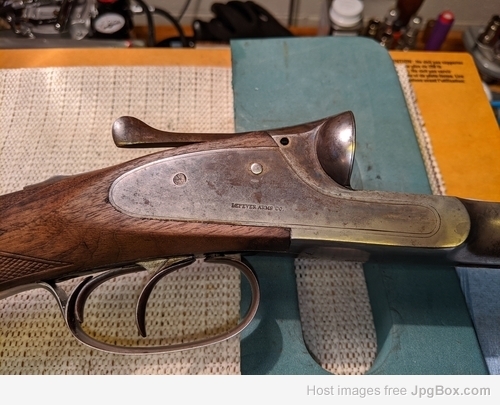 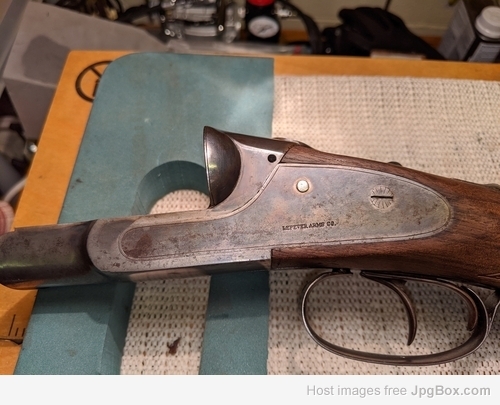  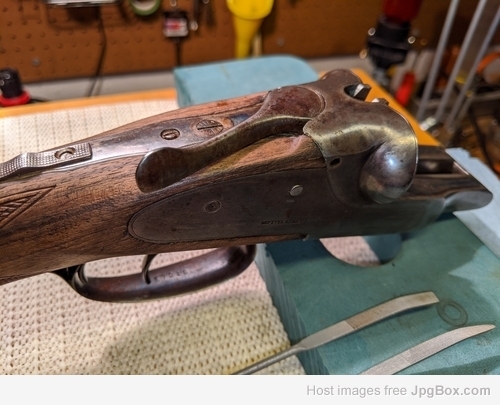 Now on to staining and oil finish for the wood. Any suggestions on commercial product? I have used Brownell's Pilkington Clear Stain a few times. LinSpeed over Tungseal (Roy Dunlap). What about Napier's London Oil Stain? I have read about this and watched a YouTube video but I have not experience with this product. Any thoughts on products with a mixture of oil and varnish such as MinWax Antique Oil Finish or Watco Danish Oil Natural (I have lots of this as I use it to seal my Damascus barrels). I would like to get a stain color close to the Lefever original if possible. As you can see from the photos of the stock it is a good straight grain walnut with not a lot of figure in the grain. Again, thanks for the many replies to my many questions.
Last edited by LetFly; 02/14/20 11:54 AM.
|
|
|
|
|
Joined: Dec 2019
Posts: 271 Likes: 20
Sidelock
|
|
OP
Sidelock
Joined: Dec 2019
Posts: 271 Likes: 20 |
Update on Lefever G project After a search for a hammer pin, getting one from GPC that was too short (as I have learned from Elliot & Cobb Lefever 12b were made in three frame sizes) dblgnfix made a precise dimension new one for me. Thanks Lou for the excellent work. If you need a hard to find old/new part give him a call (see the attached photo). Great guy to work with and talk to about all things double guns. After a bit of final fit and polish it is now installed and tested. (see photo) Cocking hook and hammer cock and hammer fall now work as new. [broken pin on bottom, new pin on top] 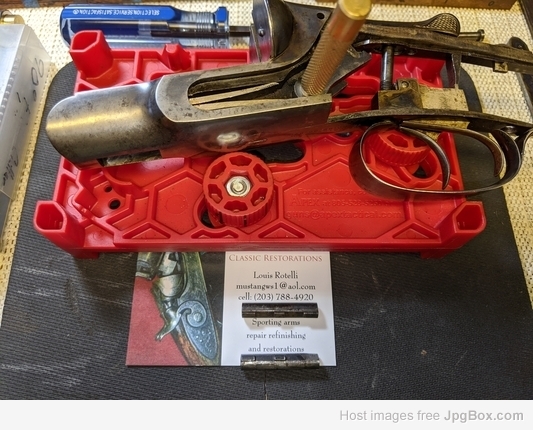 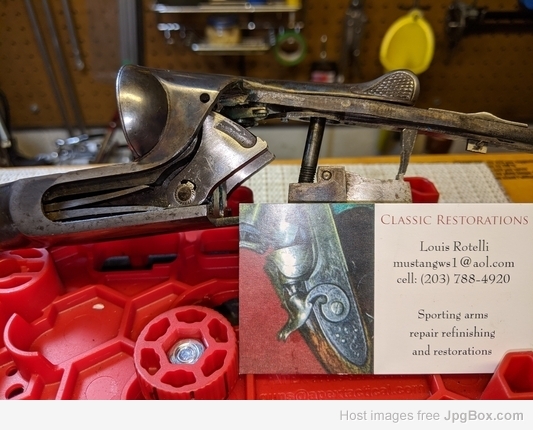 Wood is close to finished after much repair, multiple coats of Velvit Oil (selected this oil/varnish based on its soya base oil), multiple wet sanding, and final finish rub-out and wax. Thanks for the information on Flexner's book and the many suggestions and helpful advice on this forum. I must have Flexner memorized by now. I was doing most of this wood finishing correctly following my early training using James V. Howe and Roy Dunlap. However switching from BLO to a more modern oil is an substantial improvement. Getting close to field ready. Quail arrive in April.
|
|
|
|
|
Joined: Dec 2019
Posts: 271 Likes: 20
Sidelock
|
|
OP
Sidelock
Joined: Dec 2019
Posts: 271 Likes: 20 |
Update: kootching prior to final oil/varnish wipe coat.
|
|
|
|
|
Joined: Jun 2002
Posts: 2,266 Likes: 93
Sidelock
|
|
Sidelock
Joined: Jun 2002
Posts: 2,266 Likes: 93 |
How many coats have you applied? Can we get pics when finished?
|
|
|
|
|
Joined: Dec 2019
Posts: 271 Likes: 20
Sidelock
|
|
OP
Sidelock
Joined: Dec 2019
Posts: 271 Likes: 20 |
At this date, the oil/varnish process has been the following...
Oil/varnish applied very thin each time. Application #1 then wet sand 320. #2 400, #3 400, #4 600, #5 600, #6 0000 oil free steel wool, then dropped some oil varnish in a few deeper scratches, #7 600 and 0000 SW again, #8 800 oil/varnish thinned with mineral spirits. Dry time 24 to 36 hours between each application. Getting closer...also I read an account reminding me that there is a distinct difference between an oil/varnish being dry, that is able to be handled, and cured, that is hardened to the point it can be rubbed out. Dry 24 hours, cured 4 to 6 weeks dependent on oil/varnish type.
|
|
|
|
|
Joined: Dec 2019
Posts: 271 Likes: 20
Sidelock
|
|
OP
Sidelock
Joined: Dec 2019
Posts: 271 Likes: 20 |
Update photos on wood finish At this point I have completed the application of Velvit Oil finish on the wood. Velvit Oil applied as a wiping oil/varnish, each application applied and then vigorously wiped off. I have applied the finish 10 times, with a rub out with #0000 and Wool Lub between each application starting with number 7. A couple of scars earned over 100+ years have been allowed to remain as testament to its history. After allowing a cure for another 2 weeks I will rub out with rottenstone to bring the sheen up a bit and then apply a good wax. Done. 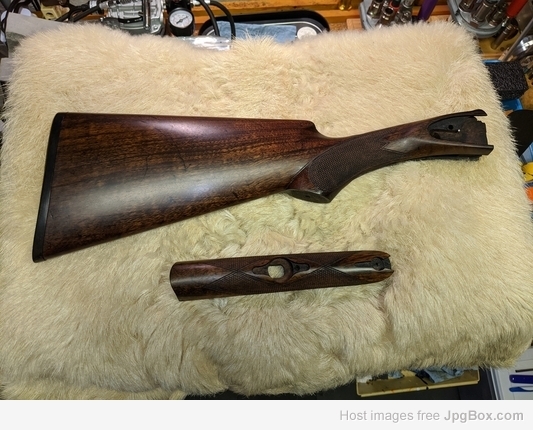 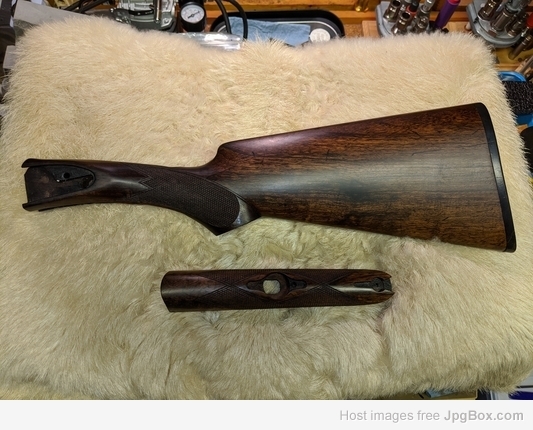
|
|
|
|
|
Joined: Dec 2019
Posts: 271 Likes: 20
Sidelock
|
|
OP
Sidelock
Joined: Dec 2019
Posts: 271 Likes: 20 |
|
|
|
|
|
