|
S |
M |
T |
W |
T |
F |
S |
|
|
1
|
2
|
3
|
4
|
5
|
6
|
|
7
|
8
|
9
|
10
|
11
|
12
|
13
|
|
14
|
15
|
16
|
17
|
18
|
19
|
20
|
|
21
|
22
|
23
|
24
|
25
|
26
|
27
|
|
28
|
29
|
30
|
|
|
|
|
|
|
Forums10
Topics38,463
Posts545,046
Members14,409
| |
Most Online1,258
Mar 29th, 2024
|
|
|
|
Joined: Nov 2016
Posts: 46
Sidelock
|
OP

Sidelock
Joined: Nov 2016
Posts: 46 |
I am relatively new to the art of color case hardening and work mostly on LC Smith and other double barrels for my personal use. I have colored 2 of these guns with decent success. I am looking for a more accurate coloring with consistent results than just dumping the receiver from a rectangle crucible similar to brownells pipe crucible. Does anyone have any advice in a crucible design, way the receiver needs to hit quench, shielding, etc. I have seen some pretty good results from some on the forum. Thanks in advance
|
|
|
|
|
Joined: Feb 2011
Posts: 1,405
Sidelock
|
|
Sidelock
Joined: Feb 2011
Posts: 1,405 |
Reading of oscar gaddys articles in DGJ on the topic would be a good start.
You can try to wade through the posts on this forum on the topic, but well over half the posts you will find are nonsense instigated by one particular member who knows nothing of the process.
B.Dudley
|
|
|
|
|
Joined: Mar 2013
Posts: 2,862
Sidelock
|
|
Sidelock
Joined: Mar 2013
Posts: 2,862 |
Here you go, 31 pages of discussion and information. http://marlin-collectors.com/forum/viewtopic.php?f=21&t=3732Regards Ken
I prefer wood to plastic, leather to nylon, waxed cotton to Gore-Tex, and split bamboo to graphite.
|
|
|
|
|
Joined: Nov 2016
Posts: 46
Sidelock
|
|
OP
Sidelock
Joined: Nov 2016
Posts: 46 |
Thanks for the info. I have looked at Dr. Gaddys articles and know what you mean by the posts on this subject. I am hoping to attain a factory look and know that the way it hits the water is crucial. I have experimented but hate to anneal and recolor more than twice in trying to come up with factory like colors. Hopefully someone will chime in that's figured this out. Any pictures, descriptions, and info is greatly appreciated.
|
|
|
|
|
Joined: Jan 2013
Posts: 1,124 Likes: 195
Sidelock
|
|
Sidelock
Joined: Jan 2013
Posts: 1,124 Likes: 195 |
For your first trial and error experiments blow air through the water in the quenching tank. Also add various amounts of Potassium Nitrate to the quenching water.
The only lessons in my life I truly did learn from where the ones I paid for!
|
|
|
|
|
Joined: Nov 2016
Posts: 46
Sidelock
|
|
OP
Sidelock
Joined: Nov 2016
Posts: 46 |
I usually aerate my quench barrel for about 2 hours before quenching the parts and turn it off before I dump the parts. Does anyone use a cage fixture to hold the receiver??? I've never used the Potassium Nitrate. Thanks, Zachary
|
|
|
|
|
Joined: Feb 2009
Posts: 7,463 Likes: 212
Sidelock
|
|
Sidelock
Joined: Feb 2009
Posts: 7,463 Likes: 212 |
I believe potassium nitrate can help create 'blue' colors, a little seems to go a long way. I'd keep track of how much is used, too much might blacken a part. I would definitely suppose, other folks might get different effects.
|
|
|
|
|
Joined: Oct 2014
Posts: 312 Likes: 1
Sidelock
|
|
Sidelock
Joined: Oct 2014
Posts: 312 Likes: 1 |
I am relatively new to the art of color case hardening and work mostly on LC Smith and other double barrels for my personal use. I have colored 2 of these guns with decent success. Thanks in advance Would love to see some pictures of the results - its something i have never tried.
|
|
|
|
|
Joined: Nov 2016
Posts: 46
Sidelock
|
|
OP
Sidelock
Joined: Nov 2016
Posts: 46 |
This is one of the ones I've done. Looks fairly decent but doesn't quite look factory. Stock isn't finished in the photo. I am currently building a larger heat treat oven to handle a larger crucible. I am wanting to build a cage to hold the receiver that has built in shielding to hold the coal close to the receiver as it falls into the quench. Thanks for the advice and keep the info coming. Zachary [url=[URL=http://s1042.photobucket.com/user/zhopkins1/media/Mobile%20Uploads/20160704_123814_zpsa3tj2ge3.jpg.html] 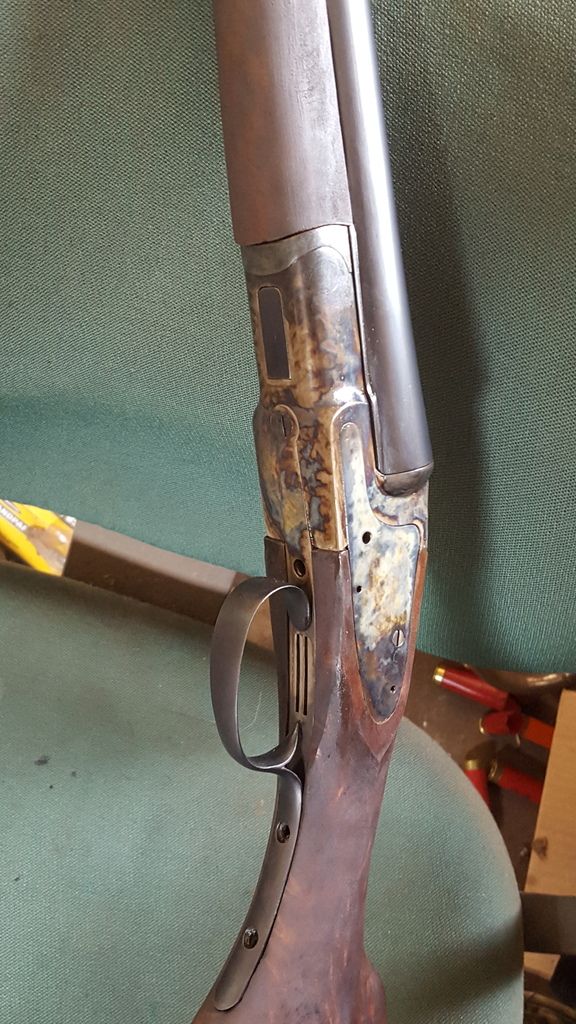 [/url]]lc smith[/url]
|
|
|
|
|
Joined: Dec 2011
Posts: 908 Likes: 43
Sidelock
|
|
Sidelock
Joined: Dec 2011
Posts: 908 Likes: 43 |
Nicely done. Several questions that you can either not answer or be vague as you choose. What temp. did you go up to, how long did you hold it? What temp. did you quench? What charcoal and what % of wood to bone. I have been told that while you don't want bubbles in the water, some movement is desired. Is you crucible lid on tight? Do you knock or take the lid off or dump it into the water? How much water and at what temp. ? What was the minimum amount of pack between the piece and the crucible wall? Do you re-use the charcoal for any reason? Did the blocking you used to prevent warping parts have better colors than the action? I'm just trying to get a system that is repeatable. any input you chose to share will be greatly appreciated. Thanks. Mark
|
|
|
|
|
Joined: Nov 2016
Posts: 46
Sidelock
|
|
OP
Sidelock
Joined: Nov 2016
Posts: 46 |
I usually get the pack up to 1350 degrees F and hold for 1.75-2 hrs. I then drop to around 1150-1100 degrees F and try to stay there for 30 minutes. I think that this was a 2:1 wood to bone charcoal mix. I have changed the ratio around when I was doing a little Winchester rifle and small parts. Lid is fairly tight but the pack is full covered in coal and I usually put a piece of paper under the lid that often times doesn't even burn completely since there is not much oxygen after a slight flash burn that uses it all up at that high of a temp. I had a plate that was bolted on the front of this receiver that hit the water first which helped cause a splash and helped maintain coal around the parts. My quench tank is probably a 45 gallon drum barrel that is about room temp or less. I've tried using ice to cool down but didn't notice much of a change. I don't reuse any coal unless I am annealing. There is probably 3/4 in of coal around the receiver in the crucible which I think is one of the problems and why I am building a larger oven. The crucible is rectangular tubing with a hinged lid. I don't block. All I do is have a spacer that fits between the tangs and between the side plates. My main reason for wanting a cage or fixture for holding the receiver is that it will cause greater movement of water and hold the coals in a way that will allow consistent results if all other variables are the same. I learned a lot from the marlin thread about a year ago when I first saw it and a link was posted above but haven't seen much on sidelock shotguns. Thanks, Zachary
|
|
|
|
|
Joined: Jan 2013
Posts: 1,124 Likes: 195
Sidelock
|
|
Sidelock
Joined: Jan 2013
Posts: 1,124 Likes: 195 |
Now I have never tried to colour case harden though I have used commercial case hardening products. Given that I have collected snippets of information on colour case hardening mixtures over the years especially the little additions to the basic bone and wood charcoal mix. Some of you folks who colour case harden may like to try some of these extra additions. As far as I know they are all forms of carbon but with various trace elements and should not cause any strange effects other than improving the final colours of the finished article.
1 Carbonised Blood Fish and Bone garden fertilizer. Made by roasting in a tin keeping the air out with just a small hole to let the fumes escape, keep heating until totally converted to carbon.
2 Carbonised leather made by treating as Blood Fish and Bone. Traditionally a small amount of Ivory turnings where also added. But we all know that Ivory looks far far nicer on elephants so that is a no no, though there was a substitute recommended which was crushed sheep�s teeth.
3 And to improve the surface hardness it is recommended that a small quantity of Potassium Ferricyanide is added to the final colour case hardening mixture before use.
***** Even though the name is similar to its extremely poisonous big brother Potassium cyanide, it has a low toxicity but can be an irritant. *****
Keep the Air blowing through the quenching tank all the time. This causes uneven cooling effecting the final colour pattern, and Potassium Nitrate I have already mentioned.
Colour case hardening is �all steam muck and magic� improved by lots of practice.
Last edited by damascus; 12/09/16 05:05 PM. Reason: Oooops!!
The only lessons in my life I truly did learn from where the ones I paid for!
|
|
|
|
|
Joined: Feb 2009
Posts: 7,463 Likes: 212
Sidelock
|
|
Sidelock
Joined: Feb 2009
Posts: 7,463 Likes: 212 |
....haven't seen much on sidelock shotguns.... Gun Craft by Venters is a very modestly priced book that has a case color section. Like most, it's not highly detailed, but shares plenty enough times, temps and misc. comments. On the other hand, if a lever rifle works slick after case coloring, then those techniques may be sound. Thanks for sharing what you have done.
|
|
|
|
|
Joined: Mar 2002
Posts: 2,857 Likes: 384
Sidelock
|
|
Sidelock
Joined: Mar 2002
Posts: 2,857 Likes: 384 |
you have to aerate the water all the time. you have to break up the steam envelope,and let the pack cool before dumping in the tank i think your temp is to high, if you try and make your own bone charcoal make sure you neighbors are not down wind from you.on your crucible seal the lid and add the piece of paper to use up any oxygen.i have made several crucibles,most like dr gaddy but i do have a short one i used for SAA frames.good luck there are a million different ideas on how to make this work,you have to figure out how to make it work consistently.
|
|
|
|
|
Joined: Mar 2013
Posts: 2,862
Sidelock
|
|
Sidelock
Joined: Mar 2013
Posts: 2,862 |
PA24 recommended adding pieces of hoof to the pack, on the edges of the crucible. This might serve the same function as the ivory or teeth.
My own tests have been unsuccessful, I'm getting unacceptable scaling, but with small patches of nice color. Since I've been making my own charcoal I suspect it hasn't been cooked completely, causing the contamination. On one test I had sealed the crucible with hearth cement, but during the heat I heard a "pop", and when I opened the kiln there were flames coming out of the crucible along the edge seam of the lid. I've ordered charcoal from Brownell's to see if I'm right. Anyone have any insights?
Regards
Ken
Last edited by Ken61; 12/09/16 11:13 AM.
I prefer wood to plastic, leather to nylon, waxed cotton to Gore-Tex, and split bamboo to graphite.
|
|
|
|
|
Joined: Mar 2013
Posts: 2,862
Sidelock
|
|
Sidelock
Joined: Mar 2013
Posts: 2,862 |
Potassium Ferricyanide is added to the final colour case hardening mixture before use.
***** Even though the name is similar to its extremely poisonous big brother Potassium Ferricyanide, has a low toxicity but can be an irritant. ***** damascus, You've spelled them both the same. Is this correct?
I prefer wood to plastic, leather to nylon, waxed cotton to Gore-Tex, and split bamboo to graphite.
|
|
|
|
|
Joined: Sep 2015
Posts: 40
Sidelock
|
|
Sidelock
Joined: Sep 2015
Posts: 40 |
Searching thru my old garage junk I came across Dr Gaddys #2 article on case coloring,as It is very detailed article with photos,It explains Lc smith Colors parker ect.Over the years I have tried everything in quench tank, such as stuff that you wash cows feet with,Just throw all that stuf out,and followed Gaddys article,wood and bone , buy it from Brownells
Lyons Gunsmithing
|
|
|
|
|
Joined: Feb 2009
Posts: 7,463 Likes: 212
Sidelock
|
|
Sidelock
Joined: Feb 2009
Posts: 7,463 Likes: 212 |
....I'm getting unacceptable scaling, but with small patches of nice color....
....I heard a "pop", and when I opened the kiln there were flames coming out of the crucible along the edge seam of the lid.... I think, if you get patches of color and some true scale forming, then maybe some of the steel was protected from oxygen (formed colors), and some of the steel was exposed to oxygen (scale) when it was in the higher temp. range. I would guess that your crucible made it through the heat cycle, and maybe O2 is reaching the parts during your quench. Just the flames that you saw may not mean anything by themselves. If the material was up to temp and air got in if the cover moved, chances are it would show a flare up. I would think the main reason to use known materials would be to minimize the chance of surprises. If you have the Venters, Gun Craft, book, R. Brown makes mention of how they cook their materials to burn off possible impurities. He also thinks if the technique is sound, that flaking is oils either from inadequate cleaning or residual in the charcoal. Only thoughts Ken, best of luck with it.
|
|
|
|
|
Joined: Mar 2013
Posts: 2,862
Sidelock
|
|
Sidelock
Joined: Mar 2013
Posts: 2,862 |
Thanks Craig.
So many variables. Besides the charcoal issue, it may be quench procedure. My crucible is fairly large, holding around 1 1/2 gal. Of medium, it's designed to hold two actions. My test pieces have been unblocked lockplates. So, even though I am able to flip the crucible quickly over into the quench, there may still be oxygen getting to the pieces. I also may need a longer heat time because of the crucible size.
Since I'm now waiting on Brownell's, I'll construct the blocking rack to fit inside the crucible.
Great thanks to the members who have recently sent me Part II of Dr. Gaddy's article.
Regards
Ken
Last edited by Ken61; 12/09/16 10:57 PM.
I prefer wood to plastic, leather to nylon, waxed cotton to Gore-Tex, and split bamboo to graphite.
|
|
|
|
|
Joined: Feb 2009
Posts: 7,463 Likes: 212
Sidelock
|
|
Sidelock
Joined: Feb 2009
Posts: 7,463 Likes: 212 |
Hey Ken, that's a pretty large crucible. You may be under filling it to save on the charcoal materials.
Consider making up smaller crucibles out of black pipe or thick wall square tubing. It's not a big deal to weld a flat base on the bottom, and rig up a slip fit welded square cover, or use a die grinder to clear out the threads of a screw on cap for round pipe.
I think I've mentioned before that you can cut V's off of angle iron quickly with a chop saw and weld them to the sides where ever you want so the crucible doesn't slide with whatever you hold it with. You can burn off paint and oil with a torch before you run it in your kiln.
I think fill the crucible, tap it down, and fill some more in. Careful this time of year, there's a bunch of CO produced that might not be venting off.
|
|
|
|
|
Joined: Jan 2002
Posts: 13,149 Likes: 1147
Sidelock
|
|
Sidelock
Joined: Jan 2002
Posts: 13,149 Likes: 1147 |
I never understood from Oscar's articles that the crucible should be nearly airtight. Did I miss something? It was my understanding that the increasing heat would drive out any oxygen that is within the crucible, and that a loose fitting top was necessary for this to happen. I have seen some beautiful colors produced with the oven and crucible I now own, and it isn't even close to having a tight fitting lid. ????????
SRH
May God bless America and those who defend her.
|
|
|
|
|
Joined: Feb 2009
Posts: 7,463 Likes: 212
Sidelock
|
|
Sidelock
Joined: Feb 2009
Posts: 7,463 Likes: 212 |
I think 'nearly' leaves some wiggle room. It's probably not a bad idea to be able to get the cover off quick when it's time to quench.
I don't know if heat would drive the O2 out, but it should be consumed when the little bit of it in there gets burned up with the charcoal. I'd think the pressure build would be potentially dangerous if the crucible was air tight. I think Ken's pop he mentioned was an inadvertent air tight seal.
|
|
|
|
|
Joined: Mar 2002
Posts: 2,857 Likes: 384
Sidelock
|
|
Sidelock
Joined: Mar 2002
Posts: 2,857 Likes: 384 |
i have colored a lot of parts, i have always sealed the lid with furnace sealant,i put a piece of paper to burn and use up oxygen i put charcoal in and add bone charcoal and layer it,i ran air to have constant bubbles to break up the steam envelope.i ran my kiln at 1200 and depending what i had in my crucibles allowed time to get everything up to temperature. when i quenched i pulled the pack out knocked the lid off and dumped it into the tank.if you made you charcoal and its wet it will get scale.or if you dont cook the bone charcoal enough. that's all i got. mc
|
|
|
|
|
Joined: Nov 2016
Posts: 46
Sidelock
|
|
OP
Sidelock
Joined: Nov 2016
Posts: 46 |
So I'm still trying to improve the color case hardening procedure that im doing and have some more questions. At what time are yall starting the time for the parts to soak at the 1350 temp. Is it when you visually see the crucible with a dark cherry glow or when the door is shut and the furnace is building up temp. I usually cook the parts for the one and a half to 2 hours before I drop it to 1150 before I quench in order to prevent warpage. I start the 2 hours when I see the crucible is glowing. Is this too long?? I am still getting some side plate warpage where the fingers of the side plate attach to the receiver. The receiver does have spacers to prevent warpage but still does. Does anyone use lower temps? Thanks Hereford
|
|
|
|
|
Joined: Dec 2008
Posts: 277 Likes: 4
Sidelock
|
|
Sidelock
Joined: Dec 2008
Posts: 277 Likes: 4 |
I�ve been doing CCH in the shop for the past 15-20 years, and I�ve been researching it for longer than that. Keep in mind that case hardening via bone char has been around for a loooong time, and was actually a commercial hardening process; everything from locomotive parts to delicate measuring instruments� look at Starrets early squares (beautiful Colors), I�ve got mid 1920s tap wrenches with gorgeous CCH. Pre WWII bone charr case hardening was well known and well established.
With that said, I don�t think anyone will get original colors, for a variety of reasons, although I can get very close to Winchesters colors. OBTW, I do have Winchester�s CCH formulas� notice its plural, meaning they had different processes/formulas for different parts.
Here are some of your challenges:
Case hardening/Quench temps: Back in the day they did true case hardening, meaning the parts were quenched at 1600 degrees +. At those temps the metal will move. Winchester experienced a high warpage/cracking rate, and in 1903 stopped CHH. A large company like Winchester or Marlin can absorb a certain failure rate� Can you?
Virgin Steel: I�ve had the steel analyzed, it�s a very low carbon steel. Each time the steel is case hardened, carbon is added to the steel. The more carbon in the steel, the higher the chances of the steel warping/cracking.
Wood/Bone ratio: Different ratios will produce different colors/look.
Bone Char: I suspect pre-1900 the bone char was buffalo, today it�s most likely sheep imported from Scotland.
Water temperature: Water temps have a significant impact on colors, I suspect they used well water. Ground water temps vary across the country, water temperature is 2� to 3�F above the annual mean temperature of the locality, because of this, well water in Mass is significantly colder than well water in Florida.
Shall I go on?
|
|
|
|
|
Joined: Aug 2018
Posts: 305 Likes: 7
Sidelock
|
|
Sidelock
Joined: Aug 2018
Posts: 305 Likes: 7 |
Hereford
Do you mind sharing your oven plans and specs and general set -up.
Many thanks.
Travis
|
|
|
|
|
Joined: Dec 2008
Posts: 277 Likes: 4
Sidelock
|
|
Sidelock
Joined: Dec 2008
Posts: 277 Likes: 4 |
I actually spent about a year developing my process for repeatable and reliable results. I would take 1/8 inch flat stock and surface grind them so that they were dead flat. I would then CCH them changing one variable at a time checking for colors and warpage. Sometimes up to two quenches a day; so a lot of time, money and energy went into setting up my system.
I remember talking to Oscar Gaddy about this, our first conversation he chuckled.. Told me not to do it . After a while he was quite helpful.
My set-up is a standard ceramic kiln, generally they can be had cheap on the secondary market, some bored housewife tries pottery for a month or so then gets tired of playing. I�ve got four kilns in my shop all from the above.
I use a digital kiln controller on the kilns, good ones are not cheap, but it will maintain the temp +/- 2 degrees. The first one I bought, something like $400 15+ years ago, now I just build my own using inexpensive PID controllers.
My crucibles are � inch stainless steel, I�ve designed my quench tank system where the lid is removed and the crucible drops to a pre-determined distance from the water all in one movement. Again..consistancy.. Always the same each and every time.
Charcoal is mixed using a concrete mixer.
I keep 4 standard wood/bone ratios on hand; one for bold bright colors, two different mixes for Winchesters, and one for Colts.
Lots of variables in getting colors: Water temp, quench temp, wood/bone ratio, bone char size, blocking, drop distance between crucible and water, quantity of O2 in the water etc. And even then there are no guarantees� one side of the frame may only have browns and blues, the other side looks like Picasso puked on it� all the colors of the rainbow.
|
|
|
|
|
Joined: Dec 2001
Posts: 6,992 Likes: 402
Sidelock
|
|
Sidelock
Joined: Dec 2001
Posts: 6,992 Likes: 402 |
Well yeah..... How about some pictures of your crucibles and quench set up?
|
|
|
|
|
Joined: Nov 2016
Posts: 46
Sidelock
|
|
OP
Sidelock
Joined: Nov 2016
Posts: 46 |
It is a basic rectangular design that is 13in deep by 9in high and 9in wide. Used the brick to build structure. All encased in a steel/aluminum shell that I used all thread to compress. I used 2 coils and heat temp wire and connectors that I ordered from some foundry place off a blade forum a year or so ago. Pid, box, thermocouple, ssr's, etc I ordered off ebay in a kit for 220 application. Isn't pretty and may go back and add a few safety switches etc but works as intended. I dont have the wiring diagram any more but my pid actually had a diagram that was basically identical to how I wired it.
Thanks for the explanation Mr Hunter. Your work speaks for itself and I greatly appreciate the input. Images of the crucible and quench setup would be very informative.
|
|
|
|
|
Joined: Dec 2008
Posts: 277 Likes: 4
Sidelock
|
|
Sidelock
Joined: Dec 2008
Posts: 277 Likes: 4 |
Well yeah..... How about some pictures of your crucibles and quench set up? Hummm�. Gots about a year, and a bunch of $$$ developing my system; and what I mean by �my system� I know how DTR does it, I�ve seen how Ballard used to do it (back when they were in Cody), I know how Winchester and Marlin did it, but my system is pretty unique from what I have seen out there, I would like to keep it that way. Besides, it�s pretty simple concept; all you gotta do is dump some 1600 degree parts into a tub of water how hard can it be  The fact that I can do it in a t-shirt and flip flops without getting burned makes it a little different.
|
|
|
|
|
Joined: Dec 2001
Posts: 6,992 Likes: 402
Sidelock
|
|
Sidelock
Joined: Dec 2001
Posts: 6,992 Likes: 402 |
The old story, you can take a boy out of the surf, but not his flip flops?
|
|
|
|
|
Joined: Nov 2016
Posts: 46
Sidelock
|
|
OP
Sidelock
Joined: Nov 2016
Posts: 46 |
I can completely understand. Way I see it is I have about 20 side by sides needing restoration and plenty of coal and alot of figuring it out to do.
|
|
|
|
|
Joined: Sep 2011
Posts: 150 Likes: 2
Sidelock
|
|
Sidelock
Joined: Sep 2011
Posts: 150 Likes: 2 |
Just for the record, Mike is my favorite both for color and hardness.
Did not know he was doing it in a t-shirt and flip-flops.
He has done several rifle actions for me.
Chuck
|
|
|
|
|
Joined: Aug 2018
Posts: 305 Likes: 7
Sidelock
|
|
Sidelock
Joined: Aug 2018
Posts: 305 Likes: 7 |
Thanks for all who constructively contribute to this board.
I can understand Mike not wanting to give up his setup as it appears to be his livelihood. On top of that I am sure that his product, as a professional, is far superior to whatever I may end cobbling together as a DIY'er. I do have the sense to know not to try most of what I am leaning about on any gun of value. However, as I have accumulated a decent stock of vintage field grade projects that beg for messing with, I am going to learn on. Hell most of my guns are going to get beat back up in use anyway.
That being said and this being a DIY board and everyone has to start at ground zero, anyone's input from experience is greatly appreciated.
|
|
|
|
|
Joined: Jan 2004
Posts: 6,711 Likes: 411
Sidelock
|
|
Sidelock
Joined: Jan 2004
Posts: 6,711 Likes: 411 |
Travis, I'm looking forward to seeing your results. It is something I would like to try someday as well.
_________ BrentD, (Professor - just for Stan) ![[Linked Image from i.imgur.com]](https://i.imgur.com/qclHjMQ.jpg)
|
|
|
|
|
Joined: Dec 2008
Posts: 277 Likes: 4
Sidelock
|
|
Sidelock
Joined: Dec 2008
Posts: 277 Likes: 4 |
Here are some suggestions /ideas to ponder.
If you truly want the factory look, you have to do it the way the factory did it, or a close as possible.
Stop looking at DT�s colors, they are bright beautiful, awesome colors, but� not quite original.
Wood/Bone ratio. Original CCH has a very translucent look to them. The more bone, the more opaque the colors become. Reduce the amount of bone.
Quench temp: Again, they did true case hardening, meaning above 1600 deg F. The hardened steel has a different look to it. I know most want to stay below 1300 deg F where warpage is minimized. Crank it up to 1400+ with some scrap parts, see what happens.
Water temp: most period gun makers were in New England, ground water temps were a little cooler up there, shoot for quench water temp around 47 deg F.
Ignore folks that suggest adding hoofs, leather etc� they don�t have a clue. Hoofs are made of keratin, same as fingernails and hair; and are full of crap literally� Nails, rocks and manure, I have a horse ranch, I know what�s in hoofs, do you really want all that in your mix. OBTW when you heat it to 1000+ it melts, and forms a black goo. Leather, pretty much the same issue, plus the tanning compounds. OBTW it stinks to high heaven�.trust me.. I�ve tried it.
|
|
|
|
|
Joined: Feb 2009
Posts: 7,463 Likes: 212
Sidelock
|
|
Sidelock
Joined: Feb 2009
Posts: 7,463 Likes: 212 |
|
|
|
|
|
Joined: Dec 2001
Posts: 6,992 Likes: 402
Sidelock
|
|
Sidelock
Joined: Dec 2001
Posts: 6,992 Likes: 402 |
Interesting comment on the Bone to wood ratio. I believe Robin Brown in the UK uses 100% bone charcoal. Much to learn. My oven is not getting used enough and I think that is going to change.
|
|
|
|
|
Joined: Aug 2018
Posts: 305 Likes: 7
Sidelock
|
|
Sidelock
Joined: Aug 2018
Posts: 305 Likes: 7 |
Question on warpage.
Is warpage from the high temp quench generally just enough that previously fitted wood no longer fits or is warpage like twisted beyond mechanical functioning? Or is it all a crap shoot and all in between?
If it is the former, then would my logic make sense that on projects that are going to be re-stocked that I do the high temp quench and then restock stock to fit?
Last edited by Travis S; 05/05/20 10:40 AM.
|
|
|
|
|
Joined: Dec 2008
Posts: 277 Likes: 4
Sidelock
|
|
Sidelock
Joined: Dec 2008
Posts: 277 Likes: 4 |
Steve, simple test to conduct, try one with 100% bone and another with 100% wood.
Priorities were 1. Hard wear resistant outer shell on steel, 2. Attractive finish. It doesn�t take much bone to �activate� the process to get hardness.
The assumption can be made that back in the day, bone char was more expensive than wood charcoal, when you�re buying it by the ton that can make a difference.
|
|
|
|
|
Joined: Dec 2001
Posts: 6,992 Likes: 402
Sidelock
|
|
Sidelock
Joined: Dec 2001
Posts: 6,992 Likes: 402 |
I have had quite a few guns CCH over the years. Most of them had no warpage or a very slight amount, knowing how to hard fit parts comes in very useful.
I recently had a breech block done. It had a striker disc in it which had very fine threads. It did not move much but the disc did not want to go back in. Lots of patience, a diamond file here and there and some lapping compound did the job. The lower legs on the block spread just enough to not go back in the action as well. Some very gentle work in my machinist vise fixed the issue.
For me a very important component of the process is ending up with a hard skin. If you quench at so low of a temp. to completely avoid warpage this hard skin is not present.
Always do wood work first, metal finish last. Any other way is a headache.
|
|
|
|
|
Joined: Dec 2001
Posts: 6,992 Likes: 402
Sidelock
|
|
Sidelock
Joined: Dec 2001
Posts: 6,992 Likes: 402 |
I have a few bags of both...I need to give it a go.
|
|
|
|
|
Joined: Dec 2008
Posts: 277 Likes: 4
Sidelock
|
|
Sidelock
Joined: Dec 2008
Posts: 277 Likes: 4 |
Travis
Simple answer is Yes.
Laws of physics dictates it.
We all know that steel expands when it�s heated, and contracts when it�s cool, and will do so at varying rates depending on the thickness of the steel, so a 1 inch thick block will cool slower than a 1/8 inch shim� only makes sense right? The greater the mass, the longer it will retain heat.
So, what happens if you have that 1 inch block, but you also have a bunch of places with only 1/8th or 1/16 inch thickness? Well we know that the thinner pieces will be completely cool, while the thicker pieces are still hot, they will expand and or cool at different rates�. It�s gotta happen�.thus you have warpage. �the steel has to move, even if you have blocking. It will just move after you take the blocks out�
Back in the day, most companies had �hard fitters� who would tweak the parts back into shape. Many firearm companies stopped case hardening once better steels were developed; just for that reason too much warpage.
Think Winchester had 5-10% failure rate, so in 1903 Stopped CCH altogether.
Last edited by Mike Hunter; 05/05/20 11:02 AM.
|
|
|
|
|
Joined: Nov 2016
Posts: 46
Sidelock
|
|
OP
Sidelock
Joined: Nov 2016
Posts: 46 |
Hard fitting is a hard necessity I have had to learn. Some problems I have ran into is sometimes getting larger percentage of grey on receivers. What is causing this to happen as other times they come out near perfect.
|
|
|
|
|
Joined: Dec 2008
Posts: 277 Likes: 4
Sidelock
|
|
Sidelock
Joined: Dec 2008
Posts: 277 Likes: 4 |
Grey= Air. The parts were exposed to air before hitting the quench tank.
|
|
|
|
|
Joined: Nov 2016
Posts: 46
Sidelock
|
|
OP
Sidelock
Joined: Nov 2016
Posts: 46 |
That's what I thought. My crucible I'm using is similar to brownells and I'm dumping with the lid still on top and coals all the way to the lid and packed. Is there something I'm missing when this happens as I'm flipping the crucible over to dump it?
|
|
|
|
|
Joined: Dec 2008
Posts: 277 Likes: 4
Sidelock
|
|
Sidelock
Joined: Dec 2008
Posts: 277 Likes: 4 |
When wood/bone char is heated to over 1000 deg F, they start to off gas carbon dioxide and carbon monoxide, this gaseous carbon is what gets infused into the steel at elevated temperatures.
These gasses also displace the air/oxygen within the container; carbon monoxide being slightly lighter than air, and carbon dioxide being slightly heavier than air. So you�re kinda covered both ways (some pushing up/some pushing down).
What you need to do when quenching is to ensure that the parts remain in this carbon envelope all the way to the water. Drop distance between the container and quench water is another variable, in my set-up I allow no more than � inch.
Early on in my development I actually thought about adding dry ice to the quench tank, it would serve two purposes, cool the water, and provide a layer of carbon dioxide gas to the surface of the water, displacing the O2. That was a long time ago, never did try it� I may have to just for fun
So bottom line is that air is getting to your parts; it�s up to you to determine how/why.
Now if someone would offer me 10K, I would build them an almost foolproof CCH set-up 
|
|
|
|
|
Joined: Feb 2009
Posts: 7,463 Likes: 212
Sidelock
|
|
Sidelock
Joined: Feb 2009
Posts: 7,463 Likes: 212 |
The carbon from CO takes time and temperature to diffuse into the surface of low carbon steel. Just thinking that maybe, if someone wanted to play with displacing O2 for the quench, it might be quick and easy to flood the top of the quench tank with some welding gas?
|
|
|
|
|
Joined: Nov 2016
Posts: 46
Sidelock
|
|
OP
Sidelock
Joined: Nov 2016
Posts: 46 |
I appreciate the input! I am going to try and run one tonight and am going to try a few things different to decrease the chances of oxygen exposure.
|
|
|
|
|
Joined: Aug 2018
Posts: 305 Likes: 7
Sidelock
|
|
Sidelock
Joined: Aug 2018
Posts: 305 Likes: 7 |
Awesome thread.
Hereford I can't wait to see how tonight's efforts turn out.
I do not have a set up yet but have been working on a crucible design that gets placed on a rack just barely over the surface of the water and the rack has a built in sliding anvil that only until the crucible is in place and settled does the anvil get a sideways whack making the bottom of the crucible come off releasing the contents. the contents are not poured, just a single vertical dump from a fully stabilized crucible.
Mike and others, does this idea have any merit in helping to mitigate the possibility of 02 intrusion as result of a sliding pour?
|
|
|
|
|
Joined: Dec 2001
Posts: 6,992 Likes: 402
Sidelock
|
|
Sidelock
Joined: Dec 2001
Posts: 6,992 Likes: 402 |
thinking along the same line myself Travis.
|
|
|
|
|
Joined: Aug 2018
Posts: 305 Likes: 7
Sidelock
|
|
Sidelock
Joined: Aug 2018
Posts: 305 Likes: 7 |
Hereford
Any report back on last nights adventures ?
|
|
|
|
|
Joined: Nov 2016
Posts: 46
Sidelock
|
|
OP
Sidelock
Joined: Nov 2016
Posts: 46 |
Not yet. My problem I believe is definitely in the quench. I have a plate now so that it will directly fall into the water with no space. I have thought of dropping the whole crucible and contents with lid removed in my quench barrel but was unsure if I would loose hardness that way?????
|
|
|
|
|
Joined: Jan 2004
Posts: 6,711 Likes: 411
Sidelock
|
|
Sidelock
Joined: Jan 2004
Posts: 6,711 Likes: 411 |
Not yet. My problem I believe is definitely in the quench. I have a plate now so that it will directly fall into the water with no space. I have thought of dropping the whole crucible and contents with lid removed in my quench barrel but was unsure if I would loose hardness that way????? Sounds like a good way to put some dings in nicely polished metal. Looking forward to seeing the results. The Marlincollectors thread was really fun to watch unfold. Maybe this will become another like it.
_________ BrentD, (Professor - just for Stan)
|
|
|
|
|
Joined: Nov 2016
Posts: 46
Sidelock
|
|
OP
Sidelock
Joined: Nov 2016
Posts: 46 |
Well after 3 runs I have found a way to get consistent colors using my setup. Thanks for the help. I would post a picture but since I lost everything on photobucket I haven't used them or a source like that for uploads. I built a taller crucible and shield setup which seams to have been the ticket to hold the coals closer to the receiver as it drops.
|
|
|
|
|
Joined: Dec 2001
Posts: 6,992 Likes: 402
Sidelock
|
|
Sidelock
Joined: Dec 2001
Posts: 6,992 Likes: 402 |
Send me your pics of the color harden parts and your set up and I will post them for you.
Steve
|
|
|
|
|
Joined: Dec 2001
Posts: 6,992 Likes: 402
Sidelock
|
|
Sidelock
Joined: Dec 2001
Posts: 6,992 Likes: 402 |
|
|
|
|
|
Joined: Aug 2018
Posts: 305 Likes: 7
Sidelock
|
|
Sidelock
Joined: Aug 2018
Posts: 305 Likes: 7 |
Definitely looks different than first pics. Lots more blue but seems to have completely alleviated any of the straw/tan colors. Anyone want to analyze what they see in regards to air exposure and/or Charcoal mix? I do not have the experience but generally I like what you are doing there.
To what grit did you do final polishing?
Also how does re-CCH'ing affect areas like between the flats, and the inner receiver recesses where you cannot get as polished as the exterior surfaces? Is it even that important to prep beyond excellent cleaning in those areas prior to CCH'ing?
|
|
|
|
|
Joined: Nov 2016
Posts: 46
Sidelock
|
|
OP
Sidelock
Joined: Nov 2016
Posts: 46 |
Thanks SKB for posting. This was reused 4 parts wood to 1 part bone for 1.5hrs at 1375f. This was polished to around 1000 grit. I have buffed before and gotten same results. Side shields were used similar to Oscar Gaddys article. Out of bone but will next switch to a 2:1 or 1:1 to attain the more globular appearance. All I polish is exterior. I feel I am getting alot closer to those found on original LC Smith's I have or seen.
|
|
|
|
|
Joined: Aug 2018
Posts: 305 Likes: 7
Sidelock
|
|
Sidelock
Joined: Aug 2018
Posts: 305 Likes: 7 |
Certainly seem to be moving closer. I wish we were in close proximity to each other I would come over and be your gopher. Please keep us posted of your progress.
|
|
|
|
|
Joined: Dec 2008
Posts: 277 Likes: 4
Sidelock
|
|
Sidelock
Joined: Dec 2008
Posts: 277 Likes: 4 |
Here�s my thoughts/suggestions:
When working up your CCH technique change only one variable.
Don�t �Practice� on a good guns; lots of cheap imported/semi-finished cast actions you can practice on.
Use fresh water each quench, goes back to changing only one variable. Each time you quench, it adds more �stuff� to the water, so in essence you�ve changed the composition of the water.
Don�t reuse the bone/wood char mix; at least not at first. Again goes back to: Change only one variable. Each time you quench the mix changes, especially if you�ve tried different ratios.
Everyone talks about cleanliness when rust bluing, cleanliness when CCH is even more important. Winchester would boil the parts in Gasoline� I asked OSHA about that, they had a fit. Your parts need to be clean, oil and water free, as an example, my cleaning procedure is a 4 step process.
Take detailed copious notes i.e... Wood/bone ratio, quench temp, soak time, water temp, O2 level in water etc. and then write down results.
When doing the above, don�t rely on a sample size of 1. Do at least 5 quenches exactly the same way so you get an average, then change one variable.
Remember, even if you do everything correctly, you may not get perfect results. I�ve had frames where one side is absolutely beautiful, and the other side has little or no color. Two frames quenched side by side, everything identical� one perfect� one less than perfect... it happens.
Also keep in mind there�s only about 3-5% of these old guns that have retained 90-100% of their original CCH. A very small sample size that you, and everyone else is comparing your colors to. Also, don�t compare colors to DTs, mine or anyone else�s, that�s their colors�. I have a notebook of 100�s of original colors that I compare to.
Respectfully
Mike
|
|
|
|
|
Joined: Jul 2005
Posts: 2,398 Likes: 16
Sidelock
|
|
Sidelock
Joined: Jul 2005
Posts: 2,398 Likes: 16 |
In my experience Mike Hunter is doing some great CCH. He's done two for me. What Mike is telling you here is the "voice of experience". Whenever you determine that in life, especially on the internet, it is time to pay attention. A Colt SAA I restored with Mike's "subdued" CCH, appropriate for vintage Colts. 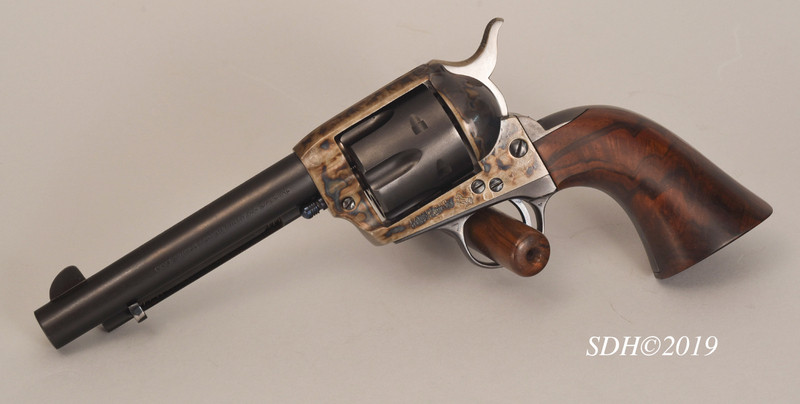 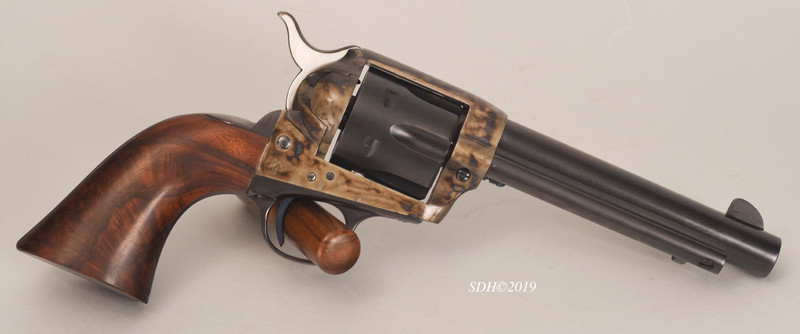 A recently completed Hagn action with "subdued" colors that I further backed off with mild abrasive to give a "used" look and better show the spectacular engraving. The top of the breech block is straight colors from Mike. I got the correct hardness I was looking for and the parts glide on each other! 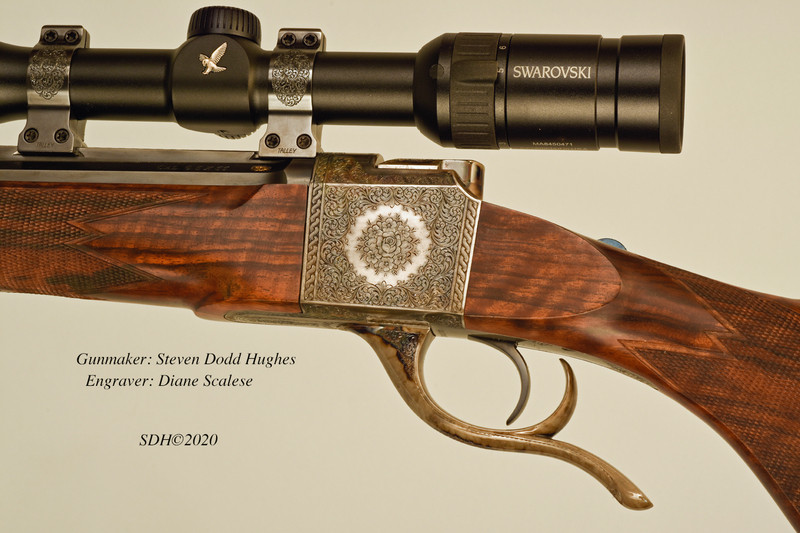 
|
|
|
|
|
Joined: Jan 2002
Posts: 9,740 Likes: 97
Sidelock
|
|
Sidelock
Joined: Jan 2002
Posts: 9,740 Likes: 97 |
good discussion about the re hardening and recoloring process, so far...
so next, what about tempering back the metal after the hardening quench?
do you consider this a necessary step and if so, why?
Last edited by ed good; 05/15/20 08:20 AM.
keep it simple and keep it safe...
|
|
|
|
|
Joined: Dec 2008
Posts: 277 Likes: 4
Sidelock
|
|
Sidelock
Joined: Dec 2008
Posts: 277 Likes: 4 |
Stephen
Thanks for the plug� The Hagn came out nice; I generally steer folks away from CCH when they want a nicely engraved piece done, CCH will hide a lot of detail, but the Hagn was well executed.
Ed Good brings up a good point� no pun intended. As I stated before, the extreme temperature change induces a lot of stresses into the metal, it�s a reality, you�ve added carbon to the steel and quenched it in water; changing the temperature by over a thousand degrees in a fraction of a second. The steel has changed.
As quenched, the steel will have a lot of internal stress, you need to relieve them the best that you can, optimally this would mean heating to annealing temp�BUT that would negate the hardness and colors. So you have to compromise.
We all know that steel changes colors when heated, the first notable color change occurs around 400 deg f. With that said, I recommend staying below that temp. Winchester would boil their parts for a period of time then tumble dry in sawdust.
I know for many that it�s frustrating that I won�t get into details, but there are a few folks out there dong CCH now, some are doing it absolutely wrong� them I like, they keep business coming my way.
CCH is also an Art and a Science. Getting the hardness is purely science, simple formula, X temp at Y time will give you Z depth of hardness. This was well known by the practitioners over 100 years ago. Lots of charts/formulas in the old books, fortunately not much on Google, which means if you want the info you have to spend the time researching.
The Art is in the colors, some folks want subdued, others want bright bold with lots of blue, and some want reds/greens. It�s all achievable with just wood/bone ratio, quench temp, O2 saturation in water and water temp�..simple.
Respectfully
Mike Hunter
|
|
|
|
|
Joined: Feb 2009
Posts: 7,463 Likes: 212
Sidelock
|
|
Sidelock
Joined: Feb 2009
Posts: 7,463 Likes: 212 |
Hi Mike,
You mention O2 saturation of the water. If it's okay to ask in general, do you measure it with a device or do you use an aeration protocol?
Thanks for any thoughts, Craig
|
|
|
|
|
Joined: Dec 2008
Posts: 277 Likes: 4
Sidelock
|
|
Sidelock
Joined: Dec 2008
Posts: 277 Likes: 4 |
No, I don�t use an O2 monitor like some other suggest.
It�s a �step� process�as noted earlier my kilns are digitally controlled. So for example: I may heat the parts to 10,000 degrees for 5 hours, at the 5 hour point my kiln will drop the temp to quench temp say 6000 degrees, well we know that the charcoal is an excellent insulator, so I allow the crucible with parts to normalize to the new lower temp, figure about an hour, once it�s normalized I will turn on the air at a specific volume approximately 20 minutes prior to quench.
The cool piece is that my controllers have a settable alarm, so I can be machining a barrel or whatever, and it will beep, reminding me to turn on the air.
The air provides two purposes, the first, it aids in the formation of colors, but more importantly it circulates the water thus avoiding inconsistent cooling. Hot steel parts dumped in water will cause the water immediately touching the part to turn into steam, this could form steam pockets which will not cool the parts as well as the water. The air provides the circulation, maintaining a constant flow of cool water against the parts�all this in fractions of a second.
|
|
|
|
|
Joined: Jan 2002
Posts: 9,740 Likes: 97
Sidelock
|
|
Sidelock
Joined: Jan 2002
Posts: 9,740 Likes: 97 |
mike: with regard to double gun parts, are you suggesting that tempering at temps less than 400 degrees f will provide enough elasticity to the metal to keep it from cracking under the stress of firing?
keep it simple and keep it safe...
|
|
|
|
|
Joined: Feb 2009
Posts: 7,463 Likes: 212
Sidelock
|
|
Sidelock
Joined: Feb 2009
Posts: 7,463 Likes: 212 |
I do appreciate the thoughts Mike, and through this thread.
I picked up on your comment about the charcoal being a good insulator. A common observable practice is that during the quench, many build in some sort of delay between the oven and releasing the parts into the water. Often one can see that the the crucible is subtly losing heat by changing color.
There�s got to be many variables related to the size and thickness of the crucible and the volume/physical thickness of the charcoal layer around and between the parts. Even the oven soak and temperature stabilizing must vary between equipment and users.
Do you have any thoughts on if the apparent drop in temperature of the crucible during a delay in quench translates to some lesser temperature of the parts than the last stabilized oven temperature? I�ve always been curious if there was any intention to have variable temperature across a single part, say slight cooling affects thinner areas with less mass first, with the possible hope of affecting color and distribution?
I know your time is valuable, I do appreciate your thoughts, Craig
|
|
|
|
|
Joined: Feb 2009
Posts: 7,463 Likes: 212
Sidelock
|
|
Sidelock
Joined: Feb 2009
Posts: 7,463 Likes: 212 |
mike: with regard to double gun parts, are you suggesting that tempering at temps less than 400 degrees f will provide enough elasticity to the metal to keep it from cracking under the stress of firing? Are you asking about the �case�?
|
|
|
|
|
Joined: Jan 2002
Posts: 9,740 Likes: 97
Sidelock
|
|
Sidelock
Joined: Jan 2002
Posts: 9,740 Likes: 97 |
please define case?
Last edited by ed good; 05/15/20 10:43 AM.
keep it simple and keep it safe...
|
|
|
|
|
Joined: Jan 2002
Posts: 9,740 Likes: 97
Sidelock
|
|
Sidelock
Joined: Jan 2002
Posts: 9,740 Likes: 97 |
hereford: any comments re tempering techniques and temps?
keep it simple and keep it safe...
|
|
|
|
|
Joined: Feb 2009
Posts: 7,463 Likes: 212
Sidelock
|
|
Sidelock
Joined: Feb 2009
Posts: 7,463 Likes: 212 |
My understanding is that this process, color case hardening, is done because the steel of the part does not have enough carbon in it to harden by conventional heat treating. I believe given the correct conditions created by this process, carbon defuses into the part. It seems to have been shown to require a low carbon steel for carbon to diffuse into the part and it seems to have been shown to only penetrate a few thousands? Are you thinking that a crack formed in that few thousands on the surface, or did the entire part become somehow brittle and crack? If the entire part cracked, was it a good candidate to attempt this process, or was the process done incorrectly, or some of both? Possibly, not entirely related to just tempering?
|
|
|
|
|
Joined: Jan 2002
Posts: 9,740 Likes: 97
Sidelock
|
|
Sidelock
Joined: Jan 2002
Posts: 9,740 Likes: 97 |
craig: our understanding of the definition of case hardening is essentially the same, with color being a by product of the process...
it is my understanding, that if the metal is not tempered back and left brittle like glass, small parts, like tangs and levers may crack and break...and if surface hardened only, larger parts like frames and trigger plates, may develop spider web type cracks, under the stress of firing, if they are not tempered...
it seems plausible that if a large part, like a frame or receiver breaks, it is because the part was hardened all of the way thru and not tempered enough?
keep it simple and keep it safe...
|
|
|
|
|
Joined: Dec 2008
Posts: 277 Likes: 4
Sidelock
|
|
Sidelock
Joined: Dec 2008
Posts: 277 Likes: 4 |
Ok� as far as heat treatment, steels fall into several categories: low carbon, med carbon and high carbon. Low carbon steels are generally steels with less than .25% carbon, these steels cannot �self-harden�. Steels such as 1095, 4140 with more than .25% carbon will self-harden, meaning when heated to a certain temperature and quenched in the appropriate medium, have enough resident carbon to harden all the way thru.
Low carbon steels do not have this capacity, thus carbon is added� thru the use of Bone/Wood, above a certain temperature the charcoal off gasses carbon in the form of carbon dioxide and carbon monoxide which is adsorbed by the steel at these elevated temps.
Case hardened parts, have a hard outer layer .001 -.003 and a soft inner core, which make it ideal for gun parts. Hard outer shell to provide wear resistance, soft inner core to absorb shock.
Steel can only absorb carbon, it cannot desorb carbon. Annealing does not remove carbon, it only allows it to spread within the steel, diluting it somewhat. IF a part is case hardened enough times, it can change the steel from a low carbon steel to a medium carbon steel; so from a case hardening steel to a through hardening steel. Thin parts are especially susceptible to this. If you have a thin piece of steel �say .030 thick, it will quickly absorb enough carbon to become thru hardening�.. Remember, unless blocked, carbon is absorbed from all sides top, bottom, front back.
I have had parts (done by someone else) that were so hard that the owner snapped a butt plate attempting to install it. He sent me all the CCH parts, and I could immediately tell what had happened. Quenched at too high a temperature and quenched in brine water; which greatly increases cooling�makes water wetter. I annealed the parts, welded the butt plate and re-cased� properly.
|
|
|
|
|
Joined: Jan 2002
Posts: 9,740 Likes: 97
Sidelock
|
|
Sidelock
Joined: Jan 2002
Posts: 9,740 Likes: 97 |
is it correct to say that most sxs shotgun frames made prior to ww2 were made of low carbon steel? hence the need for case hardening of certain metal parts, in order to increase their durability...
keep it simple and keep it safe...
|
|
|
|
|
Joined: Jan 2002
Posts: 9,740 Likes: 97
Sidelock
|
|
Sidelock
Joined: Jan 2002
Posts: 9,740 Likes: 97 |
and how is annealing different than tempering?
also, what kind of shotgun was it that had a steel butt plate? an old parker hammer gun maybe? or maybe something german?
keep it simple and keep it safe...
|
|
|
|
|
Joined: Sep 2016
Posts: 404 Likes: 29
Sidelock
|
|
Sidelock
Joined: Sep 2016
Posts: 404 Likes: 29 |
Annealing is softening the metal to work it. Typically, heat it to cherry red and let it cool slowly.
Tempering is toughening the metal after hardening. Once hardened (typically done by heating to non-magnetic / cherry red, then cooling quickly by quench), the steel is 'glass hard' and glass brittle. It will break easily.
To Temper, the hardened steel is heated to a moderate heat in order to essentially undo some of the hardening. Typically this is done either with a torch (by color) or in an oven set to the right temp for the steel, which varies
Jim
|
|
|
|
|
Joined: Dec 2008
Posts: 277 Likes: 4
Sidelock
|
|
Sidelock
Joined: Dec 2008
Posts: 277 Likes: 4 |
Annealing is the process of softening metal by heating at or above it�s critical range, then allowed to slowly cool.
Tempering is the process of heating a substance to a temperature below its critical range, holding and then cooling. Tempering is useful in reducing the brittleness of quenched steel.
|
|
|
|
|
Joined: Jul 2005
Posts: 2,398 Likes: 16
Sidelock
|
|
Sidelock
Joined: Jul 2005
Posts: 2,398 Likes: 16 |
Lynton McKenzie used to say something to the effect that, getting the correct hardness is no trick and neither is getting nice colors. Getting both without damage or warpage is difficult. I've always said that heating any steel part red hot and dumping in a bucket of water is simply foolish~~ When I taught at the Summer gunsmithing classes at Trinidad State years ago I witnessed a case coloring session when a glowing red-hot Ruger #1 action was dumped in the quench tank. I cringed~~Six months later a visitor to my shop proudly showed me that same action. I cringed again~~ IMO 4140 steel (40 points of carbon) should not be subjected to that treatment. I know it is being done at lower temperature, but I would never do it. The Hagn action shown above was specifically made from 8620 (20 points of carbon) so it could be properly heat treated by case hardening. This hardening is to provide a slick skin, increases wear and corrosion resistance. The beautiful colors are a bi-product. Bertuzzi sidelock from my shop. Lovely case colors (Turnbull) hiding a couple thousand dollars of Mike Dubber engraving. 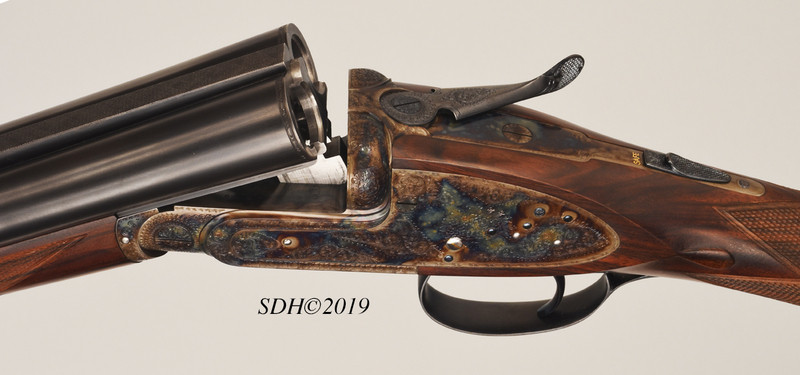
|
|
|
|
|
Joined: Nov 2016
Posts: 46
Sidelock
|
|
OP
Sidelock
Joined: Nov 2016
Posts: 46 |
I have been placing the freshly colored parts back in the heat treat oven at 350F and allowed to set for 30min and then turned off. At this point I have not had issues. Seems to darken colors. At this point the majority of my experimentation has been achieving colors more in line to the pre 1913 LC Smith's as the later marlin era guns as well as earlier Syracuse appeared different as expected. Currently the majority of my project guns that warrant a restoration fall in the hunter arms era so that is the look I am shooting for. As Mike has mentioned it takes looking at 97%+ condition guns colors to compare as what many are shooting for are not nowhere near close to factory even though they are nice.
|
|
|
|
|
Joined: Jan 2002
Posts: 9,740 Likes: 97
Sidelock
|
|
Sidelock
Joined: Jan 2002
Posts: 9,740 Likes: 97 |
so is that it, the process is complete? or is there one more step, like some kind of clear coating to protect your new colors from fading?
keep it simple and keep it safe...
|
|
|
|
|
Joined: Jan 2002
Posts: 9,740 Likes: 97
Sidelock
|
|
Sidelock
Joined: Jan 2002
Posts: 9,740 Likes: 97 |
and turnbull does very pleasing work...
art in its truest form...
keep it simple and keep it safe...
|
|
|
|
|
Joined: Aug 2018
Posts: 305 Likes: 7
Sidelock
|
|
Sidelock
Joined: Aug 2018
Posts: 305 Likes: 7 |
Hereford
Care to share what if any blocking you are doing on a LC Smith receiver assembly and how? looks like you are doing the assembly in one drop as opposed to the parts being separated in the Charcoal mix?
Have you done box locks and what kind of blocking do you do there?
Thanks for sharing your experiences with us.
Travis
|
|
|
|
|
Joined: Aug 2018
Posts: 305 Likes: 7
Sidelock
|
|
Sidelock
Joined: Aug 2018
Posts: 305 Likes: 7 |
Mike Regarding water temp, air entrainment and circulation I kind of get the water temp component but is the air bubbling more for just water circulation or actually getting more small air particles in the water? I would think water circulation is more important than air for the purposes of minimizing steam pockets along the quench. I was thinking of a pretty simple recirculation set up where the water is pushed in from the bottom side of the tank at an tangential angle to the sides of the round tank and out the top at an angle so as to encourage a swirling movement to the water and then though a ice bath back into the quench tank. I would think this movement should be present through the quench drop in order to introduce a consistent as possible water temp to the part throughout the drop. If this is a sound idea, then would air introduction even be needed and if so why? Am I over thinking this or more so am I just plain wrong  Thanks for your valued input. Travis
|
|
|
|
|
Joined: Dec 2008
Posts: 277 Likes: 4
Sidelock
|
|
Sidelock
Joined: Dec 2008
Posts: 277 Likes: 4 |
Travis
I believe you�re over thinking it� the set-up at least.
Everything I�ve read; and I�ve got a pretty substantial library of pre 1920s books on the heat treatment of steel, all note that for case hardening with colors you need to introduce air.
As stated, before I believe that the air �enhances� the colors, and provides water circulation.
Now� with that said, I�ve seen pictures of both Winchester�s and Marlins Pre 1920s Case hardening processes. They quenched parts in a large tank, about midway between waist and chest height. They had a fountain of water coming out of the center, my guess a 4-6-inch main water line.
They did things a lot differently than we can, they case hardened in mass, Marlin did about half a dozen receivers at a time, reading old notes from the Winchester plant, they case hardened 250 hammers at a time., that should give an idea of volume.
As to the recirculation set-up that you brought up, I�ve tried it�. Using a pump off a 33,000-gallon pool. The biggest issue is the charcoal plugging up filters and the pump. It�s really hard to filter that much charcoal out of the water without clogging things up. You would have to use a two-station filtration system, similar to a septic system, where a second tank would catch most of the char.
Cooling the water would be another issue, the pump I have puts out 15-20 GPM, not enough surface area to cool that kind of flow with just an ice bath.
Respectfullly
Mike
|
|
|
|
|
Joined: Feb 2009
Posts: 7,463 Likes: 212
Sidelock
|
|
Sidelock
Joined: Feb 2009
Posts: 7,463 Likes: 212 |
....They had a fountain of water coming out of the center, my guess a 4-6-inch main water line.... Could you make heads or tails if this system was running during the quench, did it appear to create significant aggitation to the water? Many tutorials recommend aeration for varying lengths of time, but then to shut it off prior to quenching. Then temperature of the water would likely be uniform, but I wonder if only so much air can dissolve in the water. It's curious to me that the water temperature that you settled on may be able to carry more dissolved air in it than at warmer temps. The reason I think it might matter is because I suspect there might be vapor jackets that form and collapse around the hot parts, but not necessarily steam? The O2 that forms the oxides that eventually show as colors must come from somewhere, but too much doesn't seem to help. A prequench aeration likely has other benefits, too. Just rambling around. I can't easily get to my little hobby setup right now, but it does make me want to play with it some more. Take care.
|
|
|
|
|
Joined: Jan 2004
Posts: 6,711 Likes: 411
Sidelock
|
|
Sidelock
Joined: Jan 2004
Posts: 6,711 Likes: 411 |
Craig, indeed, "only so much air can dissolve in the water"
And with respect to oxygen, there can be much more dissolved gas in cooler water. Warming reduces solubility. Ask a trout.
_________ BrentD, (Professor - just for Stan)
|
|
|
|
|
Joined: Dec 2011
Posts: 908 Likes: 43
Sidelock
|
|
Sidelock
Joined: Dec 2011
Posts: 908 Likes: 43 |
The set up I have used has a copper pipe with 2 full coils spiraling in. Put it in the bottom of the barrel. Run the air compressor high enough the water id rolling but not splashing out. When ready to quench, turn off the air and dump when the bubbles stop but the water is still moving. And don't forget the camel urine.
|
|
|
|
|
Joined: Nov 2016
Posts: 46
Sidelock
|
|
OP
Sidelock
Joined: Nov 2016
Posts: 46 |
Right now all I've done is side lock guns and they are all dropped assembled. I have a small bushing that the side lock screw goes through to act as a spacer as well as the rear tang screw. There is nearly always a small amount of warpage where the side plates attach to the receiver. No big deal and easily fixed. I aerate my quench water from when I start the bake until I quench which is roughly 2 hrs. I've tried both with the aeration running and not running at quench time and have not noticed any difference. I've tried distilled, well, and tap water and have had no change either. Currently running tap that has been in the barrel for 2 years and I just add to it. Next variable I need to try is temp. I've used ice water one run and didn't notice much difference but am wanting to try it again a few times to find a sweet spot.
|
|
|
|
|
Joined: Sep 2011
Posts: 150 Likes: 2
Sidelock
|
|
Sidelock
Joined: Sep 2011
Posts: 150 Likes: 2 |
Just a lesson learned long distance. don't use hardenable screws (Allen screws) for blocking.
Part will shrink slightly from casehardening. Can't get them out or drill them out.
Chuck
|
|
|
|
|
Joined: Nov 2016
Posts: 46
Sidelock
|
|
OP
Sidelock
Joined: Nov 2016
Posts: 46 |
Yes it is. I'm thinking about building a new lid that slides like his as my crucible looks very similar to his. I have a 1/4in sheet of steel across half of my quench barrel that I can flip the crucible to lid side down and slide the crucible across until lid and contents slide off the steel sheet.
|
|
|
|
|
Joined: Jan 2004
Posts: 6,711 Likes: 411
Sidelock
|
|
Sidelock
Joined: Jan 2004
Posts: 6,711 Likes: 411 |
Do any of you experience case colors that flake? I've had this on one or two pieces that were done for me by a well known shop (now closed).
_________ BrentD, (Professor - just for Stan)
|
|
|
|
|
Joined: Aug 2018
Posts: 305 Likes: 7
Sidelock
|
|
Sidelock
Joined: Aug 2018
Posts: 305 Likes: 7 |
Steve
That is pretty slick and close to what I was originally envisioning. I found another one this weekend that I think I may like better. In this or the one I will post tonight I like the fact that the water is just below the crucible and there is a complete drop through minimal air and not a shifting sliding pour.
I will post link tonight.
|
|
|
|
|
Joined: Nov 2005
Posts: 1,274 Likes: 1
Sidelock
|
|
Sidelock
Joined: Nov 2005
Posts: 1,274 Likes: 1 |
Do any of you experience case colors that flake? I've had this on one or two pieces that were done for me by a well known shop (now closed). LC Smith are bad about flaking, their case color is glass hard.
I learn something every day, and a lot of times it's that what I learned the day before was wrong
|
|
|
|
|
Joined: Dec 2001
Posts: 6,992 Likes: 402
Sidelock
|
|
Sidelock
Joined: Dec 2001
Posts: 6,992 Likes: 402 |
The flaking I have seen seemed related to the clear coat put on in order to "protect" the colors.
|
|
|
|
|
Joined: Aug 2018
Posts: 305 Likes: 7
Sidelock
|
|
Sidelock
Joined: Aug 2018
Posts: 305 Likes: 7 |
https://www.youtube.com/watch?v=O0EW_4TP6u8Go to the last 3rd of the video for their crucible and handle combo. Pretty slick as well.
|
|
|
|
|
Joined: Jan 2004
Posts: 6,711 Likes: 411
Sidelock
|
|
Sidelock
Joined: Jan 2004
Posts: 6,711 Likes: 411 |
I know George. He is a really nice guy too. I also have a WA rifle. One of the first they built, and long before George bought the business. Brent
_________ BrentD, (Professor - just for Stan)
|
|
|
|
|
Joined: Sep 2016
Posts: 404 Likes: 29
Sidelock
|
|
Sidelock
Joined: Sep 2016
Posts: 404 Likes: 29 |
For all of you interested in case hardening, here is an enjoyable article published yesterday on Shooting Sportsman
Last edited by Woodreaux; 05/23/20 09:50 AM.
Jim
|
|
|
|
|
Joined: Jan 2004
Posts: 6,711 Likes: 411
Sidelock
|
|
Sidelock
Joined: Jan 2004
Posts: 6,711 Likes: 411 |
For all of you interested in case hardening, here is an enjoyable article published yesterday on Shooting Sportsman Interesting photograph on the top.
_________ BrentD, (Professor - just for Stan)
|
|
|
|
|
Joined: Jan 2016
Posts: 37
Sidelock
|
|
Sidelock
Joined: Jan 2016
Posts: 37 |
That open top crucible surprised me, wonder if it was staged.
|
|
|
|
|
Joined: Dec 2001
Posts: 6,992 Likes: 402
Sidelock
|
|
Sidelock
Joined: Dec 2001
Posts: 6,992 Likes: 402 |
There are several videos of people using an open top crucible on you tube, one of which is Robin Brown. I think the charcoal is creating enough off gas to keep the parts in an oxygen free environment. Check out the crucible coming out of the oven at the 4 minute mark: https://www.youtube.com/watch?v=oceR5f8d9WM
|
|
|
|
|
Joined: Jan 2004
Posts: 6,711 Likes: 411
Sidelock
|
|
Sidelock
Joined: Jan 2004
Posts: 6,711 Likes: 411 |
That open top crucible surprised me, wonder if it was staged. Surprised me too. It appears that the bottom may be glowing red. The open top and unknown, but seemingly significant, distance to splashdown is not in line with the text either.
_________ BrentD, (Professor - just for Stan)
|
|
|
|
|
Joined: Feb 2009
Posts: 7,463 Likes: 212
Sidelock
|
|
Sidelock
Joined: Feb 2009
Posts: 7,463 Likes: 212 |
The interesting thing to me is the size of the crucible and the courseness of the charcoal. It looks like plenty of fuel to consume O2, and apparently very little of it burns down. Even with smaller examples, it's always been a curiosity to me when some folks put a slip of paper in a crucible to 'consume excess oxygen'. He must have case coloring in his DNA, touching the parts seems to be no problem?
|
|
|
|
|
Joined: Nov 2016
Posts: 46
Sidelock
|
|
OP
Sidelock
Joined: Nov 2016
Posts: 46 |
I always put the small piece of paper in my crucible but notice that it doesn't make a difference if packed good and tight with coal. I take my lid off right at the tank but believe that since the coal pack is at such a temp any oxygen will be burnt immediately. When I crack my oven at quench time there is always a subtle flame from the lid as oxygen is entering the oven chamber and being burnt. That is why I have made a longer crucible so that the parts sit deeper in it preventing any oxygen exposure causing a flash burn. At 1375F any oxygen is going to be burnt nearly immediately.
|
|
|
|
|
Joined: Aug 2018
Posts: 305 Likes: 7
Sidelock
|
|
Sidelock
Joined: Aug 2018
Posts: 305 Likes: 7 |
Hereford
I was looking at a later 40's LC Smith with much remaining color and noticed the side plate, top and bottom receiver screws looked CCH'd along with the receiver/sideplates/trigger plate.
Are you using your actual screws to assemble prior to CCH'ing? Any problems with removal?
Thanks
Travis
|
|
|
|
|
Joined: Nov 2016
Posts: 46
Sidelock
|
|
OP
Sidelock
Joined: Nov 2016
Posts: 46 |
The receiver is assembled during the cch. I have everything snug but not fully tight and haven't had any issues affecting their timing but they are a bit tighter as expected. I have had the rear tang screw bend once which I thought was odd but have heard of other people having that happen on Smith's but is uncommon.
|
|
|
|
|


