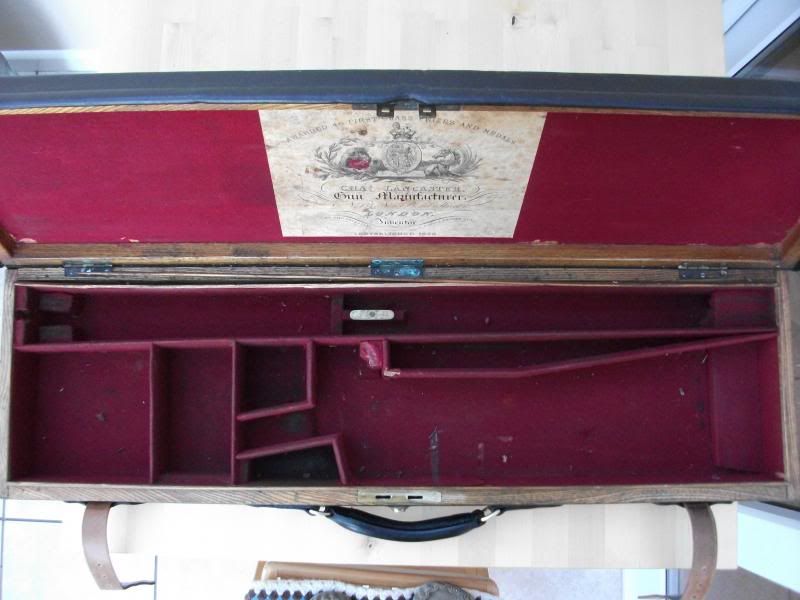
With the outside leather work finished I will make a start on the internal case restoration and at this point I would like to say that it is important to take your time because if you make an error while restoring something of this age it will cost you more than time to rectify your mistake, because you are working with vintage components that are more or less irreplaceable and if you can replace an item it will cost you what will feel like its weight in gold. So before replacing the Baize I want to stabilise the joints in each of the case corners which is now a priority also removing the lock so I can manufacture a replacement key, but the lock is fitted through the case and anchored with an extremely thin ring nut which has defeated all efforts to remove it without damaging it so far so further thought on how to accomplish it is required. At some time in the cases recent history it has been wet on the hinge side now this has caused the glue holding the corners to deteriorate to the point that it is not holding the case together. Remarkably leather does not seem to be effected by damp as much as wood even if the wood is Oak.
Now the first thing I always do before I take any item apart that may take weeks or months rather than hours to reassemble I photograph it before I start because it is amassing how your mined will deceive you about things a month or two down the line and the older you become the more this is true.
I have replaced linings and adjusted the gun fitment in many cases over the years though this is the first case I have worked on using all traditional methods and all wool Baize so it will be a learning curve for me, though all gun cases are built and fitted out on more or less along the same lines so the lessons learnt in the past will be of help.
First thing I will do is glue the long thin piece of oak that managed to split its self off the cases rear oak lining then I will be strip out as many of the case partitions without effecting the stability of the case lay out, so my intention is to leave the barrel partition running from side to side and one other connecting the barrel partition to one of the opposite case sides, this partition is the anchor point for the start of the barrel partition taper. Starting from this position I will be able remove and re use some but not all of the original partitions. Also at the start of this project I had noticed some glue marks on the base cloth indicating that at one time the case had once had a partition that has been removed so I used chalk to reinstate its position out of interest and coming to the conclusion that the gun had actually been a home for two guns at various times in its past.
To stabilize the corners I intend to feed Adhesive in to as much of the corner joint as I can then drill through the joint then fit a metal dowel anchored in the hole with Epoxy Resin Adhesive to hold the joint tight. It has worked on many other restoration projects with success but because the case is Oak the pin must be either Brass or stainless steel if you use mild steel the oak will eventually cause it to corrode leaving a black staining in the wood, my intention is to use brass dowels so it will look as if the case manufacturer wanted to further strengthen the corner joints so they will not look to much out of place. Each joint will have to be pulled up tight using some form of clamp before drilling the hole for the brass dowel, now some of you may be wondering why I did not repair the corners before I worked on the leather, it was because the leather was so dry and brittle putting pressure on the corners would have caused the leather to crack at best split at worst.
To remove the partitions the tool that I have found over many projects which works extremely well is an Artists palette knife because of the thin and flexible not to mention its strong blade that will slide under between and eventually part the partitions from the case by breaking the glue bond. The palette knife will even cut through Baize and the straight bladed version I have found to be the most useful because of its construction producing a wedging action so the further you push the knife in the more upward force it provides. For removing blocks I still use the pallet knife for the initial cuts to free the item then use a standard table fork for levering some how a fork just has enough of a curve to make a good leaver and the prongs seem to work their way under things extremely easily.
Having stabilised the corners and dealing with a few other bits and pieces necessary for me to start removing the old lining it now became obvious that the case bottom and all four sides had the baize applied before the internal partitions where fitted, in view of this partitions that are not going to be removed must have the baize cut at their boundaries so as not to disturb them when the baize is eventually removed. Now every vintage case I have worked on the adhesive used to fix the baize to the wood has always been the animal variety either pearl hide or skin so after many attempts at baize removal I have come up with a method that works for me. In a dish put a drop of detergent and add about one quarter of a pint of hot water this you apply to the baize with a brush to the point that it is saturated as the water cools replace it with more hot. Now it is most important that you do not over saturate the baize to the point water runs off and collects in the bottom of the case we are not in the business of constructing an inland sea, if this happens remove the excess water with a sponge or cloth. After about fifteen minutes you will find that the glue holding the baize will have softened to the point that you can remove it with ease, next dry the wood especially the case bottom then apply further water to what remains of the glue etc leave about another fifteen minutes and scrape off the remnants of the glue. You may have to repeat this process a couple of times to remove all the residual glue but always remember to keep removing any excess water that gathers in the case bottom. I think a very important thing to say here is take your time and work on a small section of case at a time and then let that damp section dry over night this reduces the risk of saturating the wood to the point that joints and partitions are detrimentally affected.
Next came the stubborn case lock and for a while it had me completely bemused because it appeared that the locks external escutcheon was actually fitted to the lock body by a screw thread suggesting this must be removed first before the lock its self could be separated from the case but it all ended up an illusion. In fact the escutcheon was fitted into the wood of the case and not connected at all to the lock but it did seem that the escutcheon hole was far to large for the lock plunger so I made one of the correct size that was the good news but worse was to come. To remove the lock from the case it required the removal of one of the Oak lining sections but because I had decided at the start of the project to leave two partitions still in position and unfortunately both partitions where fitted to this Oak section its complete removal was out of the question so it became necessary just to flex the wood enough to remove the lock. Now my judgement was the Oak would not flex the distance without some help so I decided to soften it by steaming it though just enough to be able to put a couple of wedges between the case and the liner producing enough clearance for the lock�s removal. I constructed a steam tent out of some polythene sheeting and a cloth to give the Oak a good fifteen minutes of steam to relax to the point it would move the distance I needed. During the locks removal came a little more not so good news one of the Brass screws holding the lock sheared of at the beginning of its threaded section adding another problem to the must solve list. When the lock finally came out I clamped the oak back in to its original position to cool and regain its shape I also cut two slots to clear the locks outriggers so it could be returned to position without flexing the oak liner again.
With the lock removed and striped down to its component parts and cleaned I could decide on the key blank required to give the lock a working key with some home spun key cutting so a trip to my local locksmith for the key blank.
After striping and cleaning the lock came a disappointment regarding its overall design and quality, firstly the locks push button was rather on the mean side with regard its diameter this having the knock on effect that the bit of the key was rather undersized in comparison to the length and diameter of the shank and bow required making the key look rather out of proportion. Because the keys bit was undersized the complexity of the lock was non existent just a bolt and one leaver and not at all the usual Victorian display of the lock maker�s art a �Bramah� it certainly is not! Now to temper what I have just written with what I know, more than likely the lock was filed up and assembled from castings in the Black Country probably in Willenhall the Brit centre for lock making by some child between the age of seven and twelve working fourteen hour days in truly filthy conditions for a pittance of a wage. So what I truly have is a lock that was unfairly manufactured using child labour enough said I think!
The broken part of the lock retaining screw left in the wood now required some attention, my experience of removing the broken parts of screws in wood as taught me one thing drilling is not the way to go if you do not want a hole ten times larger than the original and it is amazing how much the hole grows when a drill bit gets involved.
So my recommended tried and tested method is to use a small tungsten end mill to grind away the broken piece from the top down, held in a small electric drill come engraver tools.
Next the removal of the Chas. Lancaster trade label inside the case the lid to allow the removal of the final piece of baize. To remove the label my plan was to use steam to remove the label from the lid by using a wallpaper steamer as the steam source and I must say they are very convenient because they hold a considerable amount of water and electrically operated. It was not long in to the removal of the label it became obvious that the label had been torn over the years by the timber moving so it came away in four pieces On completion of the label and baize removal I can now make a start on the final design of the new case lay out and fitting the new baize.
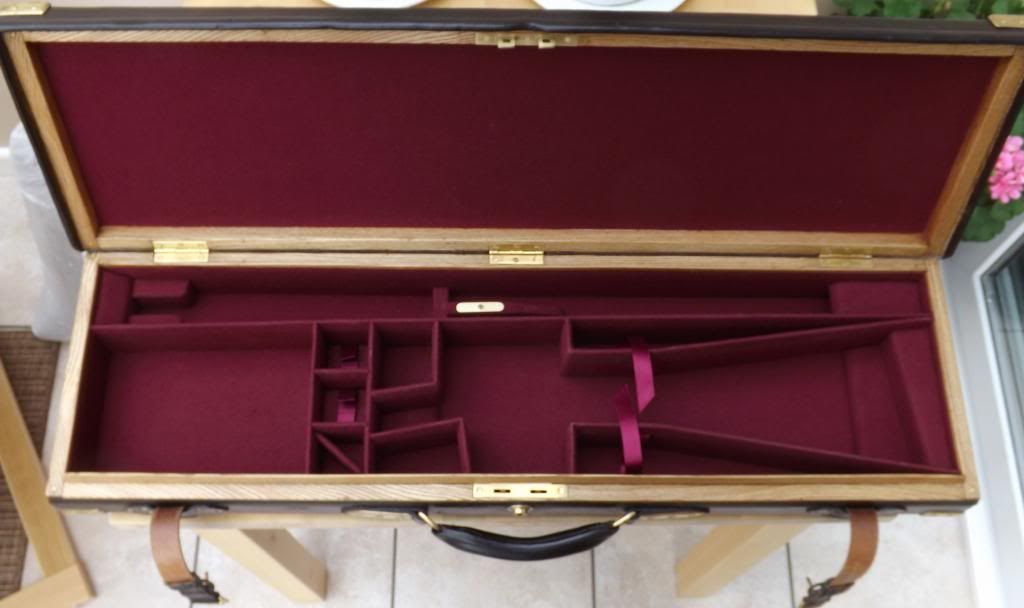
Now before I commence work on the inside of the case I want to make things clear in my view I am just restoring a second hand case that was originally manufactured to hold a Lancaster gun of some description, but seeing as this gun is no longer occupying the case I have no responsibility to save any of the original baize case partitions or lay out for that matter. I am giving the case another lease of life so it can hold a gun of the same area and of an equivalent quality manufacturer. Now if I had the Lancaster I would not have changed the case innards at all but just effect enough repairs to keep the case in a sound working condition keeping as much of the internal fittings as humanly possible to do
My first step in refitting the case is to move the action position about an inch to the left and in doing so it will give the case a more bespoke look for the gun I intend it to fit.
The hinges have produced one of the largest problems for me to solve in this restoration so far because all the wood screws holding all three hinges are steel and they shear off when you try to remove them in fact I only managed to remove one complete screw out of the eighteen hinge screws because of the steel/Oak reaction when the wood was damp. So it was more effort with the end mill then plugging all the holes with a wooden dowel trimming to length then finishing with replacement brass screws.
At this time I made some replacement lengths of wood case dividers using traditional White Deal which is light and easy to work into the replacement sections, I copied the original method of obtaining a slow bend which is cutting the partition part way through then bending it to the desired angle while ignoring the wood cracking noises then flooding the saw cut with glue to return the partitions strength. At this stage it is a good idea to fit the lifter ribbons by cutting a slit through the wood using my ancient jewellers piercing saw then widening the cut using a coping saw blade, then gluing the end of the ribbons to the opposite side to the side they are to function.
I did manage to obtain the correct Burgundy colour of wool baize for relining the case which in reality is just wallpapering with cloth though on this occasion I did use the traditional pearl glue which does have a lot going for it. It does make the baize fitting a little simpler than using other adhesives because you are able to remove any glue marks from the cloths surface with just a damp cloth and it grips the cloth quickly, the one thing I will say about fitting the baize is to take your time and use the glue in thin layers.
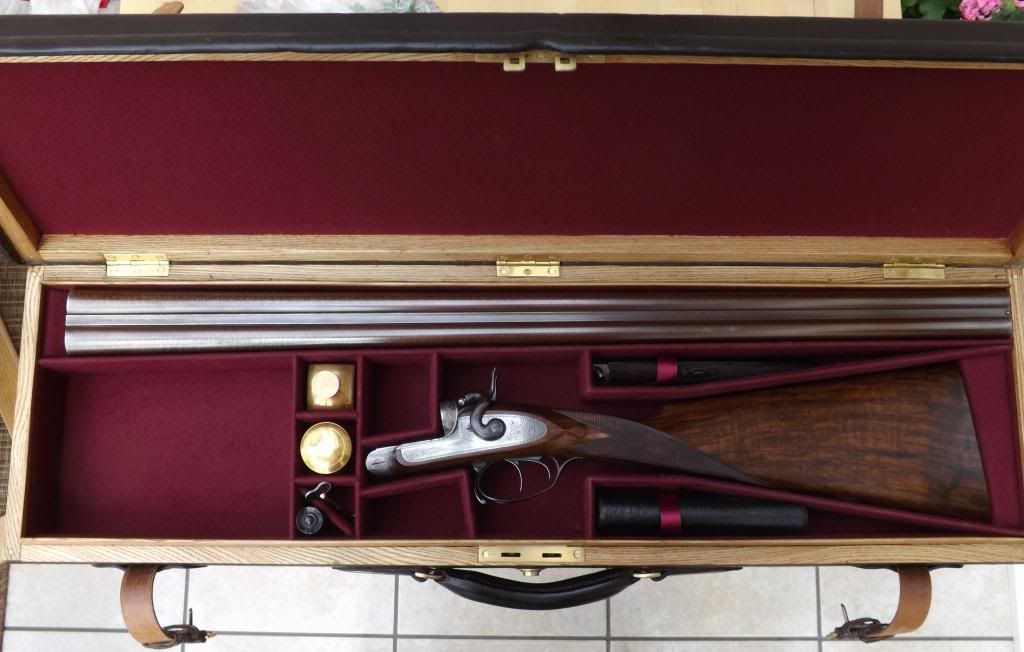
There is a picture of a couple Elephants carved from black African Ebony and some six inch engineers files I decided was to be the next project to finish the case interior fittings. African black Ebony was sort of a Victorian favoured wood for small hand tools trinket boxes etc and of course there where no restraints on its use so it was cut down mercilessly right up to the mid twentieth century. So fine black Ebony is extremely expensive that is if you can actually purchase it so our two pachyderm friends are going to be refashioned into turnscrew handles and their accompanying files into blades.
One disappointment was the reproduction case label obtained from �Peter Dyson� here in the UK it was not at all what I was expecting, the printing was not centred the ink used was a strange form of blue and to finish the whole thing was stained with tea. I did contact Dyson with my concerns. There is a photograph of the label so you can judge for your self but after the amount of effort and expense to bring the case to the condition it is now I have no intention of using it my feelings are that you can judge for yourselves.
And finally if I where to pay for this amount of case restoration work it would be fare more than the case is worth though original black cases are rather few in number and I did want this one, looking back now I should have made the brass corner reinforcement pins an invisible repair but as they say hindsight is 50 50 vision but all round I feel I have done my best for the case extending its life for the foreseeable future.
Damascus
http://s104.photobucket.com/user/damascus_02/slideshow/Leather%20Gun%20Case%20Restoraion


