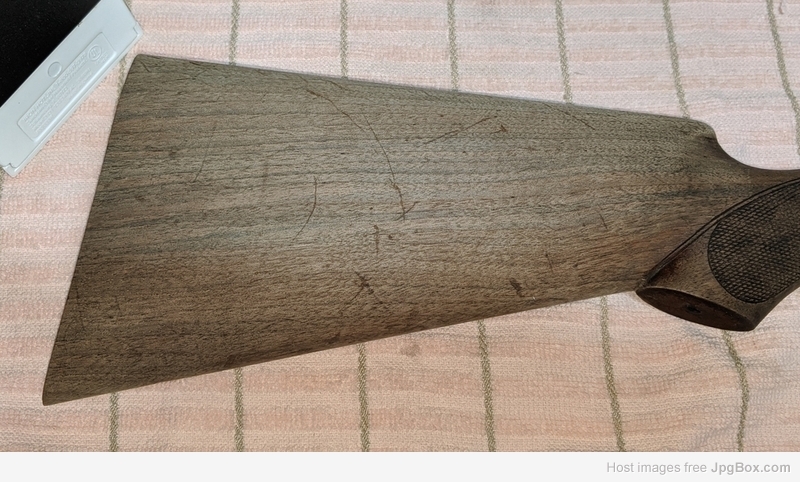
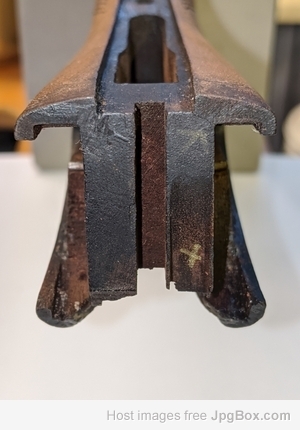
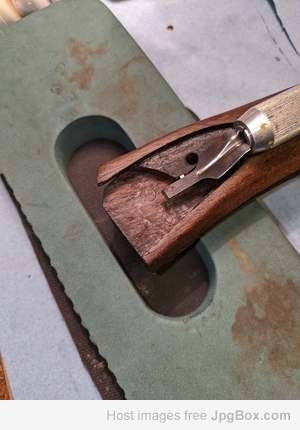
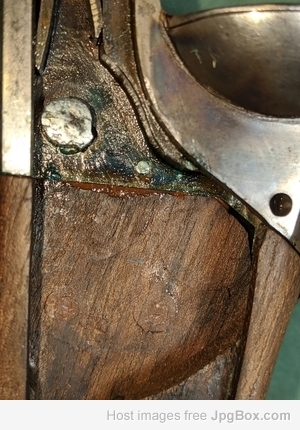
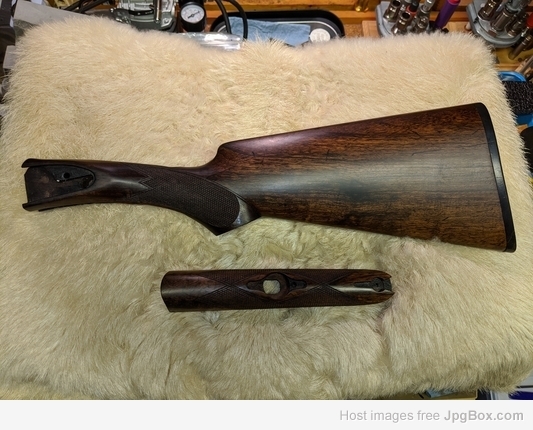
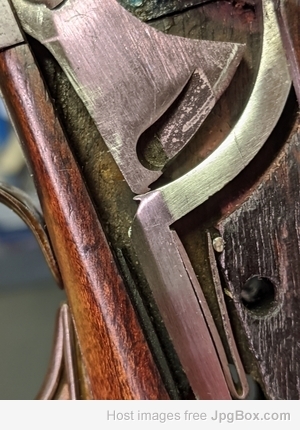
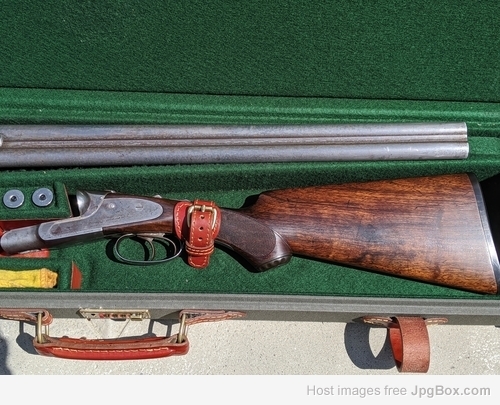
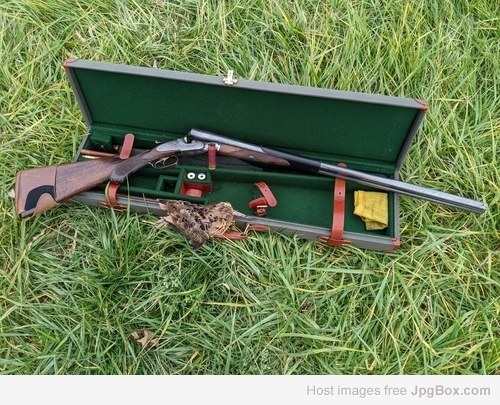
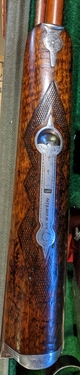
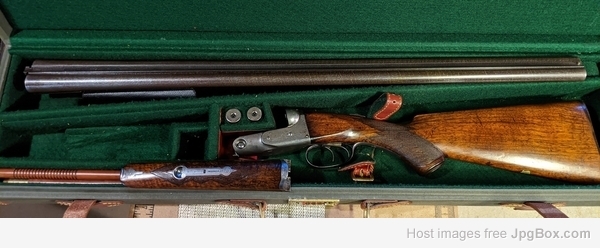
I am looking for any assistance and ideas for repairing this Lefever stock from 1903. The photo shows what I am looking at as a challenge. Now, a professional stock maker/repair expect is not in the frame as this is a 'G' grade gun. I have repaired a number of cracked/split stock heads, but this one is extreme. Note the top of the stock is on the bottom in the photo.
I am receptive to any help / ideas offered. Thanks.
Those cracks are pretty common on sidelocks. I realize your Lefever isn't a sidelock but it is bedded the same. Epoxy those cracked stock horns and then epoxy bed the stock to the action. The bedding won't show with the gun assembled.
Maybe a staple for those top cracks...Geo
The thinnest cracks can be permanently sealed with cyanoacrylate glue that will wick into the crack easily all the way to the end.
When I have enough material I use piano wire pins. Here I do not have much to work with on the horns. No material missing. Just not much to pin into.
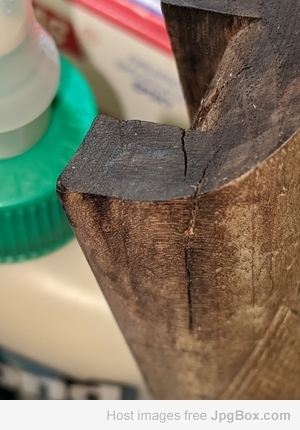
I have not used a staple before. Can you provide more detail as to how to do this. I will post a photo of the worst horn split on the left.
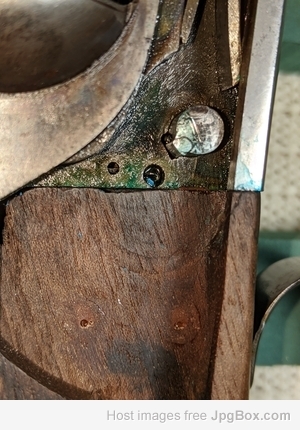
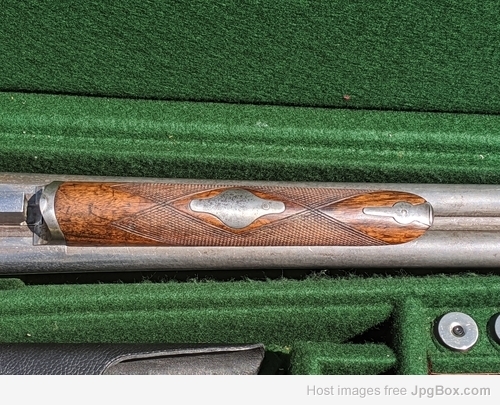
LetFly, what is the significance of the "X"?
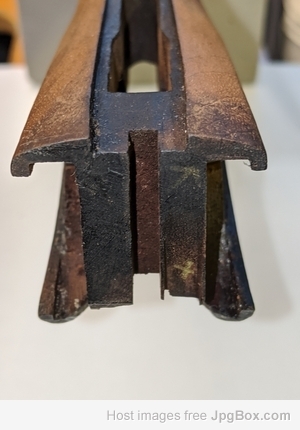
I put the 'x' there to check the matting with the top lever and bolt V spring. This part of the head is angled back to make clearance for the leg on the spring. This reduces the amount of wood in the head to bear against the frame on recoil.
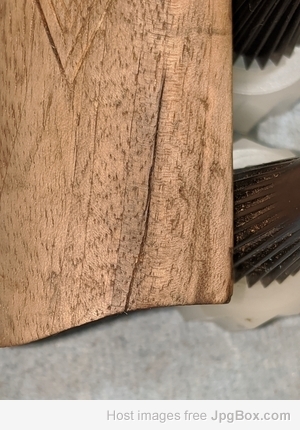
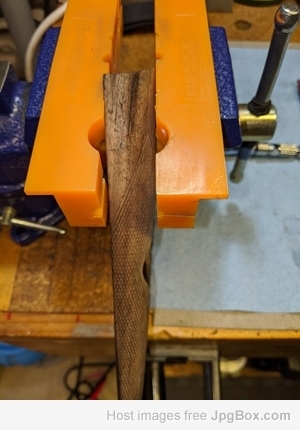
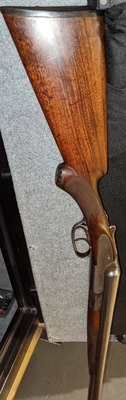
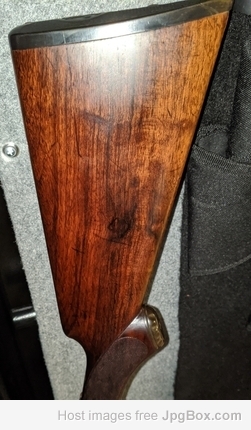
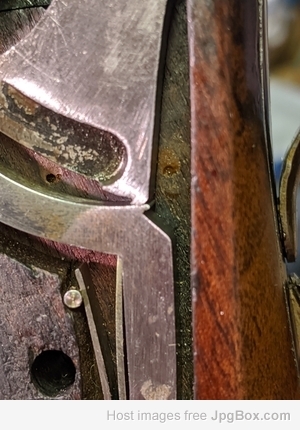
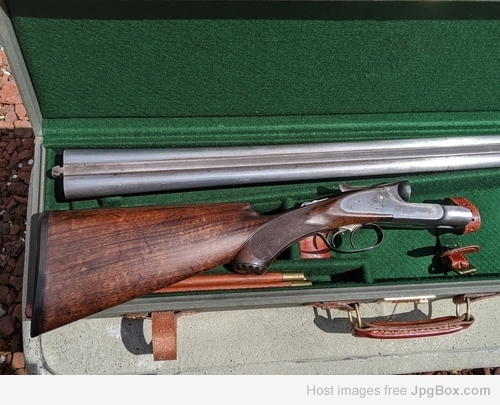
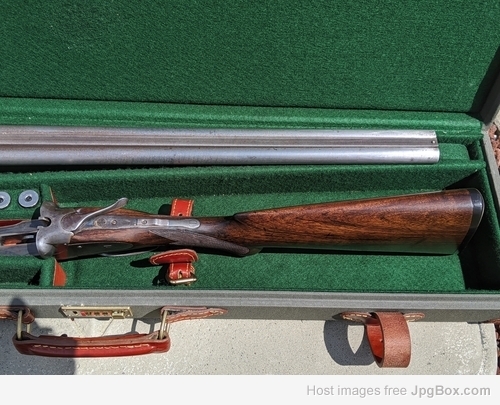
Here are two more photos. One on the worst top left split horn, and 2: a split in the butt which appears to be a crack along the grain rather than some inflicted damage. The original LAC butt plate shows no signs of impact or damage.
1: Split horn
Recommendation:? Use a CA type glue to secure this or use Brownell's AG?
2:
Recommendation?: Inject thin CA into the cracks and then fill with wood filler or use dyed Brownell's AG thinned with denatured alcohol and inject into the crack. Also in past work I have drilled a small hole at the very end of the crack to stop any further expansion along the grain line. Always works well and is easy to hide.
OR? and I am open to any and all advice. Thanks
first of all you need to get the oil out of the wood.
Maybe a staple for those top cracks...Geo
Nope, there really isn't enough wood across that top horn for the staple repair. Staple reinforcement does work quite well with other situations.
The thinnest cracks can be permanently sealed with cyanoacrylate glue that will wick into the crack easily all the way to the end.
No, no, no... bad advice from someone who should know better by now, but doesn't. It won't add much strength, and it will act as a wood sealer, and cause blotchy spots around those filled areas when finishing. Cyanoacrylate glues (Krazy Glue) are excellent for non-porous materials, and they have great strength in tension. But they are a poor choice as wood glues. They are often used to seal grain and to help reinforce punky wood that has deteriorated from oil rot, etc. But there are better choices for that too.
The best glue I have found for gunstock repair is Titebond II. Hard to tell but that stock doesn't look badly oil soaked. But Titebond II, or any other glue, works best in clean dry wood. I've found that Titebond II gives me repair joints that are as strong or stronger than the original wood. And when the joints are closely fitted and carefully clamped, it provides the least visible glue joint after finishing. I hate a stock repair that sticks out like a sore thumb. Clear epoxy is very strong, but the glue joint line stands out more after finishing. Polyurethane glues such as Gorilla Glue are very strong, and good for filling slight gaps. But they are very messy, and stain the wood around the repair, requiring excessive sanding to remove before finishing. They are good in wood that may have some oil contamination or for naturally oily woods such as ebony.
For cracks like those around the sideplates, I try to spread them open slightly, and use a syringe to get glue deep into the crack. Draw it closed and wipe off squeeze-out with a damp cloth. Then quickly clamp the crack closed. For an irregular surface like that, surgical rubber tubing or strips of rubber inner tube wrapped around the area work great without damaging the wood.
On one sideplate stock repair on a German double, I was concerned that the clamping might pull the thin wood around the locks in too far, and make it hard or impossible to get the locks back in. So I made a dummy sideplate out of steel of similar thickness, and coated it with paste wax as a release agent, to maintain the dimensions of the lock inlet.
For cracks under the sideplates or cracks that cannot be fully closed, I use a good clear 2 part epoxy such as Brownells Accraglas or West Systems. That crack on the top of the stock heel may be tough to draw completely closed. If there will be a gap, that is where epoxy shines. Some people mix the epoxy with walnut sawdust to try to match the stock, but walnut sawdust mixed with epoxy leaves a very dark repair joint. I found that fine pine sawdust matches walnut better. You can experiment before doing the actual repair to get a good color match.
Naturally, when you pull a crack closed, there will be squeeze-out, and it is best to remove what you can before the glue hardens, to minimize staining the wood and to minimize sanding. Sometimes, I wrap the area with waxed paper before clamping with rubber tubing to keep the glue from sticking to my tubing.
Thanks. This gives me a good base of knowledge to proceed.
Keith, more advice please.
I have steamed out the dents and have worked on the across grain scratches as best I can at this point. The right side of the stock has most of these scratches, the left only one small scratch. I am not keen on sanding these out, rather prefer to fill these in some manner or leave as a reminder of the guns use over 116 years. Your expertise and advice appreciated?
That's always a tough call LetFly. Unless you are doing a complete restoration, i.e., using original methods and finishing materials to make the gun look like the day it left the factory, then I agree with you about not attempting to remove every mark and scratch on a gun this old. But it usually doesn't look very good to have a shiny built up surface finish with scratches and dents remaining underneath either. I personally think a finish more in the wood would look better and more appropriate on an old Lefever anyway, versus some glossy Weatherby type finish where every pore is filled.
I don't know of any scratch filler that wouldn't stand out like a sore thumb. And nothing I see there looks very deep either. You might want to consider making a few more runs at them with your dent removing iron. I know the conventional wisdom says that you can't raise scratches and sharp dents that have broken the wood fibers. However, I have found that often they can be partially raised. They would still be there, but maybe not quite as deep. Instead of just placing a moist pad on top of the damaged area, and applying the hot iron, I discovered that I get better results if I moisten the dent or gouge with common 70% rubbing alcohol first, and let it soak into the wood for a little while. This way, the hot dent iron is generating steam from within the wood instead of trying to force it down in from the surface.
I'm glad to see that you know what you are doing, and are being conservative. So many people get carried away with sanding, and they ruin the detail and lines of the stock. I've got a 16 ga. Lefever, a 16 ga. Baker, and a 16 ga. L.C. Smith that I picked up very cheap as project guns. All of them are shooters, but they are going to need restocked due to someone going nuts with sandpaper.
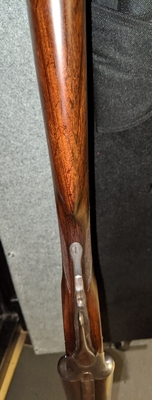
Thanks Keith. I have likely overspent on my advice requests... however, here is another. This is a very tight crack in the fore-end wood at the hinge. As the photo shows, there are actually two cracks, close but they do not meet. If not repaired they will meet sooner than I like. The challenge is how to wick glue down into such a tight crack? These cannot be opened at all without risk of injury to the fore-end wood. The crack coming off the interior channel does not appear to be very long. Would this be a place for CA-gap filling as it will wick into this crack nicely? And I do not need to be concerned with finish. The one on the outside has me uncertain as to how to proceed. Once again I am appreciative of any help or suggestion you may offer. I am right at point of gluing up all of the splits and cracks once I have a clear idea of how I will address each one. Thanks.
{on sanding... I have a very nice 1890's Sauer hammer 12b that someone sanded all the wood down to let the metal stand proud including the grip cap. Unbelievable}
LetFly, I'm glad to help if and when I can. I agree with you about the need to stabilize those cracks in the forend wood. I still don't think that CA is the best choice though. If this was my gun, I think I would go with a thinned epoxy. Warming up the wood will reduce the viscosity of the epoxy even more, and permit it to fill the crack. I'd do the crack on the inside along the forend iron first, and see if I could bring it closed a bit with careful clamping.
Then, after the epoxy set for a few days, to ensure complete curing, I would see if the outer crack will close up when clamped. If it will close up, I'd use the Titebond II wood glue. If it won't close completely, I'd choose the clear epoxy because of its' better gap filling properties, and its' great strength. You could even mask off all the wood surrounding the crack, and use compressed air to blow the glue or epoxy down into the crack. Wipe away the excess on the surface with a rag moistened with acetone or denatured alcohol. The repaired crack may be somewhat visible after finishing, but the side view makes me think you should be able to draw it closed. If so, I would choose the Titebond II for that one. Either way, at least you will sleep well knowing it isn't going to get worse.
It may also be wise to try gluing up only a couple of the cracks in the head of the stock at one time, rather than trying to juggle too many all at once. You have plenty of time between now and April!
Keith, what brand of epoxy do you use?
Thanks
For stock repair, I mostly use the clear 105/205 Epoxy from West Systems. It seems to be just as good as regular Accraglas for wood repair, but lower in cost per ounce. The last time I bought some, I found some good deals on E-bay. I've learned to be very careful in weighing or measuring out my quantities whether I am using a 1:1, 2:1, or 4:1 product when mixing my resin and hardener. And of course, it is very important to mix the Parts A and B very thoroughly in order to have a good result.
My quest for the best adhesives for gun stock repair started when I saw the vast differences between the miraculous near invisible repairs made by professional stock repair guys like Dennis Earl Smith, the Stock Doctor, the average neighborhood gunsmith, and the complete idiots who use stove bolts, nails, and gray epoxy.
I just read a short but informative article called "The Science Behind Epoxies" in the Winter 2020 Tools and Shops issue of "Fine Woodworking" magazine. It gives a fairly quick and simple explanation of how epoxies work. I'm no expert on the subject, but I try to get my information from people who are. The facts I've relayed here in the past about epoxies have come from PhD Chemical Engineers who develop and make the stuff.
Making progress. Next to work on the split in the stock.
The wood surgery: Airbrush set at 20#
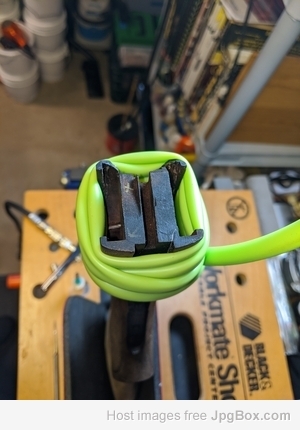
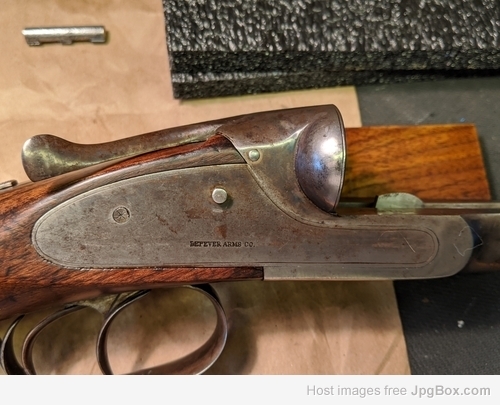
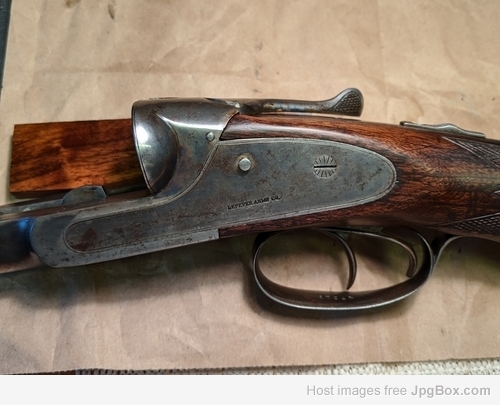
Stock head:
Fore-end:
Update from the Lafever project: (thanks, Keith and others for your advice)
Stock head
Before:
After:
Head pins (2)
Split in butt of stock
Before:
After:
Looking good! Have you tested the locks to ensure that they fit the newly repaired mortises?
Yes, glued up with all hardware in place. Required for a perfect fit.
Yes, glued up with all hardware in place. Required for a perfect fit.
Great. I was looking at the photo you had above with the green elastic bands, and I did not see any hardware, thus the question.
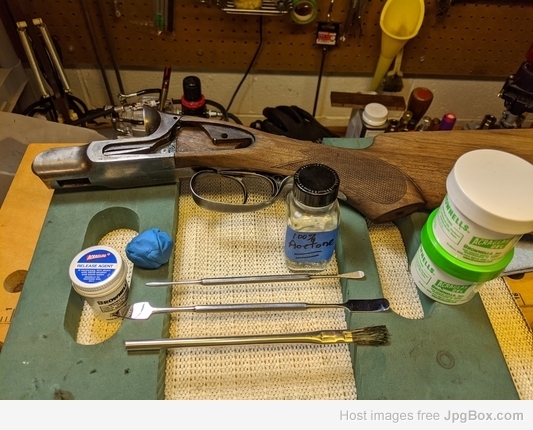
Now that I am getting near the stage of staining and applying a new finish to the wood I would appreciate advice on the various stains and oil finishes on the market. I want a satin eggshell oil finish no gloss at all. I have used a Linseed oil type (adapted from violin finish) in the past that I really like but I would like to get close to what Lefever had back in the day. My experience in stain is using Pilkington pre 64 (Brownells). Also I will have a slight epoxy line where the stock split has been repaired. Experience tells me this will not take stain. Thanks.
Ok, one more requirement prior to staining and finishing wood.
The frame to stock head gap was too much at +0.006 on the left side. As you probably know and I have observed, on these Lefever guns there is precious little contact from frame to the meat in the head of the stock. I am not clear as to why they cut that deep vertical mortise in the center as it does not appear to house any part of the cocking mechanism. I measured my frame to wood contact and it was clear that all that light coming through was why the horns had so much recoil impact. So out comes the AcraGlas Gel and the gap is now +0.000 where it counts. After this cures I am back to thinking about the wood finish. April Quail is just a short time away.
Frame to wood AcraGlas bedding setup
Frame to wood AcraGlas bed (left)
Frame to wood AcraGlas bed (right)
Update on Lefever project.
The final fit of metal to wood is now completed. Very snug and solid at this point.
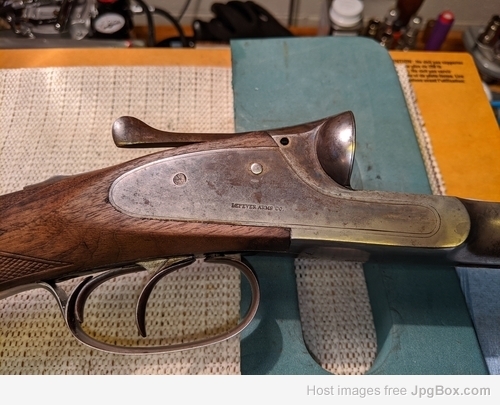

Now on to staining and oil finish for the wood.
Any suggestions on commercial product? I have used Brownell's Pilkington Clear Stain a few times. LinSpeed over Tungseal (Roy Dunlap). What about Napier's London Oil Stain? I have read about this and watched a YouTube video but I have not experience with this product. Any thoughts on products with a mixture of oil and varnish such as MinWax Antique Oil Finish or Watco Danish Oil Natural (I have lots of this as I use it to seal my Damascus barrels). I would like to get a stain color close to the Lefever original if possible. As you can see from the photos of the stock it is a good straight grain walnut with not a lot of figure in the grain. Again, thanks for the many replies to my many questions.
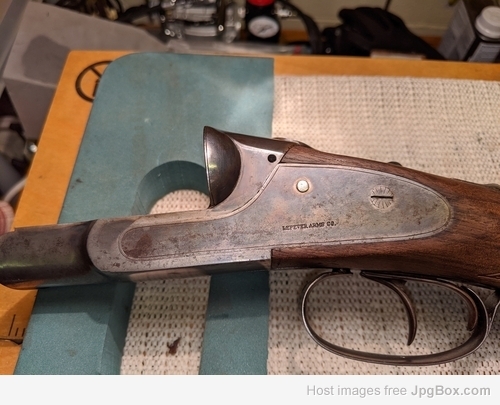
Update on Lefever G project
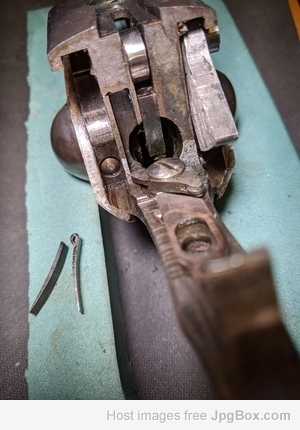
After a search for a hammer pin, getting one from GPC that was too short (as I have learned from Elliot & Cobb Lefever 12b were made in three frame sizes) dblgnfix made a precise dimension new one for me. Thanks Lou for the excellent work. If you need a hard to find old/new part give him a call (see the attached photo). Great guy to work with and talk to about all things double guns.
After a bit of final fit and polish it is now installed and tested. (see photo) Cocking hook and hammer cock and hammer fall now work as new.
[broken pin on bottom, new pin on top]
Wood is close to finished after much repair, multiple coats of Velvit Oil (selected this oil/varnish based on its soya base oil), multiple wet sanding, and final finish rub-out and wax. Thanks for the information on Flexner's book and the many suggestions and helpful advice on this forum. I must have Flexner memorized by now. I was doing most of this wood finishing correctly following my early training using James V. Howe and Roy Dunlap. However switching from BLO to a more modern oil is an substantial improvement. Getting close to field ready. Quail arrive in April.
Update: kootching prior to final oil/varnish wipe coat.
How many coats have you applied? Can we get pics when finished?
At this date, the oil/varnish process has been the following...
Oil/varnish applied very thin each time. Application #1 then wet sand 320. #2 400, #3 400, #4 600, #5 600, #6 0000 oil free steel wool, then dropped some oil varnish in a few deeper scratches, #7 600 and 0000 SW again, #8 800 oil/varnish thinned with mineral spirits. Dry time 24 to 36 hours between each application. Getting closer...also I read an account reminding me that there is a distinct difference between an oil/varnish being dry, that is able to be handled, and cured, that is hardened to the point it can be rubbed out. Dry 24 hours, cured 4 to 6 weeks dependent on oil/varnish type.
Update photos on wood finish
At this point I have completed the application of Velvit Oil finish on the wood. Velvit Oil applied as a wiping oil/varnish, each application applied and then vigorously wiped off. I have applied the finish 10 times, with a rub out with #0000 and Wool Lub between each application starting with number 7. A couple of scars earned over 100+ years have been allowed to remain as testament to its history. After allowing a cure for another 2 weeks I will rub out with rottenstone to bring the sheen up a bit and then apply a good wax. Done.
That looks real good LetFly. That's a nice looking repair and refinish job. I think Uncle Dan would be happy that you saved this G Grade and are putting it back in service. It should be good for another 100 years.
I have found that going on the darker side when finishing, as you did here, does a better job of making any crack repairs less evident.
It was also very nice to see that you gave Lou (dblgunfix) credit and praise for the work he did in making a new cocking or hammer axle. Thanks for sharing your project with us.
Letfly...that looks great mate, you got a lovely dark brown going there, it looks really nice, good work sir...good help from Keith too.
Franc
Lefever project #47216 G wood refurbished. Next step to restore the Damascus pattern on the barrels after the quail shoots in April.
A sincere thanks to forum members who helped with advice and comments on wood splits and crack repair. Also the in-depth discussions on wood finish, Flexner's book, etc. proved to be quite valuable. This forum is unmatched for advice, insight, and information. Much appreciated.
Isn't keith a remarkable guy? Just the kind of upstanding, forthright and evolved kind of guy you would like to bring home and introduce to you younger sister?
ol joe is another inspiring, warm and insightful, stand-up kinda guy. What a crew to be proud of, don't cha think?
Keith offered infinitely more help on this thread than you did. All you did was show up and snipe.
If you don't like the "crew" feel free to go back wherever you were for the last few months before you resurfaced.
SRH
I am new to the Dg BBS and I really enjoyed the interaction with others as interested in double guns as myself. This Lefever project and thread has been fun. Now...
I have noticed snipping and bad blood between some members as I read other threads. I am interested in learning from others more experienced and sharing what I am working on. I would appreciate it if you would not hijack my thread, this one or any other, for this purpose. Carping at others, please do it on your own thread.
I find this BBS very informative so please post on my threads if you have something to offer to the discussion and topic.
LetFly, a $$ contributing member.
I am new to the Dg BBS.... Now...
I have noticed ....Carping...
I find this BBS very informative so please post on my threads if you have something to offer to the discussion and topic.
Unfortunately, this seems to be the way things are on here, and as the first reply to your request demonstrates, it doesn't change anything to ask for less of the bull, even within your own thread.
And the website owner won't change anything, apparently. A casual stroll through the archives will demonstrate that this has been going on for decades.
This is the only forum that has ever asked for donations in my experience, and its website is archaic and unmoderated.
But the content is gold (if you're willing to dig through the rubble).
Alrighty then, continuing on...
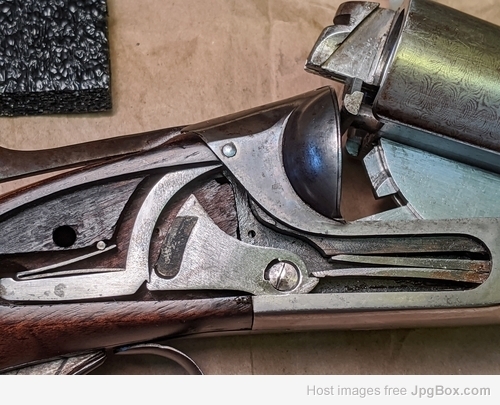
Now, getting back to the Lefever project. Wood finished, save the final rub out (still waiting on a hard cure) and wax, I have this issue to resolve. After the thorough, perhaps too much so, cleaning, the cocking hook keyway no longer functions as intended. After 106 years of who knows how many cockings, the keyway slot has been elongated just enough to the point that the hammer pin no longer rotates the hammer hooks far enough to engage the sear hooks. A couple of photos to illustrate.
Now getting the hook keyway repaired to be a custom snug fit to the hammer pin key.
Quail season is just around the corner. Quailing over the Brits in April is definitely a social distancing activity I intend to participate in with Uncle Dan's #47216.
Did you say something Stan?
Sorry, I was ignoring you.
Stan was just "sniping". It's interesting what he whines about and what he gives a pass.
Stan was just "sniping"....
Who was?
Letfly, try this put the cocking pin in with the other end first, I had the same problem and lo and behold it worked.
Gunny, thanks. Unfortunately this does not resolve my problem. My issue is a cocking hook keyway with too much slop. The cocking hook will lift up +0.34" before engaging the hammer pin rotation. Direction of pin insertion does not help.
Dewey Vicknair is correct about the function of the cocking hook, and the area of free travel permitted by the much wider cocking axle key arc in the hammers.
It is extremely doubtful that the key slot in the cocking hook wore out to the point that the hammer/sear relationship wore out as much as your photos illustrate. You are quite a distance from the sears engaging the hammer notch, and even a tiny bit would have been enough to make the gun no longer able to be cocked. It would have taken thousands of further unsuccessful attempts to cock the gun to accumulate that much additional wear.... highly unlikely.
I think I would start by checking the fit of the original cocking axle to the cocking hook. I know that one end of it was fractured, which led you to have a new cocking axle made. I would want to know if the hammer on the unbroken side was able to come to full cock or sear engagement. If so, then I would tend to think there is something wrong with the newly machined cocking axle.
I had been under the impression that the "tits" or integral keys on the Lefever cocking axles were not all perfectly in line... rather that the center key was several degrees different than the keys for the hammers. This is why I have previously found that the cocking axle is directional, and that it usually has an x or hash mark on the right end. This is probably what gunny encountered when he reversed his and fixed his problem.
But I just checked a Lefever cocking axle, and it appears that they are all in line, and this particular axle has no mark on one end. Also, the fit of the cocking hook to the axle is very snug with no rotational slop, as Dewey Vicknair noted above. Now I am left wondering if there was a subtle design change, and that there are two versions of cocking axles with a slightly different key alignment. I will try to check the cocking axle on another Lefever I am working on to see if it is different.
Isn't keith a remarkable guy? Just the kind of upstanding, forthright and evolved kind of guy you would like to bring home and introduce to you younger sister?
ol joe is another inspiring, warm and insightful, stand-up kinda guy. What a crew to be proud of, don't cha think?
Now I would like to address and respond to this bullshit. Steven DODD Hughes is the sick pervert who called me on the phone from (406) 222-9377 in Livingston, Montana on 2/2/19 in an obviously extremely drunken state. He was slurring his words as he screamed obscenities and vulgar threats at me. Of course, Steven DODD Hughes did not carry out the threats he made to me, because he is a gutless coward.
This is the sick little fag-bastard who is now questioning whether anyone would wish to introduce their sister to jOe or myself.
Steven DODD Hughes did not enter this thread to contribute any knowledge or useful information. If you want information from Steven DODD Hughes, you need to buy one of his books or sign up for one of the very expensive classes that he advertises here... without compensating Dave for the free advertising. Contrast this sick and cheap-ass behavior with the help provided by Dewey Vicknair, who took time from his very busy schedule to give free and useful advice.
Steven DODD Hughes is a sad and pathetic little man who could never follow through on his drunken threats. It is no shock to see Steven DODD Hughes acting like a woman to tell Stan that he is IGNORING him. And it is no surprise whatsoever that BrentD feels that Stan was wrong to confront him, and that he would defend someone who would stoop so low as to making cowardly physical threats over the phone. You will never see BrentD crying about the totally off-topic crap posted here by his fat little friend. BrentD's use of this forum, while he continues his one-puke campaign to encourage folks to not contribute to this site, is even lower class than Steven DODD Hughes use of this site for free advertising. Birds of a feather.
Keith, thanks for bringing me along on the hard felt personal differences on the forum.
Now to the hammer pin issue. In making the new pin I sent the original to Lou and ask him to duplicate it. As I was advised on the directional aspect I asked him to measure this as precisely as possible. The original pin does not have an alignment mark. There is no alignment or measurable difference in the three individual keys. Before contacting Lou I received one (from Gun Parts Co) that was to short to use. As you observe the keys are identical in all dimensions. From this I am skeptical of the idea that the hook key is offset on the centerline.
Now to Dewey's drawing. My cocking hook keyway looks similar to the hammer keyway. Close examination shows metal deformation made by the key itself. The key shows no wear. This tells me the metal in the hook keyway is softer than the hammer pin. Also the wear pattern would suggest that the barrels were closed hard over 100+ years.
I understand that the hammer pin must start it's rotation immediately as the barrels open and drop. Otherwise when the barrels reach their full drop, the hook it's maximum lift, the hammers are not rotated fully. This is the case with my gun.
Dredging up my University industrial arts and geometry converting linear lift to rotational degrees I calculate that it takes only +0.024 of slop in the keyway to keep the hammers from reaching a rotation needed for the hooks to pass the sears and engage. On my gun.
More when I get the repaired hook back from Lou. Thanks for your interest.
This is interesting LetFly. I have to ask you if the pictures you posted in this thread were taken with the barrels fully open, because the sears are a long way from engaging the hammer notches, relatively speaking.
I went back to the old thread where you first discovered that you had a fractured cocking or hammer axle. You mentioned that you were able to bring the right hammer to full cocked position, even though the integral keyed portion was broken. You did not mention whether the left hammer came to full cocked position. If both hammers came to full cock position, then there has to be some dimensional difference in the new cocking axle.
https://www.doublegunshop.com/forums/ubbthreads.php?ubb=showflat&Number=564255&page=3I also find it interesting that you have as much wear in the cocking hook as you describe. The one I examined earlier is a very tight fit on the cocking axle, with zero discernible slop. I've spent most of my life fixing things, and when something wears to the point where it will no longer function, it is typically repaired, replaced, scrapped, or retired. It does not get the chance to accumulate a great deal of additional wear, which is what your photos depict... unless the barrels are not fully open.
It is also interesting to see that the right end of the cocking axle in Dewey Vicknair's short video has a hash mark. I cannot recall if I ever put one in backwards, but I can say for certain that every one I have seen has the mark on the right side, when the hash mark is present. When I take one apart, I always put them back together exactly as they were originally assembled. And I have seen several accounts where it is claimed that putting it in with the hash mark to the left will affect cocking of the hammers, as gunny mentioned earlier. I haven't yet had the chance to check another gun to see if orientation of the cocking axle is critical. But why then, would they bother to put that mark on one end?
EDIT--- By the way, it was my pleasure to set the record straight on Steven DODD Hughes' off-topic comments. Some here don't care for context, but I prefer context over allowing a disingenuous turd to operate in a vacuum.
Patent no. 865,310 provides the needed details. Boy, I am now really in the weeds with this one.
Reply to Keith:
No, barrels not fully open as I took the photo with one hand holding the gun open with the other. If I had put the gun in my vise to be able to take the photos with the barrels at maximum drop the hooks would be marginally short of engagement.
As to the manner by which the hook keyway earned it's slop my guess is as good as anybody's.
Actually I missed page 5 with the video before my last post. Functions just like mine. Thanks.
I have in my possession 3 hammer pins, my original, plus two others from GPC (original broken, GPC 1 too short, 2 too rough to use). None have any mark depicting a right or left end as shown in your video AND all are perfectly symmetrical in all dimensions. On these three examples of the hammer pin I cannot find anything that determines a unique orientation for the pin.
The only issue with my gun and its hook is the elongation of the keyway. Why the elongation? Perhaps poor workmanship at the start. A monday morning filer after a heavy night with the grogg. Or, perhaps some long ago 'gunsmith' had trouble fitting the pin back in and decided a little more slop was 'just the ticket'.
Knowing that your earlier photos did not show the actual amount of the lack of sear engagement helps a great deal. We did not know that with the barrels fully open, the action was just short of correctly cocking.
I still have not yet had a chance to check any other Lefevers for orientation of the cocking axle. I do not doubt what gunny said about reversing his to get the hammers to cock, because I have heard of this problem several times in the past. I am confused about this statement where you now say that none of the cocking axles in your possession have a mark on one end:
I have in my possession 3 hammer pins, my original, plus two others from GPC (original broken, GPC 1 too short, 2 too rough to use). None have any mark depicting a right or left end as shown in your video AND all are perfectly symmetrical in all dimensions.
But you told us that the cocking axle you received from Numrich did have the line on one end:
I have the hammer pin and it does have a single line on one end. Check my question posted on the general form. I need advice on fitting the new pin to my hammers and cocking hook.
Noticing small details like this is a part of logical troubleshooting and repair. I am hopeful that we can solve this mystery, and figure out why many of these cocking axles have that hash mark on the right end. I agree completely with what Dewey Vicknair said about the notion that a real "gunsmith" would alter your cocking hook to the point that the gun will no longer cock. Unfortunately, there are many old shotguns that have had poor attempts at repair by people who call themselves gunsmiths. I also doubt if it was fitted that poorly when it was built. I'd lean more toward incorrect heat treatment, and years of slamming the gun open with way too much force. And we still have the mystery of why your gun did indeed cock with at least the right hammer, with the original cocking axle installed. The only thing that changed was the installation of the new cocking axle. Many times, when troubleshooting either electrical or mechanical problems, I can find the answer by asking, "What is the last thing that happened just prior to the malfunction?"
To help with this conversation I will post photos from each of the hammer pins.
Original pin
Left end
Right end
(note, the visible mark was enhanced by me with a file and is much more pronounced than what was an original scribe mark or scratch)
Gun Parts Co pin #1 (short at only +1.215 in length)

GPC pin #2


These pin ends do not look anything like the rather pronounced, almost screw slot style, pin head as shown in Dewey's video. It would be instructive if Dewey would reverse the pin in the Lefever used in the video and then record a video showing that the hammers will or will not cock with this reversal.
When I first disassembled this Lefever I took photos of the parts. I reviewed these photos and I found a couple of the pin end of the hook. Note this keyway is far from the rectangular shape of the pin key. More like the hammer keyway in my view.
As my last point, reading both books by Elliot and studying the patent drawings I find no information to suggest directionality for the pin. Studying my frame I cannot identify any type of taper or offset that would require or permit a unidirectional pin insertion.
From everything I have now read, Lefever was about efficiency in design. I find it odd that he would design a system that required each pin to be filed to fit and inserted only in a specific direction. How would a production shop manage this with thousands of frames, varying sizes, and thousands of pins. And what about providing replacement pins? Clearly these pins broke and where replaced as suggested by my pin.
I have no idea as to why my G did not cock with the new pin. The new pin was made to an exact duplicate in all dimensions to the original. All I can offer is that perhaps in my cleaning up of the cocking hook I removed a burr that was just enough to ensure adequate rotation of the hammer pin. I cocked the gun when I acquired it, but not again before disassembly. Also I first started a conversation on this forum by asking how to remove the barrels on a Lefever. I received a number of suggestions. I am now convinced that this difficulty in doing so was and is caused by excessive vertical movement in the cocking hook indicative of wear in the hook keyway.
I disagree LetFly. You probably recall that it was me that guided you to the method to remove your barrels. I never stated exactly why the cocking hook sometimes gets caught on the pin in the barrel lump, preventing removal, because I wanted Marks_21 to explain it to us. I'm still waiting for his explanation. It isn't because of wear in the keyway.
I have been a pretty dedicated Lefever collector and student of these guns since I bought my first one around 1988. I am still learning and finding things I didn't know, and that is compounded by the fact that Dan Lefever and his sons were always tinkering with the design. There are subtle and obvious variations, which can complicate matters when you are attempting to replace a worn out or broken part.
One thing I can say with absolute certainty is that both of the Elliot books are very informative. But the author was a collector, and not a gunsmith, and there are several things stated that are wrong. There has been a lot of new information discovered over time that you will not find in his books. I can't think of any gun that has had so much misinformation repeated about them than Syracuse Lefevers. Guns from that era were not made with boringly repetitive CNC precision, and there was hand fitting involved, even though they were considered to be machine made guns that involved the use of jigs and fixtures. I have seen quite a few of these cocking axles installed in the guns, and the hash mark is ALWAYS on the right. Miller has stated the same thing. If it had no significance, other than perhaps being an inspectors mark, one would think that we would see a roughly 50-50 random orientation. But we don't, and there is evidence that putting them in backwards may affect the ability to cock the hammers.
I do agree that the keyway in your cocking hook is distorted through wear or abuse. It is plausible, I suppose, that there was sufficient debris in that slot to permit cocking with the original cocking axle. Dewey Vicknair brought up some valid points to consider in order to make a repair that works properly, and lasts another 100 years.
Keith, thanks for your reply. It would be nice to have a gunsmithing book or chapter on these guns. I have a number of gunsmith books going back to the 40's but cannot find a single paragraph on the LeFever and it's action. Perhaps you could write one?
Why is the hammer pin mark on Dewey's so pronounced and well finished. Clearly on my examples this is far from the case. Is this a grade feature. Higher grades receive more finished work?
With your experience do you think another cocking hook with it's mate hammer pin from another same frame size would be a drop in replacement? Or is there enough hand fitting that this would not work?
Hi
I've enjoyed reading this thread and seeing the progress on this Lefever, I hope that it is back up and running soon.
Just out of curiosity, is this stock on ebay a Lefever stock?
??? stock I doubt that the seller knows what it is for.
PhysDoc
From the poor photos I would say that yes, it is a Lefever, lower grade.
Lefever 47216 project on going. Final finish in third week of cure. Patience at this point. Cannot go out as all preserves shuttered. Brits and I are catching up on our reading of the great Michael McIntosh works. Stay well.
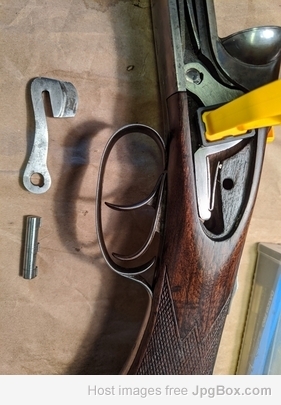
Update. In the past couple of weeks I have acquired a replacement cocking hook with its hammer pin out of #36001 H grade Lefever. Through the LACA I contacted Brian Dudley and he fortunately was able to supply these critical parts from a parts gun. The hammer pin hole and keyway in the hook are in excellent original condition. By comparing my original hook to this one I can only conclude that the poor condition of my original hook was as result of a past heavy hand tapping or hammering the pin into position after removing it for whatever reason. This battered the hole and keyway. This of course is only my guess at why the hole and especially the keyway would be so maligned.
Note, way back when I first posted about this G Lefever I asked for advice on removing the barrels. When I first acquired this gun the barrels would hang and not separate cleanly from the frame without some fussing. I now know that this was a result of the cocking hook having too much free lift or free-play. I measured the free lift (the distance the hook lifts freely before engaging the key on the hammer pin). On the replacement this is only +0.06. On the original this was three times this distance. I will not generalize, but in the future this is a measurement I will check carefully on any newly acquired Lefever.
The replacement hook and hammer pin slipped into all three keyways with very little friction. Now the Lefever 47216 locks the hammer hooks and sears as designed. The G grade is now fully functional. At this point I am going to have the barrels refinished over the coming months (way too many fine scratches at the breech end to just leave as is).
As everywhere here in the East all preserve shooting (and all trap/skeet/sporting clays) is closed and will not reopen until the fall. The Brits and I will spend our time checking out the spring flights of woodcock here in the Thorn Apples and then turn to chasing muskies in our wonderful reservoirs. Both of these activities are very much a social distancing activity. Hopefully come autumn the Lefever will be sporting fine barrels and back after pheasants, chukar and timberdoodle. I have attached a few photos.
Thank you to all who followed this Lefever adventure and to especially those who offered much need advice. Stay well.
(note the clearly marked witness line on the hammer pin)
(clean lock-up of hammer and sear)
Sideplate with cocked indicator fully engaged)
Good job Let Fly. But that slop in the cocking hook was not the reason that it was difficult to remove the barrels when you started. Hint... You can find that same difficulty on guns that have no such slop in the fit of the cocking axle to the cocking hook. I'm still hoping that Marks_21 or someone else from the LACA will enlighten us.
I also hesitate to ask what you had to pay for those parts. I inquired about some parts for a a Parker from that individual some years ago, and still haven't gotten over the shock. Found what I needed elsewhere for a small fraction of the cost.
Keith, willingness to pay equals price equals scarcity plus availability. I tried to get these from GPC at $15 a piece for just the hammer pin. GPC did not have a hook listed in inventory and if they might have there is no way to know the quality. After paying for two that were junk I went another route and had a custom pin made. It was spot on to the original and worth the cost. The problem was the poor condition of the original hook. After consultation with the pin maker it was clear that attempting a repair on the hook was not the best approach. I reached out to a couple of folks suggested over at LACA that might have both the hook and its mated pin. Brian D. had two candidate sets and after close examination selected the best set. His price was quite reasonable and I appreciate his taking the time to help out. After all a Lefever is just a wall hanger without a cocking hook and properly fitting hammer pin.
As to the hook slop barrel release issue all I know is that the original loose hook had a tendency to capture the lump pin and required fiddling to shake it free and release the barrels. With the new no slop hook the barrels just pop off as they should as the hook stays tight in the frame channel. Beyond this I cannot add anything more. Perhaps someone reading this with a Lefever and a sloppy hook can provide more insight.
As I shelter in place I will post a few photos of the Lefever 47216 as it is now almost finished. Sunshine here so this was an opportunity to get it outside for a couple of photos. From these photos you will see why I will have the barrels refinished. Previous owner(s) must have used a gunny sack full of sand to carry the Lefever. Overall the barrels are solid, just a lot of minute scratching, especially at the breech end.
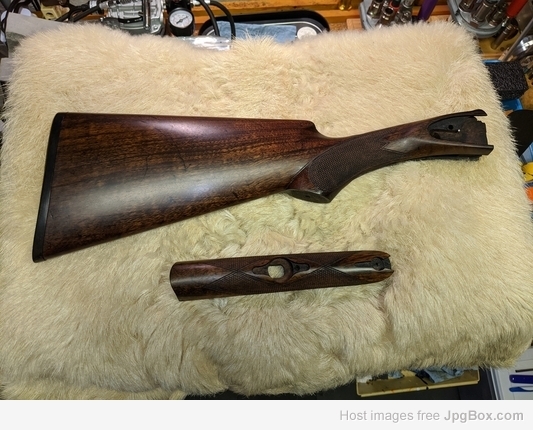
As for the finish on the wood I am pleased with the use of Velvit Oil Natural. My approach was to use two applications of Pilkington's stain, set, then wiped out with denatured alcohol, then approximately 10 coats of Velvit Oil applied thin and allowed to dry for 48 hours between coats. I used 600/800 wet/dry paper and #0000 steel wool with Wool Lub to rub out between coats starting with application number 3 and working up to 9. Final application 10 has been allowed to cure for the past four weeks.
I learned much from the replies here in this post and on a couple of other posts on this forum. Really good advice and help for working with wood repair and finishing. Thanks to all. From the Flexner book on 'Wood Finishing' I learned about doping-in the deeper scars that I was unable to raise with heat and moisture. I learned that a flat tipped iron with alcohol works wonders along with a small clothes iron and water. (Jeff Jewitt, 'Great Wood Finishes' is also a very useful read). These scars (usually inflicted by right hand carry pushing through the thorn apples on the right side of the stock) remain as witness to 107 years of carry use. All that remains for the wood finish is to apply a good coat of wax. I use MinWax for Walnut.
As for the barrels I will send these off to be refinished. This intricate task I only read about.
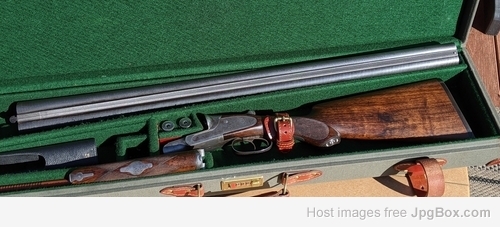
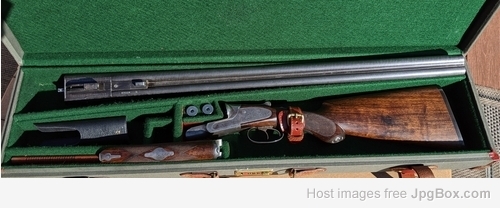
So, here is Lefever #47216 today.

Looks great. Thanks for reporting back with results
Update: barrels are now away for a complete refinish by Louis Rotelli (Classic Restorations). I will post updated photos of the completed Lefever when Lou completes the work. Check back in September as I hope to be afield with #47216 after timberdoodle and pheasants in October.
LeFever 47216 final update.
Thank goes to Louis Rotelli at Classic Restorations (203) 788-4920. Barrels polished, dents removed (super job) and refinished in black and white. Beautiful work. Read my comments and take a look at the previous photos to see what I sent him and compare to the finished product back from Lou. Also and important, Lou completed the work on time. Woodcock migration waits for no dog or man.
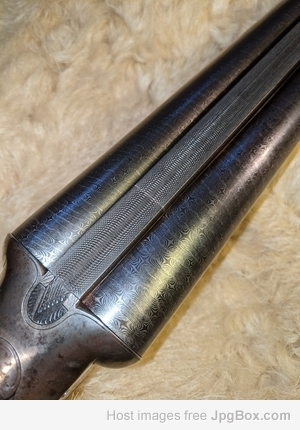
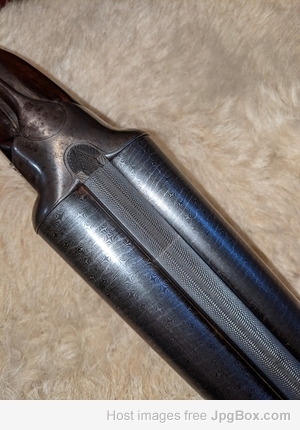
Lefever G Damascus courtesy of Classic Restorations
The Lefever is now set to head out to harass woodcock here in Ohio. Migrants are just arriving from 'that state up north'.
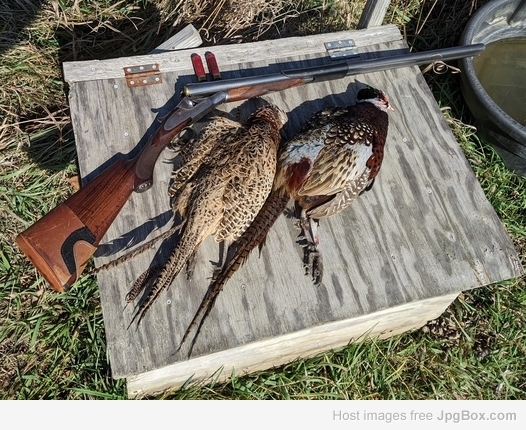
First woodcock outing November 5, 2020. 1oz, 70g 2F black.
Next project: Parker GH grade, S#78013, 1893.
This fine Parker is sound mechanically and the wood is in good condition. Requires the checkering on the fore end to be recut as it is still visible but worn quite smooth. Checkering on the stock wrist is in good condition and will require only some pick-up. The barrels have turned brown and have a number of surface blemishes. These will be refinished as well. An excellent winter project.
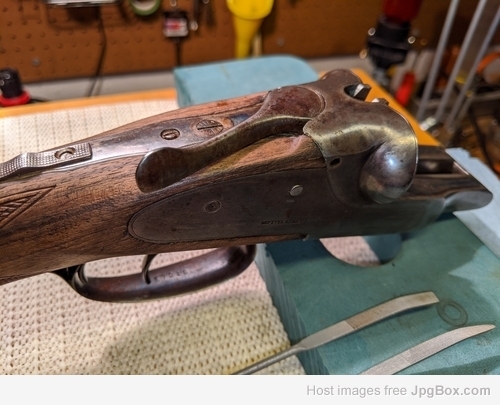
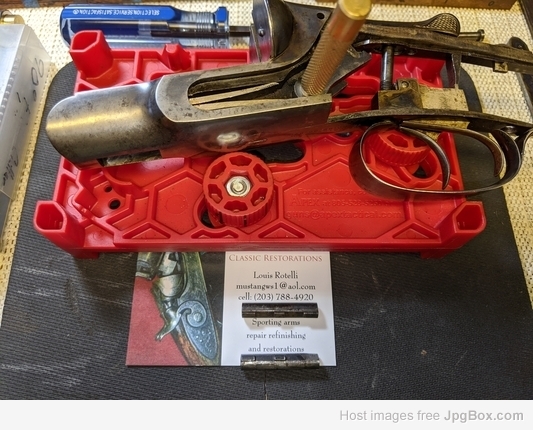
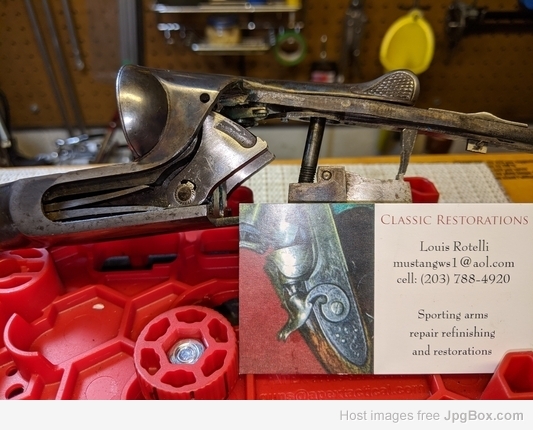
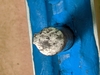
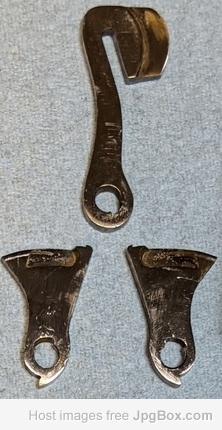
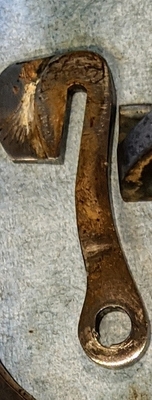
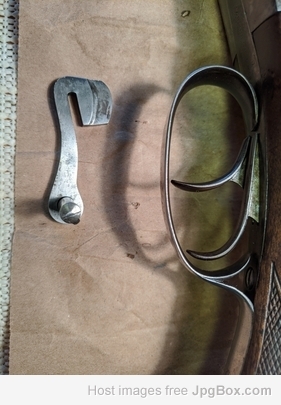
Ah, you just have to love the project gun that just keeps on giving and giving. On my second bird outing with the refurbished Lefever its top snap spring gives way after being worked over it's 119 years. Classic Restoration and Lou Rotelli to the rescue. Thanks, Lou.
Lefever back in business
Lefever G playing skeet games with the 1894 Remington AE. Another thank you to all who offered advice and assistance in putting the Lefever back in action.