|
S |
M |
T |
W |
T |
F |
S |
|
|
|
|
1
|
2
|
3
|
4
|
|
5
|
6
|
7
|
8
|
9
|
10
|
11
|
|
12
|
13
|
14
|
15
|
16
|
17
|
18
|
|
19
|
20
|
21
|
22
|
23
|
24
|
25
|
|
26
|
27
|
28
|
29
|
30
|
|
|
|
|
3 members (welder, GETTEMANS, 1 invisible),
459
guests, and
5
robots. |
|
Key:
Admin,
Global Mod,
Mod
|
|
|
Forums10
Topics40,013
Posts569,418
Members14,653
| |
Most Online19,682
Mar 28th, 2026
|
|
|
|
Joined: Feb 2004
Posts: 13,883 Likes: 21
Sidelock
|
OP

Sidelock
Joined: Feb 2004
Posts: 13,883 Likes: 21 |
I've been on this bbs for almost 4 yrs now and hadn't seen any posts on how to re-lay ribs on a double. I've seen bits on Shotgun Journal and the H&H dvd. But nothing more detailed for the uninitiated like me. Like many of you, I've run into situations where a prospective gun purchase had a loose rib or, in this case, my prized gun. I've been working up to doing a rib re-lay and now I had gotten in a pickle where I needed a gun re-layed. So, this is my first full job of re-laying. This is just the way I did it and I make no claim to it being the best way or the "right way", just the way I could deduce that pros do it, based on snippets of information. I welcome tips, criticism, or anything else from those that have done this or those that see a better way. Strip the ribs from the barrel by heating the muzzles and loosening the ribs and pull lightly heating further aft until the rib drops off. 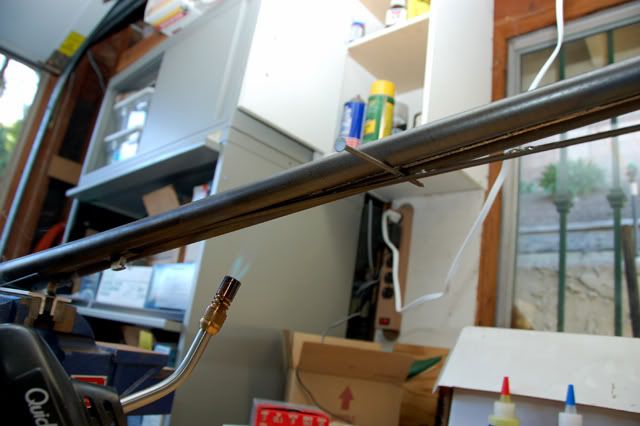 Once the ribs are off, you'll see all kinds of nasty stuff between the barrels. Don't get too excited. Let them cool and get some sandpaper and clean up the barrels between the ribs, but leave the old blueing as much as possible. It'll act like a solder stop-off. There will undoubtedly be a step where the barrels were "struck" (filed and polished) leaving higher metal under the ribs. Take a small file and run along this step to get a clean surface for the solder to stick to. This will be the fillet of the solder joint so it needs to be cleaned. 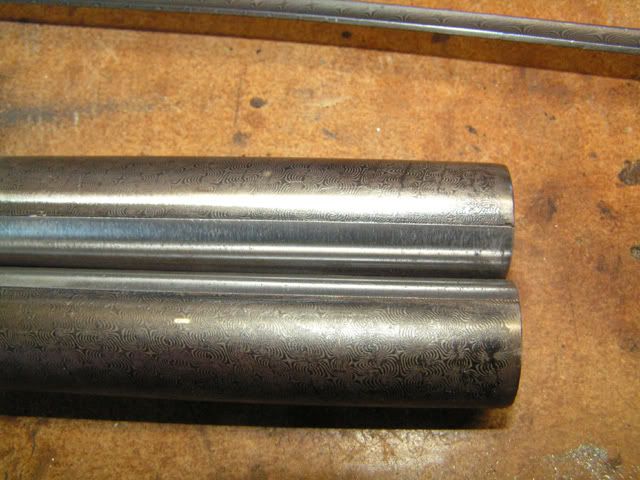 Once they're clean down to the bare steel, no rust or anything else, you can re-tin them. Do the same with ribs. Squeaky clean for them too. Leave the blueing on the rib tops as well. You don't want solder sticking to the top of a matted rib. Before you start tinning the barrels, get some Weller solder blocking paste. It's more like a grease. Put some in the muzzle ends as far back as you can stick your pinky in. Don't get ANY on the front of the muzzles. Put your finger in and then apply it while pulling your finger out to the muzzle. You'll need to tin using acid flux. I found acid core solder and well as having some acid flux around. You'll need a stainless steel brush that looks like a little acid brush. Weller sells them, but a little use and the plastic handle melted on me. So I pulled the shaft of the brush and made a wooden handle for it. 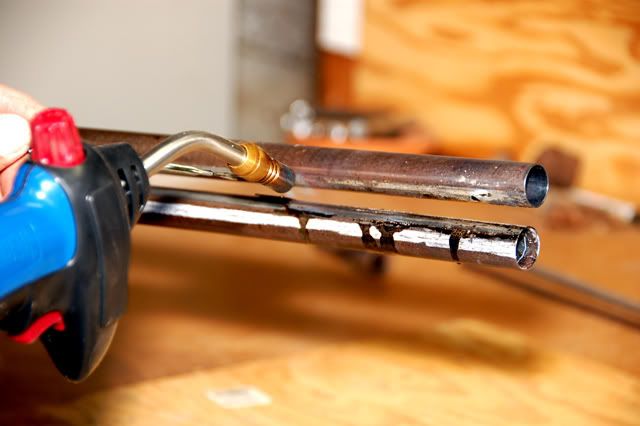  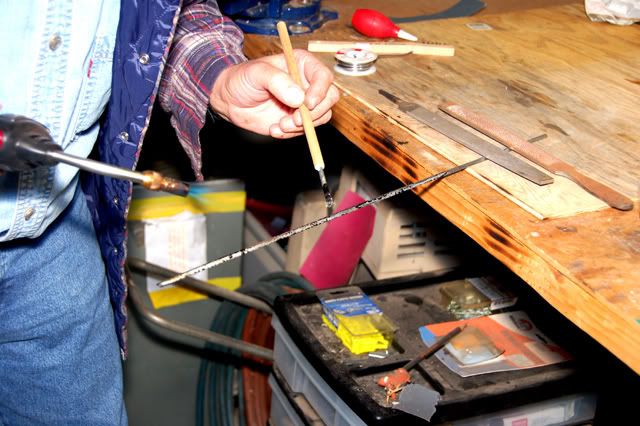 Had to break here due to limits of posting. Please let me finish before posting comments.
Last edited by Chuck H; 01/07/08 01:05 PM.
|
|
|
|
|
Joined: Feb 2004
Posts: 13,883 Likes: 21
Sidelock
|
|
OP
Sidelock
Joined: Feb 2004
Posts: 13,883 Likes: 21 |
Once you've tinned the ribs and barrels (BTW, I tinned all of the area between the ribs and the entire undersides of the ribs for corrosion protection), they need to be thoroughly cleaned of the acid flux residue. I used lacquer thinner and a new small stainless steel brush and some ScotchBrite along with some water and baking soda. Use compressed air between the short rib and forend lug (I didn't remove these during the stripping process since they were tight. Then the tinned joint areas need to be fluxed with rosin flux. I used a common paste type. Put it on both surfaces. Here's where you need to insert the barrel spacers. They should be previously tinned and coated with rosin flux. Mark on the outside area of the barrel where they are located. This is where you want to place the wire to draw the ribs down. The spacers serve to prevent you from bowing in the barrels. This is a picture of the 20/28g conversion I did a few yrs ago. The spacers are longer than most and more numerous because I was doing some regulating without the ribs attached due to the severe convergence from a larger dia breach than most 28 ga guns have. Anyway there's the basic concept of spacers.  Then wire on the top rib only, and only right near the breach end where it comes together with the stub rib that is part of the breach lug assembly. Use bars of steel bar or aluminum for wiring the rib to distribute/push the load down on the rib. One bar should bare against the short underrib. Also, wire the forend lug if you hadn't removed it during stripping, just to make sure it doesn't fall off in this process. With just the back of the rib tied down, line up the full rib with the stub rib side to side, then push it hard against the stub rib. You should have tinned this joint as well. There'll likely be some solder that won't let the two ribs come together tight. Don't fret. Heat the area until the solder starts to flow in the stub rib/full rib area and push the rib back with a stick or other handy object while the solder is fluid in the aft joint. It should go tight. Let the assembly cool. 
Last edited by Chuck H; 01/07/08 01:18 PM.
|
|
|
|
|
Joined: Dec 2005
Posts: 720
Sidelock
|
|
Sidelock
Joined: Dec 2005
Posts: 720 |
I hope its ok to post now and I didn't mess up the tutorial. Nice job, one of the best posts I have read on this forum.
How many hours do you think it took from start to finish?
Thanks for sharing, excellent stuff.
|
|
|
|
|
Joined: Feb 2004
Posts: 13,883 Likes: 21
Sidelock
|
|
OP
Sidelock
Joined: Feb 2004
Posts: 13,883 Likes: 21 |
Last edited by Chuck H; 01/07/08 03:30 AM.
|
|
|
|
|
Joined: Feb 2004
Posts: 13,883 Likes: 21
Sidelock
|
|
OP
Sidelock
Joined: Feb 2004
Posts: 13,883 Likes: 21 |
Also, backing up one step, you need to put the spacers between the barres in place. I made new ones because of the others being multi piece shims and corroded. Tin them as well and flux them. I only had two spacers evenly spaced. Once the ribs are in place and set in the barrels as you want them tighten the wire. Be careful. You can generate significant forces when you tighten wire. Check and double check the position of the ribs. Once satisfied, next is the leveling of of the barrels (ensuring no twist). Check them with two straight edges (see pics)  
|
|
|
|
|
Joined: Feb 2004
Posts: 13,883 Likes: 21
Sidelock
|
|
OP
Sidelock
Joined: Feb 2004
Posts: 13,883 Likes: 21 |
When it's all tight and everything is as you want, barrels level and all, then you start heating. I dunno if there is a proper end to start on, but I tried it from the muzzle and from the breach on the other side. No difference I could tell. Get another clean stainless brush and put some rosin flux on it to brush the fillet between the rib and barrel. I used rosin core solder of .030 dia. to aid in filling the fillet a little. Then brush the excess out of the way. Keep moving, doing a few inches then going over to other side of the rib. Go all the way down the rib that is up this way. Then flipp it over and do the other rib the same way. Get to the muzzle and fill the gaps there with the barrels slightly tilted muzzle down. You're done! Let them cool. Clean up with a solvent. Ring check them. Pat yourself on the back.   I may have forgotten something and I'll correct as needed. For cleaning/polishing up the barrels, follow the methods you would for blueing prep. If you're doing this job, you are undoubtedly familiar with that!
|
|
|
|
|
Joined: Feb 2004
Posts: 13,883 Likes: 21
Sidelock
|
|
OP
Sidelock
Joined: Feb 2004
Posts: 13,883 Likes: 21 |
This job will take you quite a bit of time. Allow a lot of time for this the first time you do it. Stripping is quick. Tinning the first time may be a bit scary on the barrels the first time. That means you go slower. So, maybe you'll want to do all this over a few days like I did. Do some work then go away for a while and think about your next step. This job took me all weekend with breaks for taking down the Christmas lights and tree and such.
|
|
|
|
|
Joined: Oct 2005
Posts: 430
Member
|
|
Member
Joined: Oct 2005
Posts: 430 |
that is amazing Chuck, good work!
|
|
|
|
|
Joined: Apr 2002
Posts: 6,812
Sidelock
|
|
Sidelock
Joined: Apr 2002
Posts: 6,812 |
I like the "winding sticks" for insuring that the axies of bores are in same plane. All other things being precise (such as outer surface being concentric to bores) this should be all one needs for regulation in elevation, but is it always?
jack
|
|
|
|
|
Joined: Feb 2004
Posts: 13,883 Likes: 21
Sidelock
|
|
OP
Sidelock
Joined: Feb 2004
Posts: 13,883 Likes: 21 |
Jack,
The leveling of the tubes is the traditional method. I know of no other method.
|
|
|
|
|