|
S |
M |
T |
W |
T |
F |
S |
|
|
|
|
1
|
2
|
3
|
4
|
|
5
|
6
|
7
|
8
|
9
|
10
|
11
|
|
12
|
13
|
14
|
15
|
16
|
17
|
18
|
|
19
|
20
|
21
|
22
|
23
|
24
|
25
|
|
26
|
27
|
28
|
29
|
30
|
|
|
|
|
4 members (Dave Weber, desullivan, 2 invisible),
485
guests, and
5
robots. |
|
Key:
Admin,
Global Mod,
Mod
|
|
|
Forums10
Topics40,019
Posts569,462
Members14,653
| |
Most Online19,682
Mar 28th, 2026
|
|
|
|
Joined: Jan 2006
Posts: 15,465 Likes: 89
Sidelock
|

Sidelock
Joined: Jan 2006
Posts: 15,465 Likes: 89 |
Very nice Tutorial....I remember now why I gave you a 5 star rating.
Don't the ribs play a big part in the barrel regulation ?
And kind of help you "get the barrels back like they were".
|
|
|
|
|
Joined: Feb 2006
Posts: 3,862 Likes: 123
Sidelock
|
|
Sidelock
Joined: Feb 2006
Posts: 3,862 Likes: 123 |
Chuck, the photos and the dialog are great. Were both ribs loose or did you just decide to do both anyway? Very nice job and keep us posted on the final results.
David
|
|
|
|
|
Joined: Jan 2006
Posts: 15,465 Likes: 89
Sidelock
|
|
Sidelock
Joined: Jan 2006
Posts: 15,465 Likes: 89 |
He did it the only way it should be done.
|
|
|
|
|
Joined: Jan 2006
Posts: 9,922 Likes: 545
Sidelock
|
|
Sidelock
Joined: Jan 2006
Posts: 9,922 Likes: 545 |
With Chuck's permission, I started another PictureTrail album 'Rib Re-lay with Chuck and Dewey' http://www.picturetrail.com/gallery/view?p=999&gid=18691676Pics of Dewey Vicknair's work are already up, and I'll get Chuck's added shortly. There is a limit to the text that can accompany pics, so the instructions will be on the Intro page with Step 1, Step 2, pics. Unfortunately, the PictureTrail text format is a pain; without paragraphs, headings, bolds, etc.  We've now got some nice 'How to' albums with the 'Repairs and Restorations', 'Butt Transplant', 'Stock Bending', 'LC Smith Disassembly and Reassembly', 'LC Smith Wonderous Wood Refinish', 'Long Cracked Smith Repair', and 'Flanigan's Damascus Restoration' albums. Many thanks to Chuck, and all the contributors!!
Last edited by revdocdrew; 01/07/08 08:48 AM.
|
|
|
|
|
Joined: Jan 2002
Posts: 5,983
Sidelock
|
|
Sidelock
Joined: Jan 2002
Posts: 5,983 |
WOW! You're very talented(and brave, too). Is that the Parker you bought when we were at the Beinfeld show together? Great post and terrific pictures, as always. Have to ask. Does it still shoot to same POA?
Thank you for a very outstanding post.
jl
> Jim Legg <
|
|
|
|
|
Joined: Jun 2005
Posts: 845
Sidelock
|
|
Sidelock
Joined: Jun 2005
Posts: 845 |
Chuck, You are a brave man, My 1st "Strip and attempt to Re-Lay' was a miserable, miserable, Failure! It ended up in a package, and was mailed to Nubs Fashingbauer,Lac du Flambeau, Wis.(1968) When he returned the Finished Job, his letter told me to Stay cutting Wood,,, I did attempt it one more time,on my 2nd attempt at'Sleeving"..after the ribs twisted like a corkscrew,molten tin dropped on to the sleeping Dog,(Vet bill $65.00..1969 $$$s)The 'Then Wife, opened up with a fire extinguisher when the wood floor 'Burst into flames' as balls of solder dropped into a mess of french-walnut shavings.You have my admiration for your achievement in this world of Gunmaking! (I wonder if any of the "Pro's" will comment on your Job??) cc/dt
|
|
|
|
|
Joined: Jan 2006
Posts: 9,922 Likes: 545
Sidelock
|
|
Sidelock
Joined: Jan 2006
Posts: 9,922 Likes: 545 |
Chuck: I don't understand this sentence
"You'll need to tin using acid flux. I found acid core solder and well as having some acid flux around."
|
|
|
|
|
Joined: Feb 2004
Posts: 13,883 Likes: 21
Sidelock
|
|
OP
Sidelock
Joined: Feb 2004
Posts: 13,883 Likes: 21 |
Jim, No, this gun is the pretty one I just got back from restoration in December and used it on that phez hunt in Blythe. I shot some pics of it just before I took it apart. It came back with a little crack. I was really disappointed. I just re-layed the ribs lastnight so I haven't shot it yet. I've regulated the 20-28 conversion this way for twist several times while changing convergence and it works fine. I believe this is the way everyone regulates for twist. I did not change convergence, so that should be the same POI. Here's some pics before.      You can see the rust where it delaminated about 3" back from the muzzle. From the outside it appeared to be less than an inch.  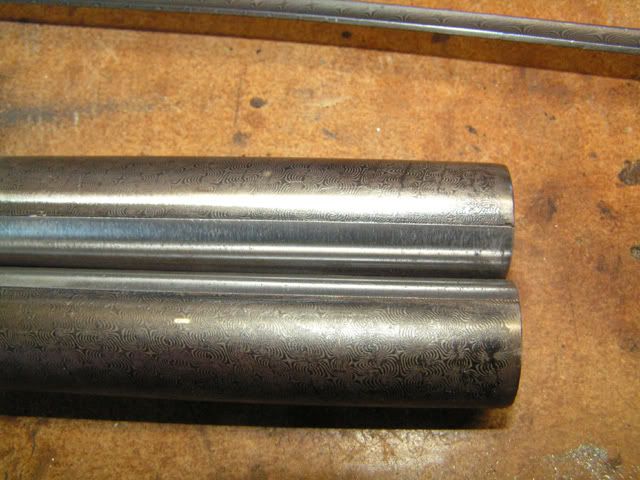 It cleaned up quickly with no pitting. One thing I did was to tin the whole suface between the ribs. When I stripped it, this gun was tinned only on the joint surfaces. I had stripped a LC for that 20-28 conversion a few yrs ago and recalled how they had fully tinned between the ribs for corrosion protection. Drew, There are rosin based fluxes and acid based fluxes. Steel is nearly impossible to tin with rosin flux. It requires an acid flux to get the solder to flow and stick. But acid flux residue cannot be left in between the ribs. So, you tinn all the parts using an acid flux. I used Brownell's Comet acid flux and acid core solder. Once all parts are tinned with the acid flux, all residue of the flux must be cleaned. Then, a rosin flux can be used because you are simply joining solder to solder. Rosin flux residue can be left in between the ribs without concern for corrosion.
|
|
|
|
|
Joined: Dec 2001
Posts: 3,604 Likes: 12
Sidelock
|
|
Sidelock
Joined: Dec 2001
Posts: 3,604 Likes: 12 |
Here is the text of a similiar question I posted on this BBS a long time ago. The parts in bold are Oscar Gaddy's replies to my questions. I did relay the ribs and to date have made no further progress on the restoration.  I see a comment concerning a child on the way. My girls will be 5 & 7 next month.  The 1912 Ithaca Flues 1 1/2 Grade I bought last summer is in need of some TLC.
I recognized from the beginning this gun was a money pit. Damascus barrels, loose rib, stock cracked. The seller should have paid me to take it. But it comes from the small town I was born and raised in, and the American Flag Damascus is beautiful.
But it has a few problems. The most noticeable being a loose top rib, and a loose forend lug.
My original intention was to send it to someone like Kirk Merrington or Keith Kearcher to have the ribs re-layed and the barrels re-colored.
The reality of a new child on the way, Christmas, and a lower than expected income this year lead me to the possibility of doing the relaying myself.
Is there a book somewhere that cover's this process, if not can anyone help me with the following questions?
1) Is this something I should even consider. (I am a "skilled" technician, and have a good background in mechanics and such.)
2) With the dovetailed lug, can I leave the barrels as a unit to strip the ribs, or is complete disassembly needed? Also the rib extension for lock-up is part of the top rib, and what problems can I expect with it?
3) Heat source??? Propane torch?? Acetyline(sp?) turbo torch??(Not oxy-acetyline) MAPP Gas torch?
4) Type of flux?? Brand names would be helpful.
5) Type of solder?? Brand names would be helpful.
6) What to clean the barrels with before starting the relaying?
7) Do I need to put the barrels in a jig, and do need to worry about changing the point of impact. I have seen pics of barrels wired together with the ribs held down with old cartridge cases and other similiar items. Is this as "simple" as it appears.
8) At what point does the heat become an issue as to the strength of the barrels themselves? Obviously I do not want to do this if it begins to affect the safety of my Nitro Powder Proved barrels.
9) If I am careful in my disassembly and work, and I feel that I am in over my head after starting, is there any reason someone with more skill could not finish the project?
10) Any other questions I should have asked and didn't?
11) Should I save my money and send the gun to Kirk or Keith??
I do not think this is rocket building. I have confidence in my mechanical abilities, I just need some guidance to get me going. Then I can re-read Oscar's articles on re-browning the barrels.
I would also like to do a pictoral step by step for this project like I did when I made the 12ga sleeves for my 10ga.
Here is the only pic I have of the rib at this time. If you look closely you can see how loose it is.
Thanks for any help,
Mike
*********
Quote: Oscar Gaddy
The following is what I have posted previously in answer to questions like yours. Hope this helps.
This is a rather complicated procedure, and to do it properly you should have all of the needed equipment. If you are only going to try to resolder a short loose section of the bottom or top rib, it is sometimes possible to raise the rib slightly and clean as much of the old solder and flux as possible from both the barrels and the rib. Paste solder, a mixture powdered solder and liquid flux, is then brushed into the area under the rib. The
rib is wired in place and heated to melt the solder. This is not a very good way to do it as you will never get the rib completely resoldered and gaps will exist at places where the solder paste is impossible to insert.
The best way is to completely remove all ribs, forend lug (loop) etc. The way that I do it is as follows. After the ribs are removed, the areas on the barrels under the ribs are then completely cleaned of old solder, flux, rust etc and are retinned as are the ribs.
This tinning is done with acid flux solder as this is the only flux that will allow solder wetting of the steel. Care must be taken not to move any of the shims between the barrels or barrel regulation will be changed. All parts are then completely and thoroughly rinsed in hot water to remove all traces of the acid flux. If this flux is not removed, there is the possibility of rusting occuring under the ribs and eventual loosening of the ribs. The tinned areas to be soldered are then coated with liquid rosin flux (obtainable from electronic supply stores), the ribs are laid in place and wired to the barrels. I use re-bar steel tie wire that is available from most hardware stores. A 2 to 3 foot section of this wire is doubled and then wrapped two times around the barrels and ribs and twisted tight. Cut steel nails are then driven between the ribs and the wires to further tighten the clamping action of the wire. A section of rosin fluxed solder ( .050 in. diameter) is then laid beside the ribs and stretched tight and pushed next to the rib to be soldered. The entire barrel assembly is then placed on a pipe burner and slowly heated up until the solder melts and flows. This allows the barrels to increase in temperature uniformly and prevent warpage. Extra solder is fed into areas where needed. The barrel assembly is then allowed to cool slowly to room temperature. There will be lots of excess solder that needs to be cleaned up which is a very slow and laborious task. The barrels are then hand polished and reblued.
*********
I will be completely removing the ribs. The top rib is loose from the chamber area to within 6" of the muzzle. It would appear to be all or nothing.
1)What can I expect the shims to look like. Until now I thought the ribs were the shims, except for the little
triangles at the muzzles.(Keels?)
2)Do I need to jig up the barrels before removing the ribs to make sure nothing moves? Do I leave the barrels "assembled" with the underlug still attached and the muzzles held together? In other words, do I work on the barrels as an assembly, not individually?
3)How do I clean the old solder and such off?? Steel wool?? Emery cloth??
4)After soldering, do I use the same materials to clean off the excess solder??
5)What is a pipe burner?
6)I think the whole problem with these ribs started with the forend lug. It has alot of soft solder around it now, and it is coming loose. I believe someone attempted to reattach it at some point and loosened the ribs. How do I reattach it to prevent myself from doing the same thing??
Thank you very much Oscar. I was hoping you were still perusing the board and could help me out.
Quote: Oscar Gaddy
1) The shims are thin pieces of steel (.1 to .2 inches thick) that are soldered between the barrels to provide
some stiffness to the assembly and to allign the barrels for proper regulation. There are usually 2 to 3 shims
located between the muzzle and the forend lug.
2) I use spring loaded clamps (the ones that look like giant alligator clips) to hold the barrels in place while
removing the ribs and tinning. You will need to remove the forend lug to clean up the tinning, but the rear (main)
barrel lug is hard soldered (brazed) in place as are the barrels at the breech so they will not move at that point.
3) Most of the old solder can be removed by heating with a torch and wiping with steel wool and/or a cloth.
You will then probably need to sand some areas ( or all of it) depending upon the condition of the surfaces
under the ribs. You then re-tin with acid flux and solder. Do not forget to completely wash the areas with hot
water after tinning.
4) After soldering, you should not attempt to heat the barrels again or you will loosen a rib and undo all of your
work. You will need to physically remove all of the surplus solder that it set up by scraping and sanding.
5) A pipe burner is a long iron gas pipe with numerous holes drilled along the pipe with a gas injector at the end
to provide a linear flame. They are used to heat long rectangular tanks for blueing operations.
6) You attach the forend lug the same way that you attach the ribs by wiring it into place after it is tinned. I
sometimes also use paste solder for the lug also. The short bottom rib behind the lug will automatically position
it properly along the barrels.
Relaying Shotgun Ribs
Materials:
Baling Wire
Cut Nails
Liquid Rosin (Electronic Supply Store)
Resin Fluxed Solder (.050" Diameter)
Spring Loaded Clamps
Paste Solder (Powdered solder and liquid flux)
Pipe Solder
1) Clean old solder, flux, and rust from barrels.
2) Re-tin with acid flux.
3) Rinse flux of COMPLETELY with HOT water. (Will cause rust if done improperly.)
4) Coat parts to be soldered with liquid rosin flux.
5) Lay ribs and forend lug in place. Wire in position with baling wire and cut nails.
6) Lay rosin core solder along both sides of top rib. (Feed in extra solder as needed.)
7) Heat slowly with a pipe burner.
8) Let cool to room temperature.
9) Clean off excess solder by hand (No heat.) and reblue-brown.
I hope this is helpful. Oscar was incredibly giving of his hard earned knowledge and a chance to share it again was to hard to pass up. In searching for this on my hard drive I also found his post on barrel blueing/browning if anyone ever asks that question again.
Mike
|
|
|
|
|
Joined: Jan 2006
Posts: 9,922 Likes: 545
Sidelock
|
|
Sidelock
Joined: Jan 2006
Posts: 9,922 Likes: 545 |
Thanks Mike and I'll add that to the PictureTrail album and Word document.
|
|
|
|
|
