|
S |
M |
T |
W |
T |
F |
S |
|
|
|
|
1
|
2
|
3
|
4
|
|
5
|
6
|
7
|
8
|
9
|
10
|
11
|
|
12
|
13
|
14
|
15
|
16
|
17
|
18
|
|
19
|
20
|
21
|
22
|
23
|
24
|
25
|
|
26
|
27
|
28
|
29
|
30
|
|
|
|
|
Forums10
Topics39,996
Posts569,199
Members14,653
| |
Most Online19,682
Mar 28th, 2026
|
|
|
|
Joined: Aug 2004
Posts: 411
Sidelock
|
OP

Sidelock
Joined: Aug 2004
Posts: 411 |
Chuck H. Would you explain the use of strain gauges in industry?
|
|
|
|
|
Joined: Feb 2004
Posts: 13,883 Likes: 21
Sidelock
|

Sidelock
Joined: Feb 2004
Posts: 13,883 Likes: 21 |
Bill,
'will be glad to do what I can. I attempted this somewhat in vain several years ago when naysayers challenged my results. But, I'll give it another go a little later this morning after coffee. I found this at 1:30a.m. and had to go read the other thread to get the context of your request.
Sleepily
Chuck
|
|
|
|
|
Joined: Feb 2004
Posts: 13,883 Likes: 21
Sidelock
|

Sidelock
Joined: Feb 2004
Posts: 13,883 Likes: 21 |
No coffee yet, but I'll give this a go. I'm no instrumentation engineer but, I've been around it a bit, albeit many many years ago. My wife should actually be doing this, as she is actually a test engineer and uses these devices regularly. Those of you that know better, please be gentle.
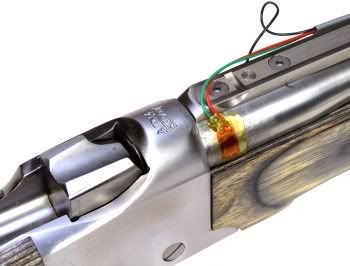
The strain gage is a thin piece of plastic. There is a super thin electrical circuit laminated in the gage that is energized with very small amount of voltage and measured on the output side of the circuit. When they stretch/compress, they change the resisitance of the circuit and the output voltage changes in a predictable and highly repeatable level. Strain gages are calibrated individually, I assume by stretching them a predetermined amount and measuring the change in output voltage. It is this technology that many electronic scales and other electronic force measurement devices use.
Metals stretch and compress then return to shape. This is known as elastic deformation. If metal deforms too much it does not return to the original shape and it's called "plastic deformation" or "yielded", past the yeild point, etc.. What we're interested in on our guns is elastic deformation. Each time you fire your gun, the barrel expands, the frame opens up a bit, etc.. We want to measure how much the barrel expands around the cartridge and then convert that to pressure of the cartridge. Kind of a ass backward way for a typical engineering project. Normally, an engineer knows the metal composition and strenth and fatigue characteristics and then wants to gather strain data and convert it to stress data. Stress is a measurement of applied force over an area of the metal. For example, a 1 square inch bar of metal stretched with 35,000 pounds would have 35,000 psi stress. An engineer may know that his steel being tested can sustain essentially unlimited cycles of stress up to say 35,000 psi without fatigue cracking. If his part will see a high number of cycles, he will want to stay below a certain stress level known to take unlimited cycles without cracking, just like we do with barrels.
With Bill's setup, the barrel wall is measured accurately in the location he wants to measure pressure. The inside diameter of the chamber is measured at that location, as well as the outside diameter. The wall thickness and diameters are input to a program and when the gun is fired, the device measures the stretch of the area and then converts it back to the force required to stretch it that much.
The strain gage only works accurately because metals behave very predicably. They stretch a known amount under a given load. Steels of a variety of alloys behave very similarly to each other. That is why we can stick a straingage on a gun of somewhat known steel alloy and have it be accurate.
So, a recap.
Strain gages measure stretch. They are calibrated individually by the maker by stretching them and measuring voltage change. We glue them on the chamber. they measure the stretch, then the device Bill has calculates the internal pressure required to stretch the chamber that much.
I either forgot a lot of stuff or gave too much info for some.
|
|
|
|
|
Joined: Mar 2011
Posts: 3,044 Likes: 137
Sidelock
|

Sidelock
Joined: Mar 2011
Posts: 3,044 Likes: 137 |
WOW Chuck. Thanks for taking the time to explain this complicated subject in layman terms. I had no clue what a strain gauge was until I read your eloquent explanation. Thankyou!
Socialism is almost the worst.
|
|
|
|
|
Joined: Nov 2005
Posts: 4,598
Sidelock
|

Sidelock
Joined: Nov 2005
Posts: 4,598 |
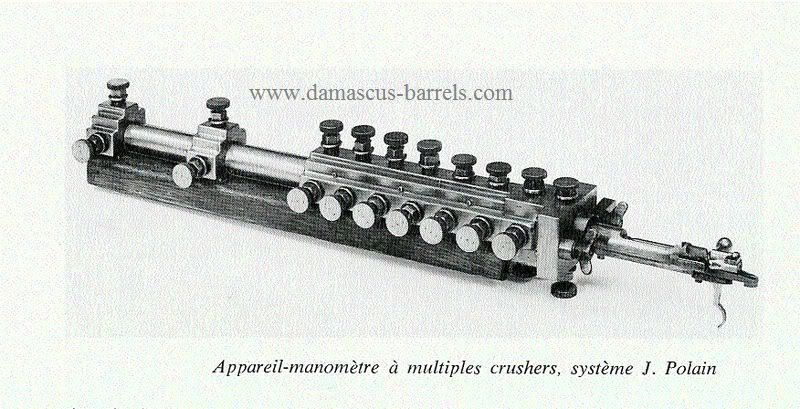
Not to detract in any way from Chuck's excellent post. Oehler's description of their system http://www.oehler-research.com/wizard.htmlModern gauge.  By 1933 Dupont was using piezo gauges attached to oscilloscopes. They used cameras to photograph the pressure curves displayed. The photo's were printed, then the data was transposed by hand to run the formulas so they could determine the pressure. Crusher units in use from 1895 or so. This is currently on exhibit in the Curtis museum in Liege.  After each firing the lead had to be removed and measured. Pete
|
|
|
|
|
Joined: Jun 2006
Posts: 3,369 Likes: 480
Sidelock
|

Sidelock
Joined: Jun 2006
Posts: 3,369 Likes: 480 |
Nicely done Chuck.
I would caution anyone reading this to not use this information to solve the wrong puzzle.
It is purely a means to measure specific chamber pressures within a known chamber/barrel structure.
As long as everyone doing these tests is using the same technique, error would reduce to calibration method. Which would only matter in comparison, not in individual application.
William's measurements (as long as performed consistently) can be different than Chuck's or Tom's, but should only differ by the zero points each uses.
I did not like the inference that all steel alloys behave so similarly, I felt that was misleading. It would imply that early fluid steel barrels behave substantially similar to modern vacuum arc steel barrels. At least by hopeful inference.
I'm not so sure that is applicable here.
So, the test fixtures by virtue of modern metallurgy can be seen to behave similarly, holding that variable approximately at 0 for testing purposes, but I don't believe anyone wants to mistakenly imply that about old barrel steel alloys.
Yes?, No?, did I misread?
Out there doing it best I can.
|
|
|
|
|
Joined: Nov 2008
Posts: 585 Likes: 50
Sidelock
|

Sidelock
Joined: Nov 2008
Posts: 585 Likes: 50 |
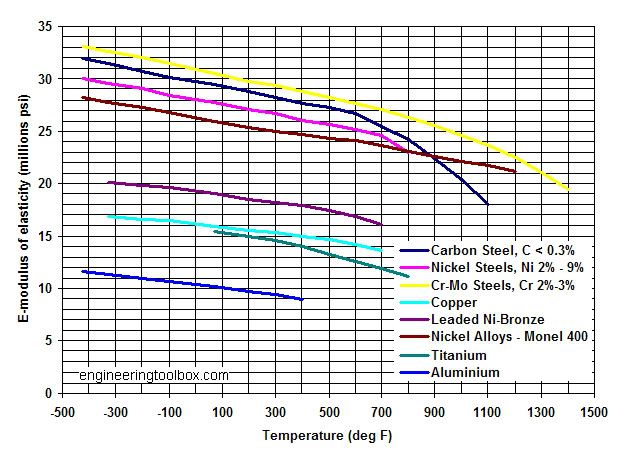
Weird thing is, modern steel and early steel do behave substantially similar because all alloys do indeed have the same modulus of elasticity (around 29,000,000 psi).
Stress = strain x modulus of elasticity.
An weaker steel will fail at a lower strain. If one subjected modern barrels and early barrels of identical geometry to identical pressures (stresses) the strain readings would, in theory, be identical. A barrel (or anything) composed of stronger steel can "stretch" more before it fails.
Last edited by RyanF; 06/03/11 11:38 AM.
|
|
|
|
|
Joined: Feb 2004
Posts: 13,883 Likes: 21
Sidelock
|

Sidelock
Joined: Feb 2004
Posts: 13,883 Likes: 21 |
Clap, I had tried to separate any discussion about old barrels and their steel capabilities, since the properties are undoubtedly variable and somewhat unknown, within some educated guessing bounds. To be clear, I believe Bill is using a modern gun to take the measurements. All, That's where the use of the strain gage data comes in. It's up to the user of data to apply it appropriately. The issue with these old guns is: we don't know exactly what each of our respective gun barrels is made out of, nor it's fatigue and strength properties. We, collectively, have some information on common cartridge pressures of the era for our guns. Then we are taking cartridge pressures we gather from whatever source and making a determination if we want shoot them in our guns. So, splitting hairs on whether a pressure value acquired is 7000 psi or 7500 psi is small potatoes when you consider that you don't know what your gun is made out of nor it's fatigue or strength properties, nor do you know how many cycles (firings) at what stress level has occurred in that gun (who knows how many SAAMI loads were fired before you got it?). It's all a WAG and therefore people should be conservative. I didn't want to over complicate this discussion, but it's almost unavoidable to get into details. Here's a modern metals modulus chart. There is variation of steel, it's just small in the scheme of what it means to a stress calculation from a strain gage. I believe the device Bill is using, has built-in firmware which has accomodated chromoly steels common to guns of today. Since Bill's gun is likely a modern H&R single shot or similar, I'd say the device is probably pretty well set to give good data if the chamber measurements are done accurately. 
Last edited by Chuck H; 06/03/11 11:43 AM.
|
|
|
|
|
Joined: Aug 2004
Posts: 411
Sidelock
|
OP

Sidelock
Joined: Aug 2004
Posts: 411 |
If you wish to see what I am using,Google Pressure Trace and there is an explanation and you can download the program.Of course,the device costs.I am on my second one.The first directly wired to the laptop; the second,by Bluetooth.Been at it for about 7 years.I compared to pressures that I got from Armusa and they were the same.First posted 7 years ago and got the same skepticism.Will I not ever learn?
|
|
|
|
|
Joined: Jan 2002
Posts: 2,522
Sidelock
|

Sidelock
Joined: Jan 2002
Posts: 2,522 |
William,
So when I asked how you calibrated your system the response that you didn't calibrate was misleading. You at least checked your calibration to known pressures provided by a manufacturer so you have some verification of the actual values over that part of the pressure range your system will encounter. If you haven't seen an industry standard gun, you might find that interesting. Looks nothing like a firearm. I would be careful with providing data to others who might rely upon the data for safety - you could be exposed to significant liability.
|
|
|
|
|