|
S |
M |
T |
W |
T |
F |
S |
|
|
|
|
1
|
2
|
3
|
4
|
|
5
|
6
|
7
|
8
|
9
|
10
|
11
|
|
12
|
13
|
14
|
15
|
16
|
17
|
18
|
|
19
|
20
|
21
|
22
|
23
|
24
|
25
|
|
26
|
27
|
28
|
29
|
30
|
|
|
|
|
2 members (GETTEMANS, welder),
386
guests, and
5
robots. |
|
Key:
Admin,
Global Mod,
Mod
|
|
|
Forums10
Topics40,020
Posts569,562
Members14,655
| |
Most Online19,682
Mar 28th, 2026
|
|
|
|
Joined: May 2004
Posts: 617 Likes: 1
Sidelock
|

Sidelock
Joined: May 2004
Posts: 617 Likes: 1 |
you can recolor an action at the Brownells prescribed 1450F, but you run a much higher risk of warpage, and I mean much higher! To what temp do you recommend heating? If one goes much below this 1450°F they will drop out of the critical temperature range of the steel & hardening will not take place. This would of course reduce the possibility of warpage, but would also leave the action in a near annealed state. I personally would not want to give up that hard skin on one of my guns, even for perfect colors. When steel is quenched "Suddenly" from a point above it's critical temp, there will "Always" be a risk of warpage. So far I have not been willing to take that risk, so my guns remain un-re-colored. Gaddy's temps seem to work quite well, and produce a good hard "skin" that passes the so called file test. 1350 max, quench at a stabilized 1250 or even 1100. Even the L. C. Smith engineers letter says 1600F, but a lot of those old timers did everything by eye. For example, the Parker letter between a retired Parker employee and a Remington guy who was having troubles recreating Parker like colors says that the retired Parker employee believed that his temps were too high at 1550, but he said that the coloring at Parker was all done by eye!

|
|
|
|
|
Joined: Dec 2001
Posts: 12,743
Sidelock
|
|
Sidelock
Joined: Dec 2001
Posts: 12,743 |
CM:
Let me pose a question & see if you have any input on this aspect. First it has been my understanding for the absorption of carbon & for hardening at the quench the steel has to be above it's critical temp. Since we are speaking here of re-hardening a steel previously carburized it is in efect already a high carbon steel on the surface, to the depth of the original case. However once the steel has been carburized the hardening effects are essentially those of any other carbon steel.
Quenching temps from an old (we are speaking of old techniques here) are as follows for various carbon steels;
.65-.80% C = 1450-1550°F
.80-.95% C = 1410-1460°F
.95-1.10% C = 1390-1430°F
1.10%+ C = 1380-1420°F
To obtain a "File Hardness" with a quench of 1250°F or lower certainly seems surprising to me. As the parts are already carburized & likely to a rather high % working in the extreme low end of the above ranges would seem plausible, but temps of 1350°F & down would seem questionable as to hardening.
Miller/TN
I Didn't Say Everything I Said, Yogi Berra
|
|
|
|
|
Joined: Feb 2004
Posts: 132
Sidelock
|
|
Sidelock
Joined: Feb 2004
Posts: 132 |
Here's a few photos of test parts of 1018 mild steel that were polished to 320 in most cases. 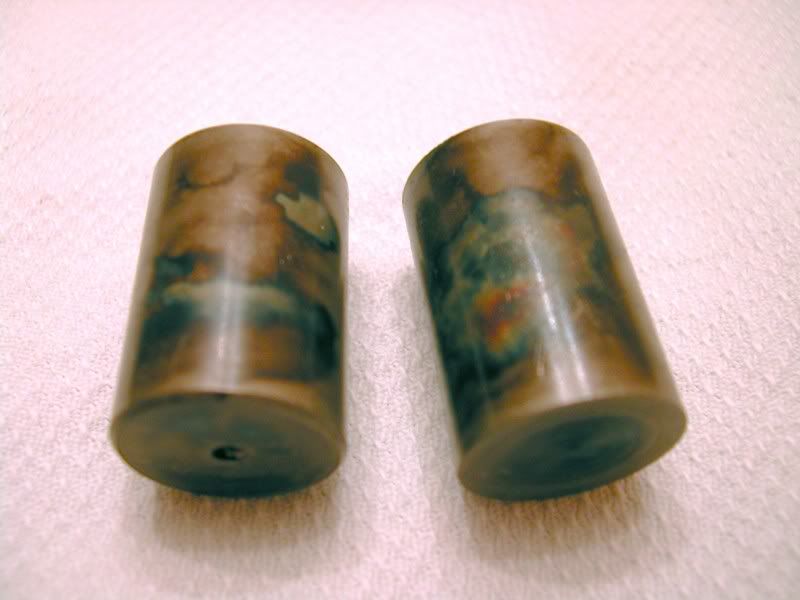    Here are a couple photos of the loaded crucible and the system I have my students use when doing the quench. We have pretty much settled on a mix of 50/50 wood to bone charcoal though we have used other ratios in testing. Our temperature is around 1400-1450 in the furnace and probably around 1375-1400 at quench time. 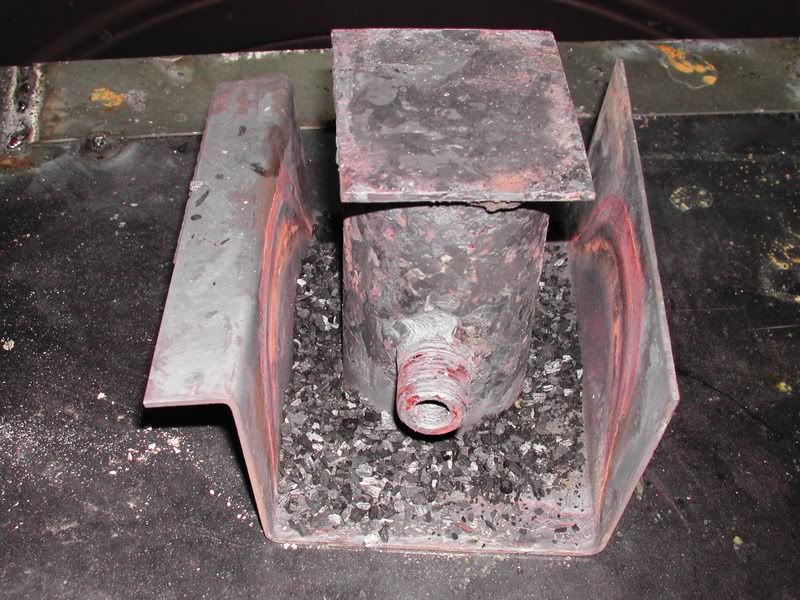 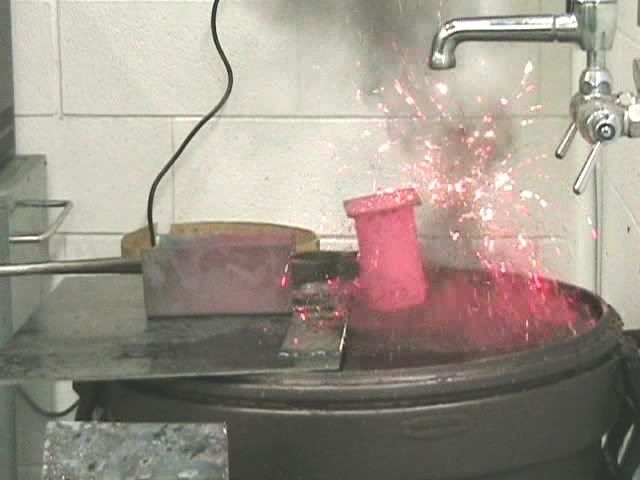 Lastly here is the video showing the whole operation. We were using the smaller furnace that Brownells sells, but we also have the larger one as well. I personally don't like the crucible that Brownells sells as it doesn't offer a really convenient way to dump the parts without exposing them to air (though others mileage could and probably does vary in this respect). The system that I use that is shown in the video involves minimal contact with the outside air as the crucible is only about 1/8" above the surface of the water when it is slid off the cover plate. [img] http://smg.photobucket.com/albums/v733/44-henry/?action=view¤t=ColorCaseVideo.flv[/img]
|
|
|
|
|
Joined: May 2004
Posts: 617 Likes: 1
Sidelock
|
|
Sidelock
Joined: May 2004
Posts: 617 Likes: 1 |
Wonderful Alex! The best way to learn about color case hardening is through experimentation (not with customers guns tho, hehe  ). Miller, Carburization is a diffusion controlled process. The longer the action sits in the crucible, the greater the carbon penetration will be and the higher the carbon content. This was taken from one of the machinist manuals out there(mind you it is describing a molten salt bath) Carbonnitriding starting with low carbon steel (SAE 1008): 1 hour @ 1425 to 1450°F results in a case .004" deep. 2 hours @ 1425 to 1450°F results in a case .006" deep. 3 hours @ 1425 to 1450°F results in a case .009" deep. 4 hours @ 1425 to 1450°F results in a case .011" deep. 1 hour @ 1600 to 1625°F results in a case .015" deep. 2 hours @ 1600 to 1625°F results in a case .021" deep. 3 hours @ 1600 to 1625°F results in a case .026" deep. 4 hours @ 1600 to 1625°F results in a case .030" deep. For example, compare 1 hour at 1425 to 1 hour at 1600 and youll notice that your steel will absorb much more carbon than if you had run for an hour at 1425. The old low carbon steels that many, if not all manufacturers used to make their actions are essentially non-hardenable. They simply absorb carbon on the surface, leaving a thin "case" to protect the outside, and a soft inner core that allows shock absorption and stresses. A longer "soak" in a carbon-rich environment will yield just as good of hardness (and colors as) if you ran it for a shorter period of time at a higher temp.
Last edited by CMWill; 09/10/08 10:37 PM.
|
|
|
|
|
Joined: Dec 2001
Posts: 12,743
Sidelock
|
|
Sidelock
Joined: Dec 2001
Posts: 12,743 |
CM;
Yes I understand that. I have been around case hardening, just not Color Hardening. In the machine shop where I worked we often actually did the carburization & the hardening in seperate operations. Other times all in one, depending upon circumstances. After that "Soak" though the "case" is no longer a Low Carbon Steel, but is now a High Carbon one. It now will respond to heat treating & this is what is done in the heating & quenching process. The core remains low carbon & does not respond to the quench to much extent & remains soft & ductile. Just the addition of carbon will of itself increase the hardness of the steel to some extent, but certainly not to that file hardness test unless heated & quenched. To obtain this result it must be above the critical temp for that steel & this would seem to drop but very little below 1400°F.
As you noted a 1hr soak at 1600° gives more penertration than a 4hr soak at 1425°. Drop much below that & my understanding is penertration will virtually halt. This too must be above that critical temp for effective penertration. From all data I have it would seem about 1350° would be about absolute bottom temp at the quench for effective hardening to take place.
In re-doing an action I am not certain it is necessary for any significant amount of penertration to take place. It would seem the carbon rich case is still there from the original carburization. Just enough surface penertrtion to provide the layer needed for the coloring, thus the higher temps (Or Long Times) necessary for deeper penertration would not be needed. As the part will have been annealed it will be necessary to re-harden & I can simply not see this taking place below 1350° bottom.
Miller/TN
I Didn't Say Everything I Said, Yogi Berra
|
|
|
|
|
Joined: Nov 2005
Posts: 4,598
Sidelock
|
|
Sidelock
Joined: Nov 2005
Posts: 4,598 |
Alex,
Thank you. Very nicely done.
Pete
|
|
|
|
|
Joined: May 2004
Posts: 617 Likes: 1
Sidelock
|
|
Sidelock
Joined: May 2004
Posts: 617 Likes: 1 |
Miller,
Just say we are square here, Im not trying to say you dont know anything about heat treatment or color case hardening. I dont want to offend anyone here, but rather share what I can and hope that somebody might have a use for it. Secondly, Im not a metallurgist and dont play one on tv. What Im sharing is from trial and error, experimentation, and mostly from reading everything I can on color case hardening. I understand why youre not a fan of re coloring guns. Many folks dont like it because its so risky (but much less if your not shooting for 1450), and Im a firm believer that it shouldnt be done unless completely necessary (at least on doubles, I could care less about those guns with levers and one barrel ;)) Either way, if you ever get a chance, get together a group of guns and compare how hard they are. Ive noticed that all guns have different levels of hardness, which leads me to believe that reaching that critical temp is not necessary for re coloring. I think you will find that many of the trades leading case coloring providers will do the same (although they wont tell you). Ive owned guns that were sent to Turnbull, Menk, Classic Guns, and a new screw slot file cut through the thin case and right into the soft metal of the under-tangs on all of them. Another example, I had two L. C. Smiths that I was experimenting with. Prior to annealing, the one was rock hard. I couldnt even touch it with a course file on the back end of the tang! (this might explain the engineers letter stating 1600F for Smiths, but I still cant believe that). The other smith was much softer, and I could cut into with emery cloth after a few strokes. They were less than 1000 numbers apart, both in similar shootable condition. That is what leads me to believe that the hardness that is achieved by carburizing at or above critical temp is not necessary for re coloring.
Alex, I have some stripped, scrap actions I can send you to experiment with if youd like. They are old hammer gun actions and wont require an ffl, but I can even send you some that arent as old and we can go through an ffl. Give me a PM if you, or anyone else is interested.
Last edited by CMWill; 09/11/08 09:07 AM.
|
|
|
|
|
Joined: Jan 2002
Posts: 474
Sidelock
|
|
Sidelock
Joined: Jan 2002
Posts: 474 |
CM,
I believe you are right that coloring can be done at low temps. After all, dark blue is reached at about 600°F and all the others are reached at lesser temps.
How else could Turnbull and others color a modern receiver made from 4140 or similar through hardening alloys? Most of them run around RC 30 or therabouts which corresponds to a tempering temp of about 1000°F. The heat treating procedure for 4140 is completely incompatible with conventional color case hardening of low carbon steel. Since all the colors can be produced well below that tempering temp., there is no problem heating and quenching as long as one does not exceed that temp. I think this is how the pros do it on a modern steel gun.
OB
|
|
|
|
|
Joined: Feb 2004
Posts: 132
Sidelock
|
|
Sidelock
Joined: Feb 2004
Posts: 132 |
I am by no means an expert in this area, but I do have a fair amount of experience with the bone and charcoal process. Some observations that I have made are that it is quite possible to get very good colors without actually getting the surface substantially hard. I did this last semester with a piece of 1095 that went in the quench at around 1250 and came out with beautiful colors, but it was soft enough to cut easily with a file. The problem is that if you are not hardening the surface you really aren't performing color case hardening. My research suggests that many older firearms had fairly superficial hardening, but they were still hardened. I have seen the site dealing with the Marlin restorer and find it very interesting, but I don't totally buy into his thoughts that these guns were quenched at these very low temperatures. I have found you can get very vivid colors at a temperature range that still hardens the surface, namely something over the critical temperature. At higher temperatures (over 1500 degrees) the colors start to diminish rapidly. I have never had a problem with warpage on the parts we have done, but if they are critical I make sure to block them appropriately. I cannot really imagine sending a rifle or shotgun action into the quench tank without some thought given to this possibility.
I am also a big fan of tempering the finished parts at 400 degrees for at least one hour following the quench. I think this helps in two ways, one it enhances the colors, and two, if by chance the part was a high carbon alloy it should help to prevent it breaking from excessive brittleness.
Will,
Thank you for your generous offer, but since I do most of my casehardening in a university lab with students I would not be able to work on firearms parts. Hopefully the information that I gather can be used by others in this area however.
Regards,
Alex Johnson
Last edited by Alex Johnson; 09/11/08 06:28 PM.
|
|
|
|
|
Joined: May 2004
Posts: 617 Likes: 1
Sidelock
|
|
Sidelock
Joined: May 2004
Posts: 617 Likes: 1 |
Im not exactly sure how much tempering the parts @ 400F for an hour does, for the most part it seems like all it really helps with is completely drying the action out. Id be hard pressed to believe that it actually reduced any residual stresses in the action(but maybe the small parts), simply because its not that hot. A good test would be to harden two parts, temper one at 400F, then see if there is a difference in hardness, breaking, flexing, etc. The L. C. Smith engineers letter says that they used to put the freshly quenched actions on top of the flipped over empty crucible to completely dry them out. Maybe this also serves as somewhat of a tempering process? Ive run test actions as hot as 1450 for two hours and quenched (exact same setup as Dr. Gaddy, sliding shutter system and all), and experienced minimal on-face warpage and minimal tang warpage, but, and heres the kicker, 2 out of ten had horrible (1/16" off face on one barrel) and horrible tang twisting and bending (down I believe). I highly doubt that any shop would be able to stay in business if their success rates were this poor. Anyways, as for properly blocking, this is extremely difficult to do and very time consuming (most specifically for doubles). Its sounds easy, but here is what goes on, and this is prior to shielding! On all double guns, you have a number of "areas" of concern when re coloring. The frame has two parts of concern, the "front" and "rear". The "font" area (water table and breech face) are rather large, making up the majority of any double guns action. (this is just box locks we're taking too, dont even get me started on sideplated guns). The "rear" of the action is the upper and lower tangs (very thin, and only attached to the frame in essentially one place each, and only attached to each by two screws usually). Step one is assemble the stripped and polished gun, blocking the hammer slots, etc with perfectly fit steel blocks, as well as perfectly fit screw braces (steel tubing) to prevent any of the tang screws from bending, and it also helps to keep the tangs in proper alignment. This does not however prevent the tangs from bending down (or up) simultaneously (or twisting left or right! which is not good when trying to put an action back in the stock and all of a sudden you have 3" of drop, are now cast off, and have a rather large gap at either the top or bottom of the stocks head depending which way the action was quenched). So, you can try to brace the tangs all you want, but your still risking a lot of warpage, and that is true at any temperature. Second is the "front" or actual frame. You have a large lug recess, which you can shape a piece of steel to nicely fit in. That does not however solve the issue of completely twisting the action at the breech, essentially destroying the gun because it is so off face. You can make up a jig, similar to the one Gaddy used (which can be noticed in his DGJ article. Its a massive block that sits in the lug, drilled and tapped for two screws to sit firmly against the face of the action), but this still does not necessarily put you in the clear because the breech can still twist in a number of ways away from the brace. That and you will lose colors where the brace touches the frame, something that you wont see on any of the "pros" jobs. You could even go "overboard" (there is no such thing when it comes to color case hardening) and custom machine something to integrate the locking mechanism of the gun or the rib extension, but no one in the trade could afford to spend this much time on every gun that needs to be color cased. That can also be proven by examining for example, a Turnbull, Menk, or Classic Guns recolor, and you will see colors surrounding every part of the action (most interestingly the breech face and water table, ie, no jigs or braces used there). Now I could be wrong and maybe they do spend hours making and modifying jigs for all of the different types of actions just so they can run at critical temp and hopefully prevent warping, but I doubt it simply because they would lose their asses on every job. So, one is left wondering how they achieve those results without sacrificing colors on those areas, and the answer is exactly that of which we all mentioned, lower temps. Just as you said Alex, many of the old frames out there that many of us shoot hundreds, if not thousands of rounds through a year were probably superficially "hardened". Here is a Sterlingworth I experiment with. Not exactly the right colors for a sterlingworth yet, so Ill re run it. Three runs so far (not counting the initial run it had at the factory) and NO warping, acceptable hardness, and the only thing Im not satisfied with is the colors yet.  
|
|
|
|
|


