|
|
|
S |
M |
T |
W |
T |
F |
S |
|
|
1
|
2
|
3
|
4
|
5
|
6
|
|
7
|
8
|
9
|
10
|
11
|
12
|
13
|
|
14
|
15
|
16
|
17
|
18
|
19
|
20
|
|
21
|
22
|
23
|
24
|
25
|
26
|
27
|
|
28
|
29
|
30
|
|
|
|
|
|
|
0 members (),
685
guests, and
6
robots. |
|
Key:
Admin,
Global Mod,
Mod
|
|
|
Forums10
Topics40,117
Posts570,742
Members14,671
| |
Most Online19,682
Mar 28th, 2026
|
|
|
|
Joined: Dec 2007
Posts: 7
Boxlock
|
OP

Boxlock
Joined: Dec 2007
Posts: 7 |
I just made myself a barrel wall thickness gauge similar to the Manson one. Anyone have a point of view on what the proper technique is to use one like this? My trials so far indicate that using it vertically and carefully finessing the barrel between the anvil and the indicator probe seems to work, but I don't have a control to verify the measurements. Any thoughts?
|
|
|
|
|
Joined: May 2004
Posts: 2,135 Likes: 59
Sidelock
|
|
Sidelock
Joined: May 2004
Posts: 2,135 Likes: 59 |
I am selling my manton gauge on ebay because of the flexibility of the rods. I could not get comfortable with the results.
I hope you made your rods thicker and stronger.
So many guns, so little time!
|
|
|
|
|
Joined: Dec 2007
Posts: 7
Boxlock
|
|
OP
Boxlock
Joined: Dec 2007
Posts: 7 |
I used 1/2 inch drill rod.
|
|
|
|
|
Joined: Mar 2002
Posts: 7,897 Likes: 666
Sidelock
|
|
Sidelock
Joined: Mar 2002
Posts: 7,897 Likes: 666 |
The late Oscar showed how he added a spring to the back side of the rod to hold it against the barrel better. I lost my old file of his post. Perhaps other here still have one to share. I find that vertical works best for me and hang the barrels from the ceiling and move the gauge around. The spring holds the rod fairly firmly against the inside of the barrel which makes measurements easier to do.
If you have any doubt about the results it is very hard to duplicate errors. If you get the same results repeatedly then you are most likely right. Try measuring with a set of calipers and make the calipers slightly off by say .004-.006 oversize. Then adjust, repeat and see how hard it is to repeat the same measurement even when you are trying. I am not saying that you can not be wrong but to be wrong repeatedly is very hard even when you are trying.
|
|
|
|
|
Joined: Feb 2004
Posts: 13,883 Likes: 21
Sidelock
|
|
Sidelock
Joined: Feb 2004
Posts: 13,883 Likes: 21 |
Rabbit had a good pictorial of the spring modification.
|
|
|
|
|
Joined: Apr 2002
Posts: 6,812
Sidelock
|
|
Sidelock
Joined: Apr 2002
Posts: 6,812 |
Did anyone save any of the many discussions of the "Gaddy spring" or the original description of the overhead suspension technique which Dr. Gaddy suggested? I've got a hardcopy of one of Gaddy's posts to a similar thread but no computer file. Without getting into the useful spring on the inner rod (maintains anvil contact with barrel wall), I'll provide the brief hint that the rec for use by the late Dr. Oscar Gaddy was a hook, cord, or chain on the yoke of the gauge for attachment to a screweye in an overhead joist, beam, door jamb or similar such that the gauge is freely suspended, barrel or barrelset handheld vertically and run up and down on the inner rod. I think it was Chuck H. who suggested that all steels have about the same deflection; i.e., mild steel round bar or "smith rod" will deflect no more than drill rod given the same section or diameter. There are variants with heavy external posts (large section iron pipe) which reduce deflection but the stiffness of the internal post is limited by the diameter which will fit thru customary choking of the various gauges. Chuck considered fabricating with carbon fiber composite rods to increase rigidity; I don't know the result of that project. bradhe, I think in the next couple days you'll get some descriptions of homebrewed WT gauges and perhaps some photos of gauges which incorporate the "Gaddy modification". I'll try to post a photo of mine in a few minutes.
jack
|
|
|
|
|
Joined: Apr 2002
Posts: 6,812
Sidelock
|
|
Sidelock
Joined: Apr 2002
Posts: 6,812 |
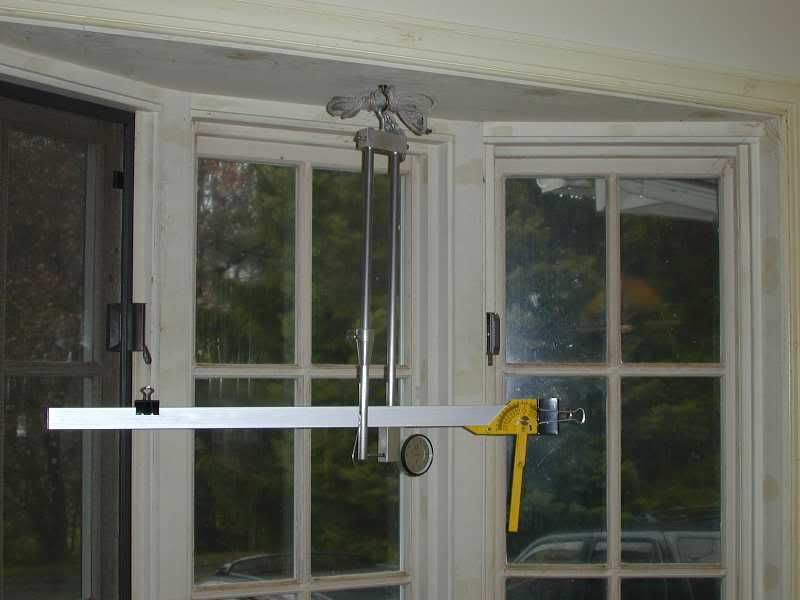 Sort of confusing as the aluminum straitedge balanced across the indicator mounting block is not part of the apparatus, but you can get the idea of Gaddy's method of employment. jack
|
|
|
|
|
Joined: Jan 2002
Posts: 1,160 Likes: 3
Sidelock
|
|
Sidelock
Joined: Jan 2002
Posts: 1,160 Likes: 3 |
That's good for spring illustration too on the left leg.
|
|
|
|
|
Joined: Jan 2002
Posts: 2,522
Sidelock
|
|
Sidelock
Joined: Jan 2002
Posts: 2,522 |
Rabbit, I am somewhat confused. It appears your setup would limit the measurements to about 10 inches from each end of the barrel. Is that approximately correct? If so, why not increase the length of the adaptor on the left side to about 18 inches so the entire bore on a normal shotgun could be probed?
|
|
|
|
|
Joined: Apr 2002
Posts: 6,812
Sidelock
|
|
Sidelock
Joined: Apr 2002
Posts: 6,812 |
Jerry, distance yoke to anvil (the bearing ball which the indicator plunger contacts) is 17" so it will plumb a 32" barrel from either end and overreach center 1" in theory. Hard to sculpt the yoke to avoid contact with some rib extension guns (16 and 20 ga.) so practically it reaches centerpt. on 32" from breech end. Might be a small "blind" spot on a 34" inch trap barrel with a Kerstner fastening; I can't remember. The conical stop collar does have to be removed or the depth is limited to approx. 15 1/2" depth on a 12 ga. I could do so by removing the setscrew in yoke, pulling the rod so that collar can slide off and replacing the rod in the yoke but have never felt the need as I have only 27<30" barrels with the exception of a 34" SBT. Graduations on the internal bar are ruffnready (MagicMarker tics at inch increments). As Christine points out, it also has the Gaddy "spring". Have closeup which I will post.
jack
|
|
|
|
|
|
|
