|
S |
M |
T |
W |
T |
F |
S |
|
|
1
|
2
|
3
|
4
|
5
|
6
|
|
7
|
8
|
9
|
10
|
11
|
12
|
13
|
|
14
|
15
|
16
|
17
|
18
|
19
|
20
|
|
21
|
22
|
23
|
24
|
25
|
26
|
27
|
|
28
|
29
|
30
|
|
|
|
|
|
|
Forums10
Topics38,445
Posts544,828
Members14,406
| |
Most Online1,258
Mar 29th, 2024
|
|
|
|
Joined: Aug 2018
Posts: 305 Likes: 7
Sidelock
|
OP

Sidelock
Joined: Aug 2018
Posts: 305 Likes: 7 |
I purchased a 20 Gauge Ideal grade LC for very cheaply. The barrel has some issues (reclaimable)as well as the stock but the metal was in excellent, zero pit condition. I bought it to learn the LC language and to attempt my first self restoration. Now for the stock problems (de-oiling post is below). Previous owner obviously never got advise from here because I do not think anyone on this forum would have advised him to pour hot lead in holes in the butt of the stock. That is exactly what it looks like he did and as a result the rear of the stock has a nasty split in it. Now there is lead coming out the rear of the gun whereas I only want lead coming out the front. 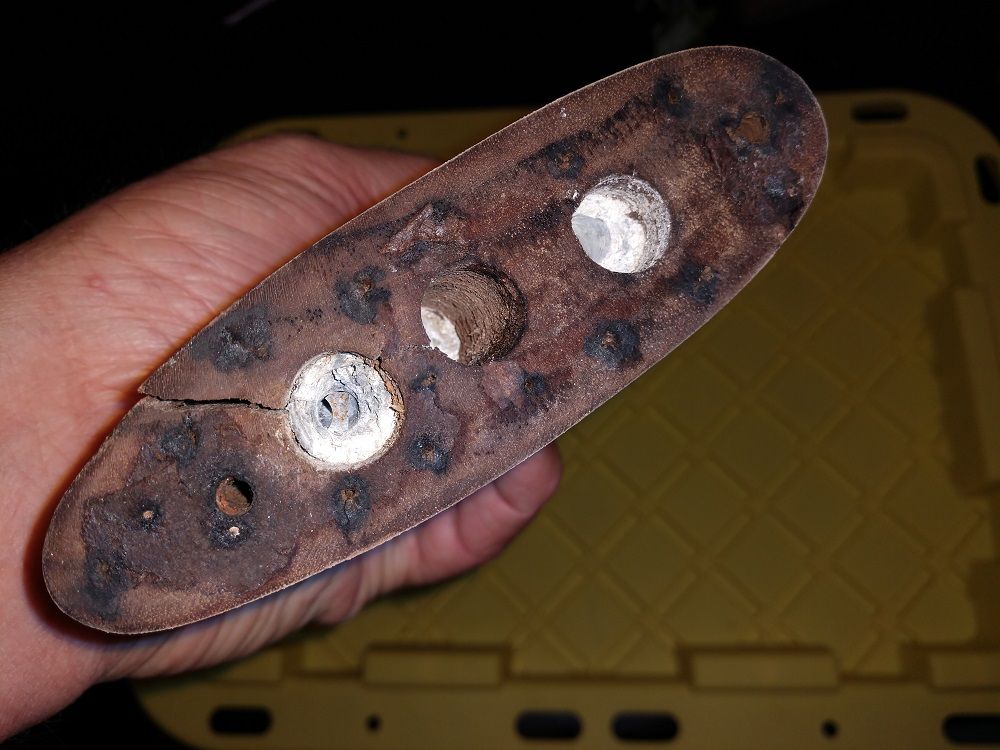 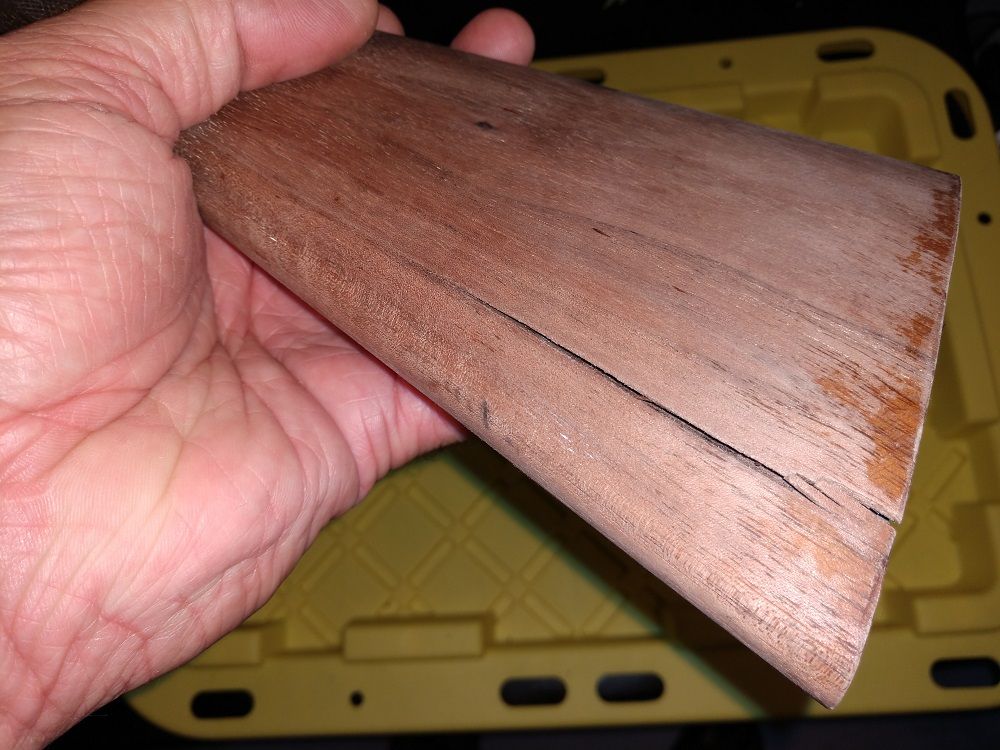 My thoughts are to chuck this up in my mill and work out the internal area of the stock leaving maybe a shell of about 3/16" to a 1/4". With the reduced wood thickness it should make the shell a little easier to draw and glue the crack back together and then basically filling the core of the stock with acra-glass or Devcon. Any thoughts or suggestions. I know it is a lot of work but it is a learning process coupled with a labor of love. The fun I am having has already been worth the little money I paid Thanks all.
|
|
|
|
|
Joined: Feb 2011
Posts: 1,405
Sidelock
|
|
Sidelock
Joined: Feb 2011
Posts: 1,405 |
Yup... that is what lead does in a stock. Eiher poured, solid, or loose shot. It swells up and splits the wood.
I have seen it several times and repaired the issue before. You have to drill the lead out completely and then pray that you can clamp the split back together to glue it up.
B.Dudley
|
|
|
|
|
Joined: Aug 2018
Posts: 305 Likes: 7
Sidelock
|
|
OP
Sidelock
Joined: Aug 2018
Posts: 305 Likes: 7 |
can you see any negative downside to my completely hollowed out idea and then pouring back solid with non-shrink epoxy?
|
|
|
|
|
Joined: Feb 2008
Posts: 11,334 Likes: 388
Sidelock
|
|
Sidelock
Joined: Feb 2008
Posts: 11,334 Likes: 388 |
I did a repair to a Lefever G grade that had a corroded mass of lead shot stuffed into a hole under the buttplate. It was even swelled enough to distort the buttplate. I dug the shot out and used solvent and compressed air to clean the split before gluing it with Titebond II wood glue. Fortunately, I was able to draw the crack completely closed with rubber tubing, and the repair is extremely hard to detect even though I know exactly where to look. After the glue repair was completely dry, I filled the hole in the stock with a close fitting walnut dowel which was glued in with clear West System epoxy. The shape of the buttplate was restored by softening it with boiling water.
You will need to completely remove the lead before attempting to glue the split stock. And remember to keep any chips, dirt, etc. out of the crack. Try pulling it closed dry before doing it with glue to make certain you will have as undetectable a glue joint as possible. You may actually have to force the split open a bit from the rear to dislodge any particles that would prevent the split from closing completely. If rubber hose or strips of inner tube won't pull it closed, it might help to use rope as a tourniquet. In clean walnut, Titebond II gives me the most invisible glue joint. The only good stock repair is one you can't see.
Edit: To answer your question, the crack probably wants to close up once the stress from the swelled lead plug is removed, so long as there is no debris in the split preventing that. So I don't think it is necessary or desirable to mill out a big opening in the butt, and then filling that with a mass of epoxy. Plus, I found that Acraglass or other clear epoxies did not give as undetectable a glue joint as the Titebond II wood glue.
A true sign of mental illness is any gun owner who would vote for an Anti-Gunner like Joe Biden.
|
|
|
|
|
Joined: Jul 2008
Posts: 448 Likes: 4
Sidelock
|
|
Sidelock
Joined: Jul 2008
Posts: 448 Likes: 4 |
Yup... that is what lead does in a stock. Eiher poured, solid, or loose shot. It swells up and splits the wood.
I have seen it several times and repaired the issue before. You have to drill the lead out completely and then pray that you can clamp the split back together to glue it up. How does lead swell up enough to split the wood ?
|
|
|
|
|
Joined: Feb 2008
Posts: 11,334 Likes: 388
Sidelock
|
|
Sidelock
Joined: Feb 2008
Posts: 11,334 Likes: 388 |
The lead oxidizes over time. Lead oxide occupies more volume than lead, just as iron oxide occupies more volume than unrusted iron or steel. This potential swelling is probably worse when lead shot is used to add weight to a stock because shot has more surface area than a solid plug of lead. If you have used lead in your stock to adjust the balance or to add weight, there is a very real possibility that this type of damage will happen.
A true sign of mental illness is any gun owner who would vote for an Anti-Gunner like Joe Biden.
|
|
|
|
|
Joined: Aug 2018
Posts: 305 Likes: 7
Sidelock
|
|
OP
Sidelock
Joined: Aug 2018
Posts: 305 Likes: 7 |
|
|
|
|
|
Joined: Feb 2011
Posts: 1,405
Sidelock
|
|
Sidelock
Joined: Feb 2011
Posts: 1,405 |
Solid plug or shot. Doesnt matter. The eventual result is the same. Personally in the examples I have observed, the really bad splits were with solid lead. On one gun, the split went nearly all the way up to the grip.
I have had some where the wood is not split, but the buttplate is being pushed up off the butt surface. And some I find lead in have not yet caused a problem. I will remove it anyway.
B.Dudley
|
|
|
|
|
Joined: Feb 2002
Posts: 1,850 Likes: 150
Sidelock
|
|
Sidelock
Joined: Feb 2002
Posts: 1,850 Likes: 150 |
Looks like a broken off drill bit in the bottom hole.
Maybe someone else had the thought to drill the stuff out and save the stock.
Lead is tough to drill out to any great depth by just going at it full speed ahead w/a regular hardware store drill bit and a Black&Decker.
The stuff grabs and loads up the bit quickly and the drill snapping off down in the lead is a real problem.
Lead shot even if a corroded mass drills out OK as it breaks apart as you'r working on it.
But a solid pour like this appears to be is a tough plug to remove that way.
The broken off drill bit in the lower hole is going to prevent another drill or a mill bit from doing any lead removal in that one.
That deep drill attempt may have helped that lower plug split the wood out.
Not knowing how deep the holes are, and fearing the worst as many home mechanics like to keep going to get the most enjoyment from their efforts, I'd probably start with the stock set up in the mill and w/end mills, start removing the wood around the plugs.
Going deep enough and just wide enough around the set of 3 to allow them to be finally snapped off in there as they will be supported each on a small pedestal of end grain.
What you are left with is a hollowed out butt stock not unlike many done that way on purpose for weight reduction.
But before you plug it back up again, if you in fact decide that you want to do that,,use the now shell of the stock as it is and do the repair(s) to the cracks.
The wood is thinner and more flexible a this point and can be moved around and more easily allaigned and clamped.
.
Just the way I'd do it most likely.
Keep the lead and make .490 RB with it.
|
|
|
|
|
Joined: Feb 2006
Posts: 3,726 Likes: 49
Sidelock
|
|
Sidelock
Joined: Feb 2006
Posts: 3,726 Likes: 49 |
Not all stocks with lead in them are going to crack from being filled. This is an L.C. Smith Quality 2E from 1896 that had a 7/8" plug put in. The Records Letter states in one column that guns weighs 9lbs and shoots tight. It is a 12 gauge. The customer wanted the gun to be a specific weight and Hunter Arms did so. 
Last edited by David Williamson; 09/19/18 11:27 AM.
David
|
|
|
|
|
Joined: Jan 2002
Posts: 13,146 Likes: 1146
Sidelock
|

Sidelock
Joined: Jan 2002
Posts: 13,146 Likes: 1146 |
If I wanted to use a lead plug for weight in a buttstock I would pour the plug in a shotgun hull of the appropriate size, peel the hull off, dunk the plug in polyurethane, let dry thoroughly, then find the right size wood drill for a slip fit with the plug. It should never oxidize, and could be removed if necessary. I'd never pour it in place.
SRH
May God bless America and those who defend her.
|
|
|
|
|
Joined: Jul 2012
Posts: 4,461 Likes: 207
Sidelock
|
|
Sidelock
Joined: Jul 2012
Posts: 4,461 Likes: 207 |
What Keith said. However, I use bands cut from an innertube. If you pull the "stretch" out as you go along will build up a lot more pressure than you would think.
Mike
|
|
|
|
|
Joined: Feb 2002
Posts: 1,850 Likes: 150
Sidelock
|
|
Sidelock
Joined: Feb 2002
Posts: 1,850 Likes: 150 |
Not all stocks with lead in them are going to crack from being filled. Might be tin instead of lead. That was commonly used in place of lead to avoid the problem of oxidation and cracking of the wood. I sometimes wondered if some of the plugs I've seen weren't a high ratio tin to lead mix as they seemed to have oxidized a bit,,turned dull grey,, but never had gone wild like some and 'grown' to split the wood or butt plate. The Win M12 3" Heavy Duck Gun has a large 'lead' plug under the pad. I wonder what they used. Those plugs always seem to be fairly shiny and w/o oxidation dispite their age and probable marsh and field use.
|
|
|
|
|
Joined: Aug 2018
Posts: 305 Likes: 7
Sidelock
|
|
OP
Sidelock
Joined: Aug 2018
Posts: 305 Likes: 7 |
Kutter that was my thoughts about milling around the plugs and then having a thinner shell hoping the wood would be a little easier to reshape and then one the cracks have been closed and glue to fil the void with something .....other than lead.
I was probably not that clear in my original post.
Thanks all
|
|
|
|
|
Joined: Aug 2018
Posts: 305 Likes: 7
Sidelock
|
|
OP
Sidelock
Joined: Aug 2018
Posts: 305 Likes: 7 |
almost a year later.
I have been de-oiling for this period of timer but today finally got on to getting the lead out. I figure removing the core of the stock may also make it a little easier for the final de-oiling.
Things are going well
I made a plywood template and jig to use a router with a bushing set up and got the stock milled out to a depth of about 2 1/2". The stub of the snapped off drill is out as well. I will be able to go about a 1/2" more with the bit I am using and will need to get a longer bit to go deeper.
I have not gotten to the bottom of the lead yet but am making good progress with leaving about 1/4" shell of the stock that should close back up pretty well once full depth is milled out.
I will [post pics once fully milled out
I am going to have to fill this hollow up with something and am thinking Acra-glass. It will be a big void. Any thoughts?
Last edited by Travis S; 08/10/19 07:01 PM.
|
|
|
|
|
Joined: Feb 2008
Posts: 11,334 Likes: 388
Sidelock
|
|
Sidelock
Joined: Feb 2008
Posts: 11,334 Likes: 388 |
Sure, fill the void with a hardwood dowel epoxied in place. No need to waste all that epoxy. And really, no need to use the relatively expensive Accraglas on a project like this. I mentioned having the stock on a Lefever G grade split due to a solid mass of oxidized lead shot. After I cleaned it all out and repaired the split with Titebond II, I used a walnut dowel I turned to fit on a lathe, epoxied in place to fill the void. Several years later, and the repair is still great.
By the way, larger volumes of mixed epoxy often heat-up and cure very rapidly, foaming out in the process. Another reason to not fill a large void with straight epoxy.
A true sign of mental illness is any gun owner who would vote for an Anti-Gunner like Joe Biden.
|
|
|
|
|
Joined: Dec 2001
Posts: 6,991 Likes: 402
Sidelock
|
|
Sidelock
Joined: Dec 2001
Posts: 6,991 Likes: 402 |
If you go with accraglass to fill the void use the gel product to fill a large void. It does not foam and cures at a very slow rate.
|
|
|
|
|
Joined: Aug 2018
Posts: 305 Likes: 7
Sidelock
|
|
OP
Sidelock
Joined: Aug 2018
Posts: 305 Likes: 7 |
I got all the lead out. There was three holes to about 4 inches deep filled with lead. I am glad to have learned form someone else's bonehead move.
I used a sharp paddle bit to get most of it out once I got the drill stub out.
What I have left is a hollowed out the stock to a depth of about 4 inches deep with 1/4" of stock wall left all the way around.
On to finishing de-oiling and will pick back up on the crack repair afterwards. If the head of the stock was not in such good shape (except for oil) I am not sure I would have done this but if successful, then a good large step in restoring/reclaiming a nice ideal grade 20 gauge LC smith.
|
|
|
|
|
Joined: Dec 2001
Posts: 3,553
Sidelock
|
|
Sidelock
Joined: Dec 2001
Posts: 3,553 |
Good man Travis...
How long are the bbs?
how much (weight wise) was in the stock altogether?
Must of been a couple or three oz or more?
Are you going to try to get some weight back in the holes, or just wooden plugs?
good luck
franc
|
|
|
|
|
Joined: Aug 2018
Posts: 305 Likes: 7
Sidelock
|
|
OP
Sidelock
Joined: Aug 2018
Posts: 305 Likes: 7 |
30" tubes. I recovered the ole girls from a local gun shop.
It is a labor of love and learning.
I am thinking about fabing up an aluminum housing to fit into the back of the stock/hollow that, from the outside, would look like a spacer between the stock and recoil pad but would be hollow and large enough to fill with weight as needed. I have used 1/4" alum as spacers on numerous guns and it adds a pleasant littlest amount of bling. I need 14 1/2 to 15 " of pull so it makes sense to me.
|
|
|
|
|


