April
S M T W T F S
1 2 3 4 5 6
7 8 9 10 11 12 13
14 15 16 17 18 19 20
21 22 23 24 25 26 27
28 29 30
Who's Online Now
7 members (graybeardtmm3, Roundsworth, ClapperZapper, Jtplumb, LeFusil, 1 invisible), 420 guests, and 4 robots.
Key: Admin, Global Mod, Mod
Forum Statistics
Forums10
Topics38,479
Posts545,212
Members14,410
Most Online1,335
Apr 27th, 2024
Previous Thread
Next Thread
Print Thread
Page 4 of 12 1 2 3 4 5 6 11 12
Joined: Mar 2012
Posts: 234
Likes: 3
Sidelock
**
OP Offline
Sidelock
**

Joined: Mar 2012
Posts: 234
Likes: 3
I have all of the barrels polished but after the Scotchbrite I found some streaks that have to come out. Additionally, there is some 400 stone work around the scope bases that is needed. Diemaker's stones have been a boon to me for this work. They break down readily but will aggressively remove metal as contours emerge as the machine marks disappear.

Progress has continued with other parts of the project too. The takedown pin has been ground and it indexes to the same point of rotation with each of the four barrels installed. A lever will need to be designed and welded on and then this part of the project will be done. A spare pin has been ground and fitted and a lever will be welded to it also.


Morris milled the forearm escutcheons today. They mirror the profile of the front scope base, are .200" thick and are set up for a #10 screw diameter using a 5/16" head. The have a 2 1/2 degree draft to ease tight inletting. I need four but as you can see now have some spares. I used a profile like this on another Martini project and liked the look. They are big enough to support an engraved border and some small scroll both front and back of the screw.


I'll start inletting forearms this week. Because of the close tolerances of the barrels a small stock duplicator would be the cat's meow as I would only have to do one and scrape the others in. Oh, well.
Dennis

Last edited by Dennis Daigger; 12/06/14 11:39 PM.

Dennis
Joined: Jan 2010
Posts: 278
Likes: 21
Sidelock
**
Offline
Sidelock
**

Joined: Jan 2010
Posts: 278
Likes: 21
Dennis, please check your PM's.

Joined: Mar 2012
Posts: 234
Likes: 3
Sidelock
**
OP Offline
Sidelock
**

Joined: Mar 2012
Posts: 234
Likes: 3
All four of the forearms are inletted and will only require about .010" scrape in when the escutcheons are installed.

Between the forearms are two gage pins. Until about a year ago I didn't know what a gage pin was but having watched Morris use them constantly I bought .061-.250 and .250-.500 sets. The two pins in the photo were used to determine when I had reached the half barrel diameter at the front and at the rear. I measured the barrel diameters at the front and back locations of the forearm, divided by two and chose the respective pins. These were kept at hand as I inletted and were easy visual references for progress. The top surface of the forearms were sanded dead flat and with the pin in the barrel channel a straight edge laid across the pin it was possible to see precisely how far I needed to go. It also allowed me to make adjustments on wood removal fore and aft so that I didn't have one end going down faster than the other.

Considerable wood needs to be removed from each of the forearms to reach the final dimensions and I can't yet tell just what figure will survive but it appears that there will be something left of interest in each.

Dennis

Last edited by Dennis Daigger; 12/12/14 07:25 PM.

Dennis
Joined: Jan 2010
Posts: 278
Likes: 21
Sidelock
**
Offline
Sidelock
**

Joined: Jan 2010
Posts: 278
Likes: 21
Dennis, sent you an email.

Joined: Mar 2012
Posts: 234
Likes: 3
Sidelock
**
OP Offline
Sidelock
**

Joined: Mar 2012
Posts: 234
Likes: 3
With the escutcheons made and the forearms inletted the next step would be drilling and tapping the forearm barrel lug and then the forearm retaining screw hole.

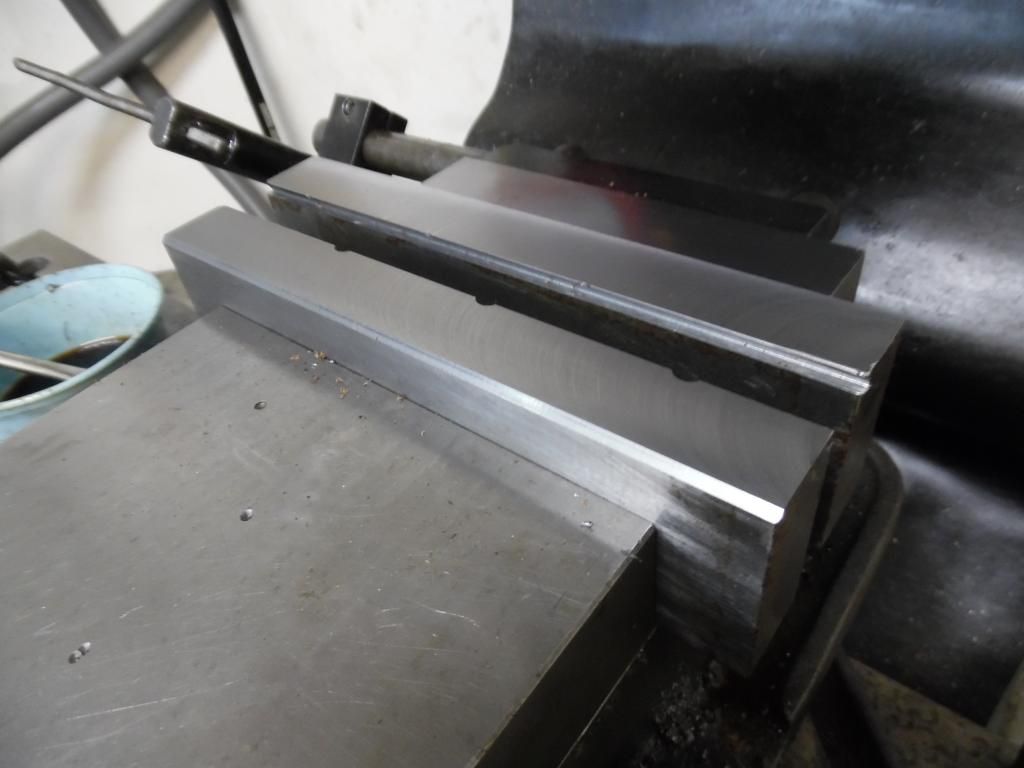
A holding fixture was needed and Morris used an old set of Kurt vise jaws. The jaws were first installed on the vise, surfaced, separated by spacer blocks and then dovetail cut on each face. This would provide a very precise method of holding the barrels in place by inverting the barrel and using the integral scope bases secured in the newly made fixture.


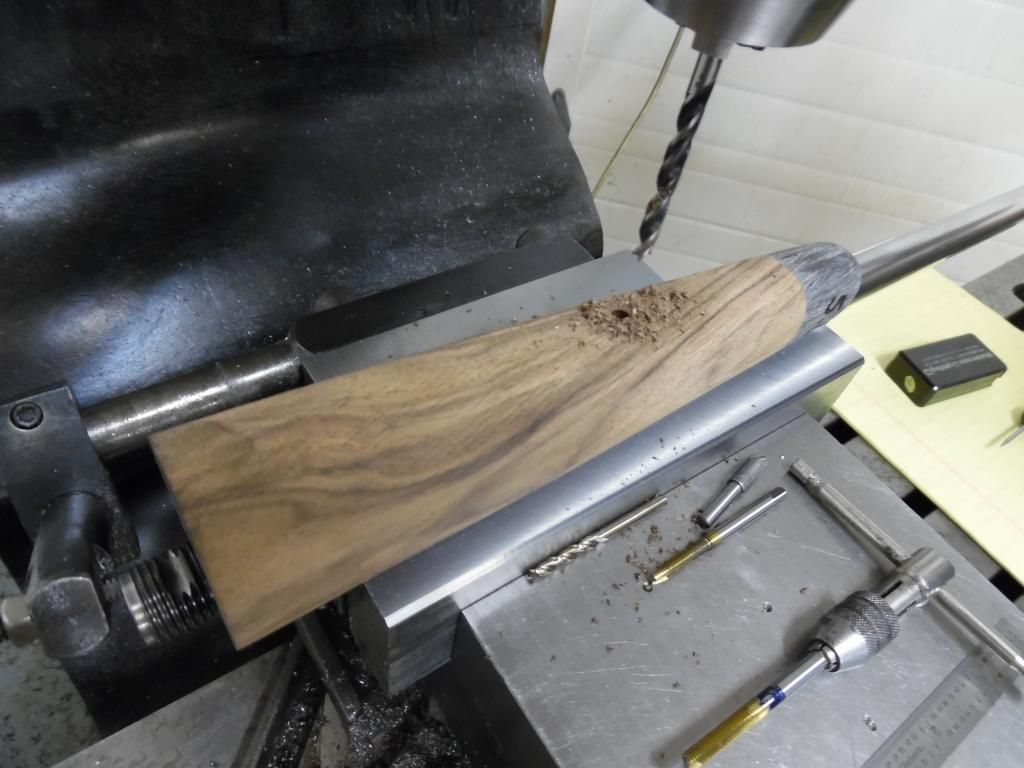
I didn't want to use a #10 drill for the wood because the fit with a #10 screw shank would be very tight and a small amount of draft was needed. I do some cabinet making also and found a 5mm wood bit in a drawer that was perfect for the job.


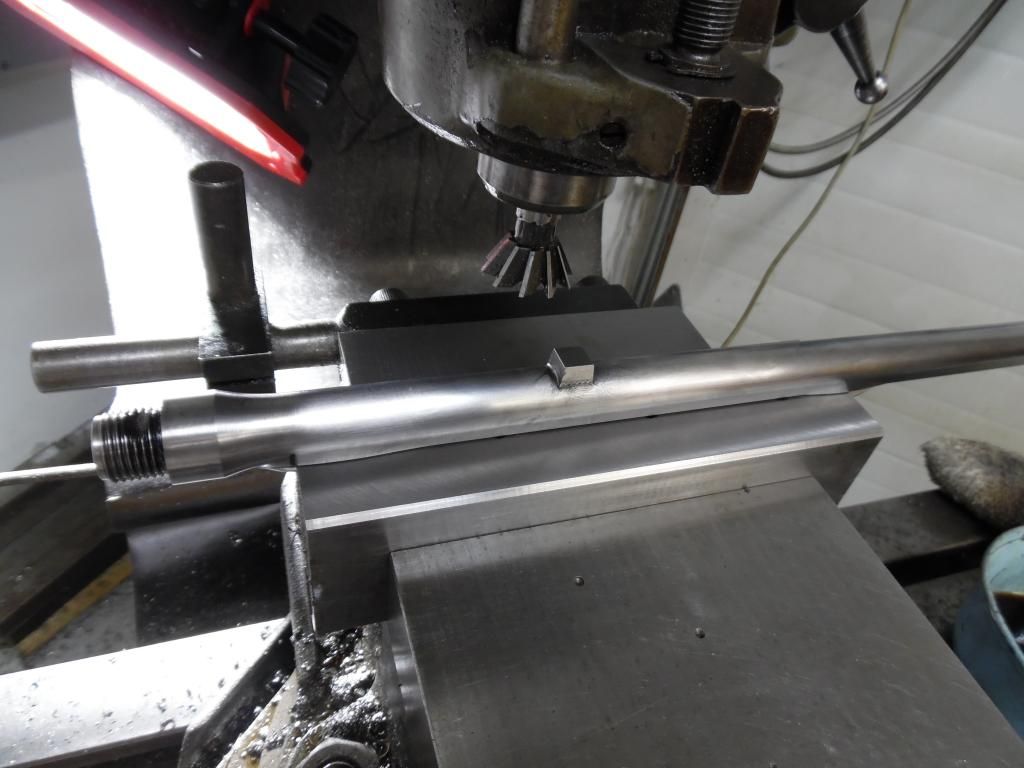
Each barrel was precisely positioned at the center of the forearm barrel lug and the sequence of drilling the lug, tapping it, installing the wood bit and setting the depth to the dead bottom of the lug (the top surface with the barrel inverted), placing the forearm in position and, finally, drilling the wood.

Morris sent #10 cap screws home with me for the final inletting of the forearms.
Dennis


Dennis
Joined: Jul 2012
Posts: 4,463
Likes: 207
Sidelock
**
Offline
Sidelock
**

Joined: Jul 2012
Posts: 4,463
Likes: 207
Thanks for letting us see his "set up".
Mike

Joined: Mar 2012
Posts: 234
Likes: 3
Sidelock
**
OP Offline
Sidelock
**

Joined: Mar 2012
Posts: 234
Likes: 3
Mike,
I hope this thread is informational as well as entertaining.

While inletting the escutcheons I found a serious mistake that I had made when inletting the forearms that required a lot of effort to correct. Fortunately I had left enough wood to recover. Not having a professional gunmaker status to look after I probably should write that up too but don't know if there is any value to others.
Dennis


Dennis
Joined: Nov 2008
Posts: 565
Likes: 12
Sidelock
***
Offline
Sidelock
***

Joined: Nov 2008
Posts: 565
Likes: 12
Originally Posted By: Dennis Daigger
Mike,
I hope this thread is informational as well as entertaining.

While inletting the escutcheons I found a serious mistake that I had made when inletting the forearms that required a lot of effort to correct. Fortunately I had left enough wood to recover. Not having a professional gunmaker status to look after I probably should write that up too but don't know if there is any value to others.
Dennis


I for one am certainly enjoying and learning from your progress reports, and very much hope you continue. Also eagerly await the photographs of the finished rifle.

Thanks much,

John Holliger

Joined: Jul 2012
Posts: 4,463
Likes: 207
Sidelock
**
Offline
Sidelock
**

Joined: Jul 2012
Posts: 4,463
Likes: 207
Being able to id and correct mistakes is a sign of a good craftsman.This means you know what good work is.
Mike

Joined: Mar 2012
Posts: 234
Likes: 3
Sidelock
**
OP Offline
Sidelock
**

Joined: Mar 2012
Posts: 234
Likes: 3
The part of gunmaking that I enjoy the most is the anarchy of setting to rough shaped wood with tools and creating form. I got the escutcheons in Monday, the Biesen buttplate inletted Tuesday and one of the forearms and the buttstock to near final form yesterday.

I put panels on the forearm and a cheek piece on the buttstock contrary to the Hoffman that inspired this project.


The file in the photo is a Grobet half round Vulcanite and is simply the most useful file I have every used on wood. It is tapered on both the fine and course side and this allows shaping of a wide range of curve radii as well as other shapes. It is aggressive and cuts smoothly. I keep a new spare at hand and it came out yesterday just for this work.

I am using my Canon G10 for the photography that I have been posting but am fast approaching the time when I need to have quality photos. Michael Petrov gave me his photo setup when he found that his time was very limited. Unfortunately, he passed away before I got a tutorial. It is an incandescent system and I'm hoping to use light boxes with speed lights instead. His camera is a Nikon 70S and I am using my Canon 550EX and 420EX flashes in 12"x48" light boxes. I haven't figured out how to disable the camera's pre flash feature so have a 3 second delay between the master and slave flashes. This works fine with shutter speeds longer than 3 seconds but this is not how I want the system to work. If anyone has experience that they would share about using light boxes and flashes for gun photography I'd be grateful.
Dennis


Dennis
Page 4 of 12 1 2 3 4 5 6 11 12

Link Copied to Clipboard

doublegunshop.com home | Welcome | Sponsors & Advertisers | DoubleGun Rack | Doublegun Book Rack

Order or request info | Other Useful Information

Updated every minute of everyday!


Copyright (c) 1993 - 2024 doublegunshop.com. All rights reserved. doublegunshop.com - Bloomfield, NY 14469. USA These materials are provided by doublegunshop.com as a service to its customers and may be used for informational purposes only. doublegunshop.com assumes no responsibility for errors or omissions in these materials. THESE MATERIALS ARE PROVIDED "AS IS" WITHOUT WARRANTY OF ANY KIND, EITHER EXPRESS OR IMPLIED, INCLUDING BUT NOT LIMITED TO, THE IMPLIED WARRANTIES OF MERCHANT-ABILITY, FITNESS FOR A PARTICULAR PURPOSE, OR NON-INFRINGEMENT. doublegunshop.com further does not warrant the accuracy or completeness of the information, text, graphics, links or other items contained within these materials. doublegunshop.com shall not be liable for any special, indirect, incidental, or consequential damages, including without limitation, lost revenues or lost profits, which may result from the use of these materials. doublegunshop.com may make changes to these materials, or to the products described therein, at any time without notice. doublegunshop.com makes no commitment to update the information contained herein. This is a public un-moderated forum participate at your own risk.

Note: The posting of Copyrighted material on this forum is prohibited without prior written consent of the Copyright holder. For specifics on Copyright Law and restrictions refer to: http://www.copyright.gov/laws/ - doublegunshop.com will not monitor nor will they be held liable for copyright violations presented on the BBS which is an open and un-moderated public forum.

Powered by UBB.threads™ PHP Forum Software 7.7.5
(Release build 20201027)
Responsive Width:

PHP: 7.0.33-0+deb9u11+hw1 Page Time: 0.062s Queries: 35 (0.040s) Memory: 0.8699 MB (Peak: 1.8989 MB) Data Comp: Off Server Time: 2024-04-28 22:44:08 UTC
Valid HTML 5 and Valid CSS