I've welded up a damascus gun barrel and test fired it!!
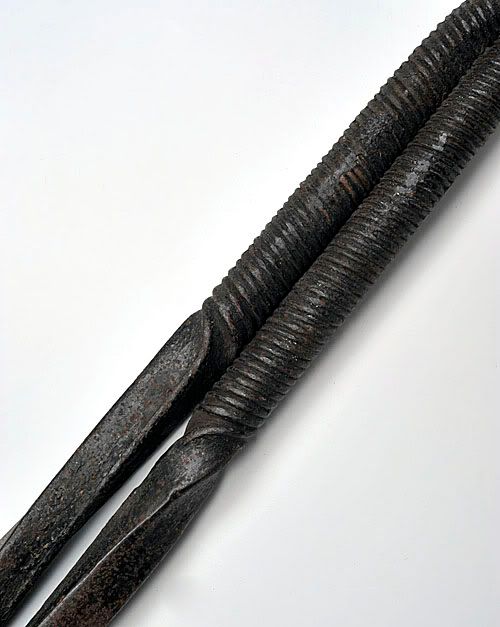
Admittedly, it is a short barrel; only 3 � inches. My intention was to make a 5 inch barrel. Due to more extreme forging than I had done before to close the welds, I compressed this tube more than the others that I had tried. Too, there was a slag inclusion at the muzzle end of the tube that just didn't look nice. So, I sawed � inch off of the tube. Still, my barrel making process is proven and I only need to start with more material to make a longer barrel. My target bore diameter was .50 caliber. I pretty much hit that, with the final bore dimension being .509". A .490 round ball and a .015" patch fit the bore nicely. I wanted the finished outside dimension of the barrel to be 1 inch. This tube is .977; so I'm close there too.
The machining of a forged tube is a complicated process. The forged bore is not perfectly straight, so it requires that you begin with tapered reamers and then step drill the bore with larger and larger drill bits until you finally get the bore straight end to end. It also requires that you continually go back and turn the outside of the tube to keep it aligned with the bore, then re-face the ends of the tube square. This too reduces the length of the finished barrel.
I've attached a picture of the barrel. It has only a light etch to display the damascus pattern. I will etch and finish the barrel near completion of the project that I will be using it on.
I video documented the entire proof firing sequence, so there is documentation that I have succeeded in making a functional damascus barrel. Below is a link to the video, on my YouTube channel.
Congrats!! Too many folks accept "It can't be done!" without trying. It seems perfectly reasonable to me that, with the proper learning curve, damascus tubes can be made in modern times. After all, we have far better materials, tools, and techniques than the guys did 100+ years ago. I do understand that that 'ole learning curve may be rather demanding. Well done to tackle and overcome.
Steve has spent over a year working to produce this barrel. He has invested large sums in obtaining the correct tools. The learning curve is very steep. Especially for some one working alone. Unlike the classic makers, he did NOT have a master with 30+ years of experience to guide him.
He is only the second American that I can confirm that is capable of producing a barrel that retains all the elements of the classic makers. Worldwide, there less than 10 men who can pull this off. The rest are in Europe.
Hopefully, given time, he can attain production capabilities.
I believe one of Steve's fellow knife makers overcame the 'meandering' hole of a damascus tube by forge welding the pattern material on to solid round stock and then using standard deep hole drilling methods.
His name was Bill Fiorini and I believe his barrels were used by a very few custom gunsmiths over twenty years ago, and he documented the process during some of the seminars he used to do. He relayed the story that he was approached by H&H to produce a set of one off barrels, but the commission never got off the ground.
I don't mean to drift off topic from the nice work shown by Steve here. Thanks for pointing it out Doc Drew.
Hallelujah. Lazarus, is that you? Well done! If you are able to bring these to market so that sleeving of damascus guns with matching damascus barrels could be made possible.... Holy cow, the mind whirls.
Yesterday I was fortunate enough to visit the Birmingham proof house. These are a few of photos of the sample strips they have to show the Damascus barrel process. � just thought it might be of interest.
This is the outside of the original 1813 building where they test fire M/L barrels.
If you ever get the chance to visit the proof house in Birmingham you have to book as part of a group. The visit is fascinating for anyone interested in firearms as it is a living, working museum. It has survived and still caries out the work it was originally set up to do by an act of parliament. Most of the buildings are original and the testing hasn�t changed a great deal in over 200 years. John
Thank you for all of the kind complements on my damascus barrel!! I decided that I had better sign up for this forum and respond to all of your messages.
As both a Master Bladesmith and a Master Gunsmith, figuring out how to make damascus barrels is something that I have wanted to accomplish for a long time. This barrel is destined to be used on a project that I am currently building.
I definitely intend to make more barrels. I plan to start working with more complicated patterns. I have been working with just a simple damascus pattern, because I have ruined so much damascus learning how to weld it into a barrel. Now that I am confident in my barrel welding process, I am willing to spend more time making the damascus that I will use. I videoed the process of making this barrel, as I did all of my failed attempts. I have HOURS of video of me ruining perfectly good damascus steel!!!
I haven't had anyone helping me with the physical labor of making barrels. I've got a hydraulic forging press and a 50lb. Little-Giant trip-hammer to assist in the work.
I build my own propane forges for use in my shop. I have a large forge that I use for welding big billets of damascus. I found it unsuitable for welding barrels, because I couldn't localize the heat in the barrel tube. Finally wound up designing and building a special forge just for barrel welding. It is very small and can heat just a couple of inches of the tube.
I feel that modern steels can actually be a hindrance for damascus barrel making. From what I can ascertain, the iron element in the old barrels was wrought iron. The steel element's content was very basic; just iron and carbon. This combination of metals would be relatively easy to weld. Our modern steels include alloys that narrow the temperature range for forge welding and also create a very tenacious forge scale that has to be mitigated to make a weld. So, modern steels are more difficult to weld and present a higher risk of slag entrapment in the welds. Because of the alloys, modern steels are often tougher at heat and move under the hammer with more difficulty. So, moving the metal to close the welds requires more effort.
The "meandering" forged bore is something to deal with for sure. But, not an overwhelming issue. Just takes some creative machining. As with any forging, getting it finished requires examining it and figuring out what you need to do to bring it to final dimensions.
Welding the damascus to a solid rod leaves the possibility that the solid rod itself (and so the bore) will no longer be straight after forging. When the tube and the solid rod are hot, they can both be bent. I would not be happy with any portion of the solid rod remaining in the bore once the barrel was finished. Most especially at the muzzle were it could be seen. This would require a very small rod, so that it can be completely bored out. The likelihood of the small rod bending would be significant. I prefer to forge the tube with an open bore. That way, I can see how the boring process is going and I'm not working blind.
I see no reason that damascus barrels could not be factory made. I already have visions of production machinery that could do the job.
Great photos of the Proof House and demonstration barrels!!! I hope to be able to visit Birmingham and also the firearms museums of Belgium some day.
I used to own 2 sample damascus forgings like the ones shown above. One still had a mandrel inside that they used. Unfortunately, I no longer have photos of that one. Here's one of the other forging. I think Drew now owns this one.
That's a stunning piece of work. Hats off to you. I love damascus barrels, they can make a gun stand out in a crowd. Fantastic ! Keep up the good work.
I used to own 2 sample damascus forgings like the ones shown above. One still had a mandrel inside that they used. Unfortunately, I no longer have photos of that one. Here's one of the other forging. I think Drew now owns this one.
Mike,
I purchased that one from you. It had some charred wood in the tube, which I have removed.
That is the chemise, not the mandrel. The chemise was a sheet of iron that was wrapped over the mandrel to keep the barrel from being welded to the mandrel.
There are early accounts of poorly made barrels where shards of chemise would become jammed in the barrel, causing the barrel to explode. To my knowledge none of those barrels has survived... But they certainly contributed to the period reports of cheap Belgian guns.
I�ve read the last few replies on this thread and thought that it would be a good time for me to add some barrel-smith expertise to the comments.
On the topic of mandrels, just to be clear, the mandrel used to wind the riband into a coil and the mandrel used during the barrel forge welding are two entirely different tools.
As to taper on the mandrels, the mandrel used for forging is tapered. The reason for the taper is to make it easier to remove it from the barrel tube after forging. During forging, the barrel tube is forged down tightly on the mandrel. It often takes a firm rap with a hammer, or other method, to break the mandrel free of the barrel. Once it starts to move slightly, the taper makes it possible to pull it from the tube freely. If it were not tapered, it would have to be driven its entire length past the constriction in the barrel bore.
The mandrels that I use for winding the riband into a coil are also tapered, though not so much as the mandrels that I use for forging. As the riband is wound, it is wrapped tightly on the mandrel. This can create a great deal of resistance against removing the mandrel. So here too, there is a benefit to having a taper on the mandrel. I cannot say whether or not the mandrels that Pete saw were tapered, as I did not see them. It may not be essential that winding mandrels be tapered, though it can prove beneficial. As the winding mandrels do not need as strong a taper as forging mandrels, perhaps the taper may not have been clearly evident along the length of a four foot long mandrel.
Concerning the chemise; I can state with certainty that the chemise is not used to prevent the mandrel from welding into the barrel. The welding process creates no risk of the mandrel being welded in this manner. Note that the British barrel makers did not use a chemise; at least not during the later years of production. This can be seen in the demonstration tube photos from the Birmingham Proof House, posted earlier in this thread. Clearly, the British makers had no fear of the mandrel being welded.
Jean Puraye stated that the chemise was to facilitate the entry of the mandrel into the barrel. Again, no need for this, as there is no difficulty involved in inserting the mandrel. The British apparently agreed that a chemise was not needed here.
I cannot honestly say that I am certain of the purpose of the chemise, though I have a theory, based on what I believe it could do for me in a barrel welding operation. The forging mandrel, when placed into the barrel is cold. The mandrel is never left in the barrel when the tube is in the fire. The mandrel must be cold, to provide a solid anvil surface to form the inside of the barrel bore. As the mandrel is cold when inserted into the bore, it immediately begins to draw heat from the barrel tube. This can have a very negative effect on the welding of the barrel tube. Forge welding temperature spans about a 100 degree Fahrenheit temperature range. Once the material is at welding heat and is removed from the fire, it begins to lose heat. The smith only has 3 to 5 seconds to close the welds before the material slips below the temperature required to make the weld. Shoving a cold piece of steel (the mandrel) against the area to be welded will shorten the available time to close the weld. I believe that the chemise serves as a thermal buffer, to prevent the cold mandrel from robbing the heat needed to close the welds between the turns in the riband.
Pete is correct about the possibility of chards of chemise coming loose inside the barrels. I believe the barrel makers wished to see the chemise become solidly forge welded to the inside of the tube. However, referring back to the effect of the mandrel robbing the welding heat, it sometimes fails to weld completely. The bore finishing process is intended to completely ream the chemise material from the inside of the barrel. However, the barrel makers of old also had to deal with the meandering forged bore hole. So occasionally, the entire chemise would not be removed. If this occurred where the chemise was not solidly welded, the chard could be stripped from the bore during firing. W.W Greener called this, �throwing slivers�.
Thanks for the great reply. This is literally the 1st time a barrel-smith has written on the subject in nearly 100 years. The historical accounts we have, were for the most part, not written by actual barrel-smiths.
Great job Steve! and thank you for sharing, I've always found it a fascinating subject and you have certainly shed some light on many of the obscure details..as you progress and try other patterns perhaps you can try to put letters in the pattern and create a word...I still can't get my head around how the managed to do that
Again...wonderful work
All best
CJ
The taste of poor quality lingers long after the cheap price is forgotten.........
The next operations take place at the factory and consist of breaking the core of the barrel by drilling the liner sheet with the aid of a square bit. The barrel is placed on a drill bench and held in a kind of vise while a square bit mounted at the end of a block operated by a hydraulic wheel turns in the core and removes the liner sheet which is fully welded to the barrel.
To make a good barrel, the chemise must be calculated on the thickness of the ribband, so as to this ent�ve all with drilling. Maybe, for example, a gun having to be drilled with 17 mm in diameter; it will have to be finished of forging mill on a broche of 12 mm with a chemise of 12 mm thickness, which gives two for the diameter of them. The chemise enlarges rather; it does not decrease by tightening; it increases approximately 1 mm. Under these conditions, a drilling of 15 mm. to diameter the limits of the chemise while carrying it until would be enough to reach; to 17; there thus remain 2 mm. to take in the matter packed to free the curves and to give the interior polish, which is necessary and sufficient.
"Gun Barrel Industry in Liege" http://books.google.com/books?id=piEZAAAAYAAJ&pg=PA330&dq 1904 Unless due care is exercised this sleeve can be the cause of great damage to the gun barrel, for, in its various hammering and the reduction of the finished barrel to the proper gauge, parts of this sleeve adhere to the inside of the tube, and the shooter will notice the scaling off of this foreign substance, which is called splinters. It is not part of the barrel proper, and is the result of carelessness. This happens only with the barrel of inferior make. With the higher grade of barrels the minute examination of the same would invariably reveal this defect. The barrel is welded and hammered into form in proportion to the outside dimensions, which proportion must be maintained to increase and preserve its strength and flexibility. The next step is the boring out, straightening, and polishing, the latter being done on an emery stone, which permits of better results than the lathe, inasmuch as it better preserves the proportional thickness throughout, and, the makers say, gives better satisfaction than the lathe. The straightening is done in a small, vise-like machine, arranged slightly higher than the operator's head. The barrel is placed in this machine while the force is operated through a hand lever. The barrel is focused on a subdued light about 20 feet from the operator, while his eye is placed close to the barrel at the end above his head, which end is gradually brought down until the proper focus is secured. The eye must be accurate to get results, while the work is rapidly done.
Another translation on the text Drew posted above:
The next operations take place at the factory and consist of enlarging the bore of the barrel by drilling out the chemise with the aid of a square bit. The barrel is placed on a drill bench and held in a kind of vise, while a square bit mounted at the end of a block operated by a hydraulic wheel, turns in the bore and removes the chemise, which is fully welded to the barrel.
To make a good barrel, the thickness of the chemise inside the riband must be considered, so as to ensure the removal of the chemise. For example, a gun that will be finished to a 17mm diameter bore size; it will have to be final forged on a mandrel of 12mm with a chemise of 1 mm thickness, which adding the thickness of the chemise times two, equals a total of 2mm. During forging, the thickness of the chemise is not reduced, but is instead thickened, by about 1mm. Under these conditions, drilling the bore with a 15mm bit would be enough to remove all of the chemise from the bore. (12mm mandrel + 2mm for the chemise + 1mm for thickening of the chemise = 15mm) Drilling the bore to 17mm would remove another 2mm of material from the bore, which should be sufficient to straighten the "meandering hole" and to give the interior a good finish, which is necessary and sufficient.
I put together a video of short clips, from filming that I took while making the damascus gun barrel. I thought the video might be of interest to some here.
Thanks for posting the video Steve. This is one of the best and most informative threads ever posted on this site in my opinion. Seeing the sheer amount of labor involved in creating a damascus barrel is sobering, and riveting. Keep up the great work!!
Steve I'm sure that what's not shown is the amount of time, work, and materials it took you to get to this point. An admirable endeavor indeed. Any plans on making longer barrels?
That Sir,is mind boggling....but man, it looks like a fun time. I really would love to see a set of sxs pipes of your construction.The as is pattern on that short bbl looks amazing. Yes indeed....how many actual hours into that bbl?..I'd bet thousands from your first efforts???? It was worth it man...that wee tube is totally sw eet!!! Is this for like a single duelling pistol, or Howdah? Will it be black/white? I'm sure so many of us here are incredibly envious of what you have just done...just beautiful man. .....eeerrr, do you have any idea how many $K per inch they'll be when you start whacking them out??? Awesome work man Franc
Franc, Yes; I have a tremendous amount of time invested in damascus barrel making. I have spent hundreds of hours poring through books on damascus barrels and researching on the internet. I have a copy of the video of old barrel makers, that Pete Mikalajunas sells on his web site. I have watched this video frame by frame. I am certain that I have seen things in this video that no one else has noticed. I have also spent several months of shop time designing and making the tools that I needed and attempting to weld barrels.
As to making longer barrels; I believe that it would be possible for me to weld a longer tube. However, the finishing out of the tube into a barrel is problematic. With the tooling that I currently have, I think a barrel of 12 inches is about the maximum that I could accomplish. I have a Southbend lathe with an 8 foot long bed. Even that large of a machine is not big enough to accommodate the tooling required to finish out a long barrel tube. Of course, I could build the machinery and tooling, or hire a machine shop to do the work. If I hired a machine shop, I expect that I would have to show the shop how to make the tooling required and teach them how to use it.
As to what I am going to do with this barrel; I should first explain how I got to this project. I am a member of the American Bladesmith Society. I hold the rank of Master Bladesmith. The ABS has a testing program, where knifemakers may submit their work for testing and earn the rank of Journeyman or Master Bladesmith. The testing program has been in place since 1988. Since testing and ranking was installed, there have only been about 150 knifemakers who have passed the Master Bladesmith test. Due to deaths and retirements, there are currently only 114 active Master Bladesmiths in the entire world. Besides being a Master Bladesmith, I am also a gunsmith; though I no longer do firearms repair for the public.
Throughout history, there have been thousands of combination weapons made; incorporating a gun and a knife into one weapon. In recent history, there have only been a handful of people who have made these weapons. A couple of friends of mine (Bruce Bump and Ron Newton) have each made a number of these pieces. In the knife industry, we call them cut and shoots. As I am both a knifemaker and a gunsmith, it seems logical that I should also make cut and shoots. Bruce and Ron have made some incredible pieces and have earned a good bit of notoriety in the custom knife industry for their accomplishments. I figured that if I was going to be noticed at all for making a cut and shoot, I would have to create something extraordinary; thus my decision to use damascus barrels on the cut and shoots that I make.
The project that I made this barrel for, is my first combination weapon. The piece is basically a flintlock pistol, with a bowie knife blade on the left side of the stock. It is a side-lock. I designed the lock-work on my computer, using a drawing program. It looks like the typical lock, but the geometry is based on my calculations. I am in the process of building the lock for this piece, using damascus for all of the major parts. Only the internal screws and parts are not damascus steel.
Below is a photo of the lock, as of today. The oversize lock-plate will be cut to final dimensions after all work on the lock is completed. The lock-plate is not etched, but it is of the same damascus pattern as is the blade that will be on the opposite side of the gun stock. The lock rests on some of the drawings that I created on the computer.
Once I have this cut and shoot build completed, I will offer it for sale. This is how I make a living and I must sell the piece to stay in business. Due to the scope of the build, the price will be high end. But, as it also incorporates what is perhaps a historic barrel, the value of it should be considerable.
Steve, this is really amazing stuff. Thanks a million for sharing it with us, and thanks again to Drew and Pete and all of the other researchers who have done so much to salvage the secrets of an almost lost technology. Does anyone have any idea how many man hours it took on average, for LLH or any of the accomplished makers, to make a pair of unfinished Damascus barrels for a shotgun in the late 1800's?
It's pretty sobering to think of how many times I turned my nose up and walked away from very nice shotguns in the past just because they had those nasty unshootable Damascus barrels. In fact, It was only a few weeks before I stumbled upon the Sherman Bell articles in back issues of DGJ that I passed on a very nice star Damascus Lefever in at least B grade at a gun show for a ridiculously low price.
Voting for anti-gun Democrats is dumber than giving treats to a dog that shits on a Persian Rug
There are all sorts of time estimates around. Some consider them written in stone. I think the question needs to more focused, eg 1890 Birmingham, 1900 Liege, etc. Barrel makers were paid by piece work.
So,if you take the above list and figure that the manufacturer had a 100% mark up over his cost. There was the cost of the ribbon from the rolling mill, the 1st barrel makers forge (2 men), the 2nd barrel makers forge (2 men), the grinder, the boring, the inspector, the joiner, the cost of proofing, etc. The barrel makers were making something like 10 cents a barrel. They could turn out maybe 4 barrels in a 10 hour day. How many man hours went into a single set?
Steve would be able to make a more educated guess than any one I know.
Steve would be able to make a more educated guess than any one I know.
Thanks for your vote of confidence, Pete.
Before I would be willing to throw out an estimate of time required to make a barrel, I would want to put a pencil to some calculations. I would be amazed to find that the barrel makers could produce 4 barrels in a day. Off the cuff, I think two barrels a day would be a challenge.
One thing that must be considered, is the time required to bring the material to heat in the forge. Nothing happens on the anvil until the steel is at the proper forging temperature. A lot of shop time is used up, just waiting for the metal to come to heat. I can use the movie of the old barrel welders to do some estimates on the number of forging cycles required. Then, use my knowledge of how long it might take to heat a given section of metal to forging temperature. Adding heating time to time on the anvil for each forging cycle should give some reasonable estimates.
I've seen some figures published on the number of barrel smiths in a given area, plus the number of barrels produced in a year's time. If these figures can be trusted, it might be possible to back into the time required to make a barrel, by calculating the number of man hours available in that year and dividing by the number of barrels produced. This might be used to verify any calculations that I come up with.
Not that is has any relevance to what experienced barrel makers could do; but, I spent six hours at the forge making the small barrel that I produced. I should be considered to be inexperienced, working by myself, using different tools and entirely different forges than the old barrel makers. I was being very slow and methodical with my work. I'm sure an experienced workman could accomplish the same in a lesser amount of time. I also believe that the iron and steel materials used back then were much easier to work with.
I'll work on some calculations and post the results here. Probably will take several days, at least.
Thanks Pete and Steve. I think a large part of the appreciation I have for vintage doubles is the amount of hand work and craftsmanship that went into making them. As I learn more about the process of producing Damascus barrels, I come to realize just how unaffordable these guns would be to the average guy if built today.
That really never hit home when I was bombarded all my life with so much misinformation by various gun writers about how Damascus was made, and how and why it was so inferior to fluid steel. How many of us spent decades reading that Damascus was just a bunch of (rusty)iron and steel wire wrapped around a mandrel, and heated and hammer welded? That stuff is still being printed in gun magazines today.
I did read somewhere recently that U.S. gun makers were paying around 6-7 times as much for unfinished Damascus tubes vs. fluid steel tubes from European sources. I think the figures were something like $3.50 for Damascus tubes and $.50 for a pair of fluid steel tubes before WWI. I suppose if we knew wage rates and subtracted materials cost and manufacturer profit margins, we could get a rough idea of the total man-hours that went into a pair of Damascus barrels. Supposedly, this large cost difference was part of the motivation for gunmakers to begin the propaganda that Damascus was inferior and even dangerous to shoot with modern ammunition.
Voting for anti-gun Democrats is dumber than giving treats to a dog that shits on a Persian Rug
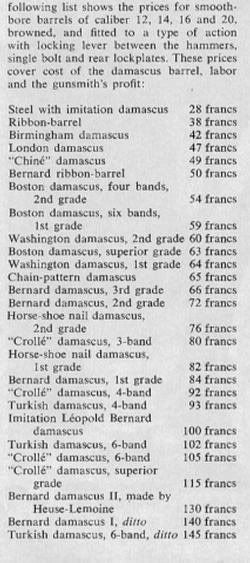
Please note that Pete's Ferdinand Drissen 1897-1898 price list is for finished barrels, but certainly reflects the price differential for the various patterns. The conversion of Belgian francs to U.S. dollars in 1900 was about 5 francs to 1 dollar. The complete charge for the barrels and gunsmithing for '3 band Crolle' was 80 francs or about $16. In 1900, Jean Lejeune of Nessonvaux listed the following prices for damascus barrels alone: 'Oxford'-16f 50 'Boston'-10f (about $2) 'Birmingham'- 8f In 1914, Arthur Delvaux-Heuve of Nessonvaux offered both '3 Band Boston' and 'Starred' for 12 francs 50 and Birmingham (Twist) for 7f 65.
The 1902 Sears, Roebuck & Co. catalog lists the Remington 1894 A grade with �two stripe Damascus� for $35. It would would have been much more economical at that time for Remington to source their tubes from Belgium. Steel barrels were introduced on the 1894 Remington Hammerless in the Remington Arms Co. April 1897 catalogue. "Remington Steel" sold for the same price as the ordinary Damascus barrels on A-grade guns. "Ordnance Steel" barrels were offered at the same price as the fancier Damascus barrels on grades C and above, but cost a $10 premium on A- and B-Grades when introduced in 1897, and climbed to $15 by the 1899 catalogue and remained so through the 1909 catalogue.
Certainly after WWI the price of damascus tubes increased but I suspect most U.S. makers were using up stock on hand ie. purchased at the c. early 1900s price.
Duties on Metals and Manufactures of Metals By United States. Congress. Senate. Committee on Finance 1912 Testimony http://books.google.com/books?id=QDkvAAAAMAAJ&pg=PA893&dq STATEMENT OF MR. W. A. KING, OF MERIDEN, CONN., REPRESENTING THE PARKER BROS. GUN CO. The Chairman. Mr. King, you are the superintendent of the works of the Parker Bros. Gun Co., are you not? Mr. King. Yes, sir. The Chairman. I am informed that you are familiar with the wage question here and abroad. Mr. Kino. Yes, sir; to a very limited extent abroad. The Chairman. I think the committee would like to be enlightened on that point. Mr. King. I can speak only for our own company in so far as wages go. For instance, on the question of barrels, Mr. Hunter informed your committee that some years ago some of the manufacturers of this country attempted to make barrels. We made some barrels: we built an addition to the factory, put in some up-to-date machinery, and brought some men from Belgium to show our blacksmiths how to do it. Wo had to pay our blacksmiths not less than 32 cents an hour, up to 40 cents, and we gave it up, because the highest wages paid the Belgian blacksmiths for exactly the same grade of barrel are 11 cents per hour. That is what is paid to the highest-priced man employed. Senator Smoot. In Belgium? Mr. King, In Belgium: yes, sir. That is where all of our barrels are imported from, with the exception of our very high-grade Whipple (likely a typo for Whitworth) steel barrels. Senator Lodge. Those are rough-bored barrels? Mr. King. Rough-bored only. The Chairman. Do you make any barrels at all? Mr. King. We make no barrels whatever.
I get a big chuckle out of those congressional hearings when I read them. They are talking 11 cents USD. Not sure the exchange rate back then. They also fail to mention the high number of women and children working in their own factories in the USA. None of whom were being paid the rate of a male worker.
In Belgium the children were mostly apprentices. They were the children of guild members.
Steve,
I understand what you are saying. At least by 1924 they had 2 sets of barrel makers at the forge. From the stills I have, there are multiple tubes standing against the wall. However, I am willing to acknowledge the high likelyhood that was the photographer dressing up the scene.
E Heuse-Lemoine in "Manufacture of Damascus Gun Barrels" 1890 claimed that some barrels had to under go 300 heatings, that would be for a single tube. He also states that only master barrel makers ran the forge.
I have realized that I made a misleading statement in my previous post. The six hours that I stated that I spent at the forge making my barrel, was ONLY the time spent welding the riband coil into a solid barrel tube. The six hours does not include the time spent making the damascus billets, drawing the billets into rods, twisting the rods, welding the twisted rods into a riband and winding the riband around a mandrel to form the coil.
300 heats to weld a barrel might be slightly on the high side; but perhaps not exceedingly so. There are many variables that determine how many heats will be necessary. Blacksmithing isn't an exact science and the smith rarely keeps track of the number of heats he needed to complete a forging. It takes what it takes, depending on how the work is progressing.
How long it takes to bring a given section of material to heat is also quite variable. Temperature of the material when placed into the fire, efficiency of the fire and how well it is managed, mass of the material, whether it is a welding heat or a lower temperature shaping heat, etc. Along the length of a barrel tube, the heats may be as short as two minutes near the muzzle and as long as 15 minutes or more at the breech end. Picking a very short average of 3 minutes per heat, times 300 heats, calculates to 15 hours that the barrel was just setting in the fire.
All of these variables are what causes me to hesitate to put into print a statement of how long it took to make a damascus gun barrel. The best I can do, is to calculate the minimum number of heats that I believe the work could be accomplished in and multiply that by a calculated average of time to heat.
The barrel tubes standing against the wall were quite possibly staged. I wouldn't be surprised if many of them were taken off of the scrap heap of useless forgings. I am certain that not all barrel forgings were completed successfully. Things go wrong and some pieces are lost. Even in modern manufacturing, some percentage of product defects and wastage are expected.
I've been doing some calculations on how long it would take to weld a twist damascus barrel. I've based my calculations on the barrel being made in the 1924 video. The process thus being timed is for a barrel in a 3 iron crolle pattern.
Mentioned earlier in this post was Lemoine's statement about barrels undergoing 300 heats. Examining the statement closely, I believe the 300 heats mentioned was actually for two barrels; 150 heats for each tube. Based on my recent calculations, 150 heats per tube may be slightly on the high end. Unless perhaps, Lemoine was also counting all of the heats required to process the damascus rod stock into a barrel.
Numerical calculations suggest that a 36 inch riband coil could be welded into a solid tube in about 50 heats; IF everything went perfectly. I think a fair estimate of the actual number of heats is closer to 100. This figure falls between the calculated minimum and the 150 heats given by Lemoine. So 100, is the number of heats that I used for the time estimates.
My calculations are based on all of the work going perfectly. The smith/smiths are at their best and working efficiently (not too many beers the night before). The forge fire is absolutely perfect and heating the metal in the shortest possible amount of time. Seldom do all of these things come together at once�..
I've started the calculations at the twisting of the damascus rods. Six rods would be required. The six rods would be welded into two ribands. The two ribands wound on a mandrel and scarf welded together near the center of the spiral coil. The coil then welded into a solid barrel tube.
Total time required to go from damascus rod stock to welded barrel tube; 11 1/2 hours.
Note that as there were two, or more, smiths working on a barrel at the same time, this equates to a total of 23 man hours.
I've got my calculations hand written on several pages of note pad. I can supply the breakdown of individual times, if anyone wishes to see them.
These estimates are ONLY the actual amount of time that the material would be in the forge, or on the anvil. There is no time included for building the forge fire and the necessary maintenance of the fire during the entire forging process. No time is allowed for the smiths to take breaks/lunch. Also not included is the time for the oft mentioned cold hammering of the barrel tube to improve the metal. I expect the cold hammering process to take at least one hour per tube.
This lock will be used on the project that I am building, to include the damascus barrel mentioned earlier in this thread.
This lock is totally my design and is the first flint lock that I have ever built. All of the pivot points and geometry are based on my calculations. All of the major parts of this lock are made of damascus steel. After spending so much time making this lock out of damascus, it was a real relief to have it function perfectly on the first test.
I'll post pictures of the lock when finished, as well as updates on the project build.
This is great stuff! Steve - thanks for posting your work, and thanks to the other lights in the thread for so much valuable and interesting commentary.
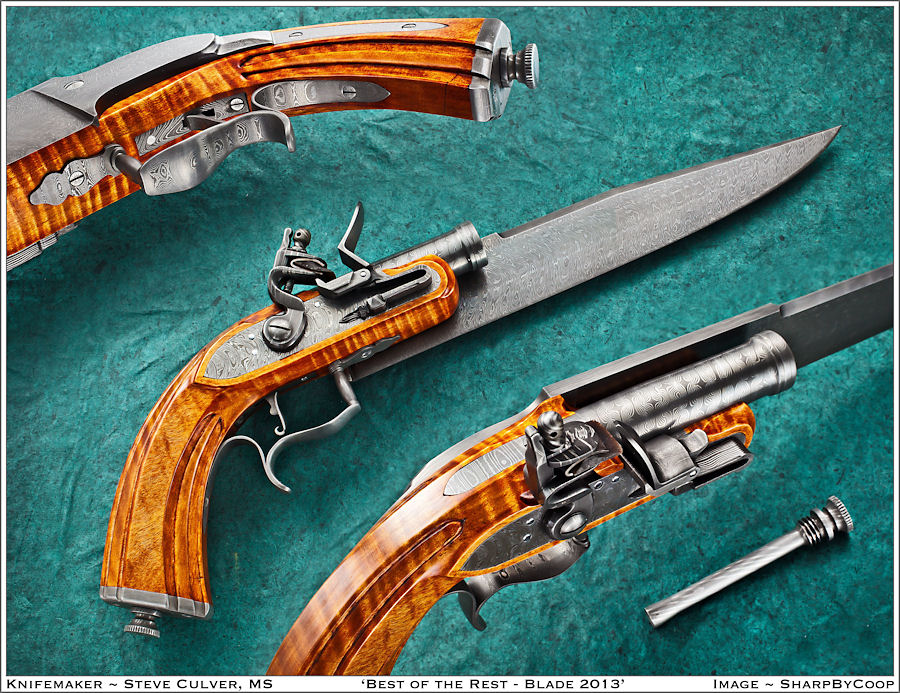
I wanted to add this information to this thread, to show where the damascus barrel that I made wound up. It was utilized in this combination weapon. This style of weapon is often called a "Cut-N-Shoot", in the custom knife circles. This project took about six months to complete. I fired it for the first time on April 22, 2013. Below are some photos that I took in my studio and a video of the first two shots fired from the completed piece. I will soon have professional photos taken of it.
This is the first combination weapon that I have built. The completed piece was test fired on April 22, 2013. Except for the top jaw screw, all of the damascus parts are made of 1084 and 15N20 steel. The top jaw screw is 1084 and 1018 steel.
The barrel is 3 1/2 inches long, in .50 caliber. It is a spiral welded barrel in the damascus pattern, two iron Crolle. The breech plug is also damascus steel, with ladder pattern in the tang.
The flint-lock mechanism was designed and built by me. All of the exterior lock parts are made of damascus steel. The lock plate damascus pattern, matches the damascus pattern used in the knife blade. The only parts of this lock that are not damascus are the tumbler, sear, bridle, main spring, sear spring and internal screws.
The 12 inch long blade is in the Woodhead pattern. In this style of blade, the spine slopes downward towards the point. This provides for the blade to be out of view when aiming the pistol, so that it is not a distraction. The blade's tang is sculptured to resemble the lock mortise on the opposite side of the pistol stock. The lower portion of the tang lies flush with the surface of the pistol grip. The blade damascus is w-pattern, that has been pressed with West Texas Wind dies.
The pistol stock is made from fiddle-back maple. It is styled after French dueling and target pistol stocks of the late 1800s. The fluting on the grip is reminiscent of decorations commonly found on French pistols of this era.
The damascus steel ramrod screws into the ladder pattern damascus butt cap and stores in the grip of the pistol stock.
The trigger guard is in ladder pattern damascus. It was forged to shape and hand sculptured to its final form. The trigger and trigger plate are also damascus steel.
Each of the screws used on the exterior of the piece have been engraved with a flower design.
The overall length of this piece is 17 1/4 inches. The overall height is 6 3/8 inches, from the top of the cock to the bottom of the pistol grip.
Below is a link to a video of the first two shots fired from the finished piece. The load was 26 grains of FFF black powder. .490 round ball with a .015" patch. FFF powder was also used in the flash pan.
buzz, I originally planned to rifle the barrel, but decided against it as a cost saving measure. I've got to sell this thing, as building such works is how I make a (meager) living. As it is such an enormous build, the price I need for it is rather high. The barrel rifling and other decorations that I had originally planned, I decided to forgo, to keep the selling price from being astronomical. However, if the future buyer wishes for the barrel to be rifled and/or other work added to the piece, there is no reason why I couldn't do more to it at a later time.
I was firing it at a 1 x 10 pine board from 25 feet. I had no problem hitting the board at that distance. My original plan included rudimentary sights, but these too I left out of the final project. The round barrel provides a decent sighting plane, by lining up the top center of the barrel with the target. It certainly would be a dangerous thing to have fired at you, out to about 50 feet. This is within the expected distance that such a weapon would be used. The 26 grain FFF load easily put a ball through the pine board.
Pete, combination weapons were quite common, back when firearms were single shot. They were made in every part of the world. There were guns with blades attached. And blades with small guns attached; every combination possible. Some of these pieces were originally built as a combination weapon; many were constructed by adding a blade, or gun, to the item later. I'm a bit surprised that you found none in the museums, as I know that the Belgians and French were well known for building them. There is a book titled "Blades and Barrels". It was written by H. Gordon Frost. The publisher; Walloon Press. The book is out of print and rather hard to find. The book has hundreds of pictures and descriptions of combination weapons.
My intention with learning to make damascus barrels was so that I could get into making combination weapons and have something original to my work. I've got a couple of knifemaker friends who make combination weapons and they have found a strong market for them. These guys have made some incredible pieces. I knew that if I didn't enter this field with a build that was a bit over the top, there was the possibility that no one would even notice what I had made. So, I built something that my knifemaker friends would have difficulty building themselves. I fully intend to continue making combination weapons and will install damascus barrels on each of them.
I have kept this piece in my possession long enough to show it at a few knife shows. I am now offering it for sale.
This weapon won the Best of the Rest Award at the 2013 Blade Show. The Best of the Rest category, is for edged tools and weapons that do not fall into a typical "knife" category.
Laffite's Revenge This combination weapon is named, "Laffite's Revenge". It was built by Master Bladesmith, Steve Culver. The completed piece was test fired on April 22, 2013. This weapon incorporates the spiral welded damascus gun barrel, discussed in this thread.
More information about this weapon can be found at the following link: Laffite's Revenge
Blade: The 12 inch long blade is in the Woodhead pattern. The blade damascus is w-pattern, that has been pressed with West Texas Wind dies. The steels used in the blade are 1084 and 15N20.
Gun Barrel: The barrel is 3 1/2 inches long, in .50 caliber. It is a spiral welded barrel in the damascus pattern, Two Iron Crolle. The breech plug is also damascus steel, with ladder pattern in the tang. The steels used in the barrel and breech plug are 1084 and 15N20.
Flint Lock: The flint-lock mechanism was designed and built by the maker. All of the exterior lock parts are made of damascus steel. The lock plate damascus pattern, matches the damascus pattern used in the knife blade. Except for the top jaw screw, all of the damascus parts are made of 1084 and 15N20 steel. The top jaw screw is 1084 and 1018 steel. The only parts of this lock that are not damascus, are the tumbler, sear, bridle, main spring, sear spring and internal screws.
Trigger Guard: The trigger guard is in ladder pattern damascus. It was forged to shape and hand sculptured to its final form.
Trigger and Trigger Plate: The trigger and trigger plate are made of 1084 and 15N20 damascus.
Ram Rod: The damascus steel ramrod screws into the ladder pattern damascus butt cap and stores in the grip of the pistol stock. The ram rod damascus is twisted 1084 and 15N20 steels.
Pistol Stock: The pistol stock is made from Premium Fiddle-back Maple. It is styled after French dueling and target pistol stocks of the late 1800s. The fluting on the grip is reminiscent of decorations commonly found on French pistols of this era.
Each of the screws used on the exterior of the piece, have been engraved by the maker with a flower design.
The overall length of this piece is 17 1/4 inches. The overall height is 6 3/8 inches, from the top of the cock to the bottom of the pistol grip.
Laffite's Revenge was test fired on April 22, 2013. The loading was 26 grains of FFF black powder, .490" round ball with a .015" patch. FFF powder was also used in the flash pan.
Copyright (c) 1993 - 2024 doublegunshop.com. All rights reserved. doublegunshop.com - Bloomfield, NY 14469. USA These materials are provided by doublegunshop.com as a service to its customers and may be used for informational purposes only. doublegunshop.com assumes no responsibility for errors or omissions in these materials. THESE MATERIALS ARE PROVIDED "AS IS" WITHOUT WARRANTY OF ANY KIND, EITHER EXPRESS OR IMPLIED, INCLUDING BUT NOT LIMITED TO, THE IMPLIED WARRANTIES OF MERCHANT-ABILITY, FITNESS FOR A PARTICULAR PURPOSE, OR NON-INFRINGEMENT. doublegunshop.com further does not warrant the accuracy or completeness of the information, text, graphics, links or other items contained within these materials. doublegunshop.com shall not be liable for any special, indirect, incidental, or consequential damages, including without limitation, lost revenues or lost profits, which may result from the use of these materials. doublegunshop.com may make changes to these materials, or to the products described therein, at any time without notice. doublegunshop.com makes no commitment to update the information contained herein. This is a public un-moderated forum participate at your own risk.
Note: The posting of Copyrighted material on this forum is prohibited without
prior written consent of the Copyright holder. For specifics on Copyright Law and
restrictions refer to: http://www.copyright.gov/laws/ - doublegunshop.com will not monitor nor will they be held liable for copyright violations presented on the BBS which is an open and un-moderated public forum.


![[Linked Image from i.imgur.com]](https://i.imgur.com/Ez9oz9Rl.jpg)
![[Linked Image from rbsiii.com]](http://www.rbsiii.com/Guns/Purdey_500_top_360.jpg)