I took apart a LC Smith SxS recently because the safety no longer worked. Lots of parts fell out of the gun when I pulled the stock and I think that was the problem. It seems that some of the pins that hold the safety parts in place are held there by the stock but apparently not that well. In any case, the problem I am having putting it back together is with the shaft from the top lever. The v spring that powers the top lever is at the bottom and causes the unsupported end to be way out of alignment with the hole in the trigger plate. I can put the trigger plate on it if the stock isn't there by using it to lever the shaft into position but have no access to it with the stock in place. I could drill and tap a hole in the receiver (that would be hidden by the stock) and use a set screw that could compress the spring and allow the shaft to go to center but it seems like a lot of work. I have also tried putting a steel rod (allen wrench) in the screw hole at the bottom of the shaft and using that for a lever but it requires more force than the allen wrench can stand and it just bends. There must be a way that they did these at the factory. Does anybody know? Thanks for any responses!
If you check over at the lcsmith.org website I believe they have some information with photos describing how to do this. There are several ways to do this. A modified C clamp with a small hole drilled in the stock is a common way (need to see pictures to understand). Hope this helps.
I use the Bill May method except I use a #4 steel shot to hold the spring. I pry the spring with a screwdriver to install the shot, but make sure you don mar the edge of the recess for the trigger plate. I install the shot very close to the end toward the spindle. Any farther back and the spring is compressed too much.
http://www.picturetrail.com/sfx/album/view/15525639
Thanks for the resposnes. I tried to find something on the LC Smith collectors forum but was unable to locate anything, even in the disassembly/assembly thread (or sticky). I think I understand how the c-clamp would be used but will probably use a vise. I'll also look into using the steel shot method. Thanks for the prompt responses!
I insert all screws except the one in the trigger plate and only tighten them a few turns.I use a 12" tapered and hardened rod to get everything re-aligned. I clamp the receiver upside down in my vise using wood blocks for padding.
I apply pressure to the trigger plate with one hand while rocking the top lever towards the hole with the tapered rod. Usually in a few pushes it will snap into place. I them install the screw and finish tightening the other screws.
Jim
I made a tool years ago as I work on quite a few LC Smith Shotguns regularly....
Picture is worth a thousand words.....compress the spring with a screw driver vertically, insert the tool, remove the screw driver....
Requires a small notch in the non structural super thin wood internal divider wall, cut a clean notch with a razor blade or side cutters......after assembling the stock and trigger plate, simply remove the tool.....it holds spring pressure off of the lever shaft during assembly for perfect alignment of the lever shaft while inserting the screw without any side load on the threads........
No slipping marks, rubs, gouges or depressions on the wood or metal from clamps or external tools, no force needed to reduce spring tension during assembly etc....
Hope this helps........


Gazz, the factory workers who put these together used a 3/32" drift or nail punch along with a screw driver that had a "V" shape in the blade. They inserted the drift into the bottom hole next to the trigger guard hole (4-40 hole) and used the notched screw driver to push the drift over until it fell into the counter-bored hole for the top lever shaft to fit.
I tried that once and that was enough for me, one slip and you slide across the receiver and gouge the wood. I use the "C" clamp with a 3/32" x 1 1/4" long drill blank imbedded into the top jaw of the vise. For the stock, drill a 1/8" hole 5/16" up from the bottom of the wood and 5/16" over from the end of the stock.

[IMG]


The 1/8" hole gets drilled on the right side. Put all the other screws in loosely, and put the left lock in place to put the moveable jaw on. You can see I have a pad on mine.
Some do not like this way of doing it, because they said they split the long narrow wood from the clamp...if you are dumb enough to do it without any support, you deserve to crack it.
Most of this is on the L.C. Smith Site under Disassembly and Assembly
I was "lucky" enough to have a problem with the first LC Smith gun I worked on that required assembling it about 7 thousand times. I always started the top and bottom screws just a little. Turned the gun over (on a padded surface)so the weight of the gun was on the top lever pushing it towards the trigger plate, and then use the biggest allen wrench that will go through the plate and into the top lever. Slide the allen over with your finger until the top lever "snaps" into place, VOILA. I did bend the allen a few times, but if you keep your fingers down close to the receiver it should go. I don't like the notched screwdriver idea as it is just something else sharp to drag across your gun if it slips. Jerry Andrews who has seen the inside of a whole lot of these guns told me that is how he does it.
One of the funniest things I read on the LC Smith board was a post about this job where one gentleman commented that it was "OK to cry a little."
CHAZ
Today I drilled a hole in the stock and tried the push pin method. I set up my arbor press with wood blocks to rest everything on and used a bronze pin to push against the shaft with. The spring is quite easy to compress with the arbor press but unfortunately, the shaft is also forward of the hole once I have lined it up side to side. The lever tool looks interesting and it seems there is a relief in the wood for something, maybe a lever. The V-notch screw driver and hardened pin seems that it has an advantage in being able to push the shaft in the direction(s) required. I'll let you all know what I end up doing and thanks again for all the great ideas.
I use a lever similar to PA24, except much smaller. My lever is made of 1/8" flat steel. I saw and file it until it is in an "L" shape with the long arm about 1" long and the short arm about 3/16" or a little less. Both arms are 1/8" thick. The important thing when making the tool is that the inside corner is square.
I pry the spring over until the short arm of the tool fits between the spring and the frame, with the long arm pointing outward. Put the stock of the gun up to the tool and mark the location and depth of the notch that is required to clear the tool.The notch will be cut in the thinnest portion of the wood under the lock plate. I usually cut it with a cut off disk in a Dremel tool, but other methods will work. The tool is held in place by the spring while the trigger plate is put in position and screws inserted and tightened. I then check the function of the safety before removing the tool, because getting the safety lever in the correct position is my biggest problem when re-assembling. Once everything is in place, push the top lever over to free the tool and remove it. If there is a need to disassemble again, the tool can be easily reinserted by pushing the top lever over and reinserting the tool before continuing dis-assembly.
Thanks for the resposnes. I tried to find something on the LC Smith collectors forum but was unable to locate anything, even in the disassembly/assembly thread (or sticky). I think I understand how the c-clamp would be used but will probably use a vise. I'll also look into using the steel shot method. Thanks for the prompt responses!
Your need to go to the Photo Trail- under L.C. Smith specific- Your tour guide with first rate photos and details as to what you are faced with is much like the storied Duncan Phyfe- a "Sharp Dresser"- Maurice Chevalier boater hat-- c'est magnifique!!
A pin punch and a large blade screw driver w/a V groove in the blade.
Tighten the trigger plate screws down so there's a little pressure on the lever spindle as already pointed out.
You should be able to feel the safety engaged correctly at this point.
Take a shop rag/cloth w/a small hole in it and place it over the spindle hole to avoid any marring of the frame and trigger plate.
Place a pin punch in (I see allen wrenches seem to be popular now),,lay the screwdriver against the punch and push on the screwdriver handle with your stomach.
That leaves both hands free to push the trigger plate down into position as soon as the spindle lines up.
There's no need to panic doing this, you can push and hold the spindle in position very easily while you use your hands and eyes to line everything up.
Use the thumb of either hand to hold the screwdriver blade down flat against the frame if you like.
Many people that first try this method have a feeling the driver is going to come flying upwards and off the punch. Keep it horizontal, and keep a thumb latched over it and you'll be and feel very secure.
After doing this a few times you'll find it's not necessary to hold it there if you use a pin punch as the punch tapers outwards/gets bigger above the driver and keeps it in position down on the frame.
Keep a finger of one hand below the action on the top surface of the lever. That'll keep from pushing the lever back out position and off of the heavy spring.
The linkage keeps it from coming right out of the frame, but there's enough movement usually to allow it to skip off the spring if pushed far enough.
The trigger plate will snap into place. Remove the punch and cloth.
Place the small spindle screw into place and tighten most of the way to avoid the spindle creeping away and allowing the spindle to snap out of the recess where upon you'll have to do this all over again.
Tighten the trigger plate screws,,relax.
Takes much longer to type out or even to read than to do.
This was the method used at the factory and shown to me while working at Marlin to reassemble LC Smiths.
If there was anything special about the tools used, some 'smiths made up their own special 'slotted screw driver tool'.
They used an old worn flat file for the bit (annealing and shortening/shaping as needed) and used a small bit-brace type handle instead of the normal small diameter screwdriver handle.
Made for a more comfortable time of it!
But it isn't really necessary to do the job.
I use a small brass wedge with a piece of fishing line attached to it. Compress the spring, insert wedge, depress the post in the rib extension area with a screwdriver, which allows the top lever to return to center. Then assemble, pull the lever to the right, and pull out the wedge with the fishing line. Pretty simple. I got this idea from Fishnfowler (he gave me a couple wedges that he uses on his Smiths), and it works really great.
I read an interview (early DG Journal I think) with English gunsmith John "Jack" Rowe in which he was asked what guns he worked on. After listing numerous English, European & American guns & rifles he commented: "L.C. Smith guns I don't want to know".
I don't say this to offend any L.C. Smith fans but along with their charm they do have their idiosyncrasies & it sounds like Jack's dry humor.
I wouldn't drill holes in the stock to reassemble a LC. It's too easy to slide a nice pin punch in the threaded hole of the shaft on the toplever and simply push the shaft into alignment. If a gunsmith did this to my priceless Deluxe grade, I'd keelhaul him. Since I don't have a priceless Deluxe grade, I'm not so worried, but I still wouldn't be happy about it.
If you're not happy with the pin punch idea, you can use a long, hardened, screw.
If a gunsmith did this to my priceless Deluxe grade, I'd keelhaul him. Since I don't have a priceless Deluxe grade, I'm not so worried, but I still wouldn't be happy about it.
I'd much rather have an internal unseen small hole on the non-load bearing thin divider, than bone and charcoal case colors on a graded Fox or Sterlingworth which shows on the outside when it was and is supposed to be cyanide colors, worth a "keelhaul" as well ya think...?..........Hypocritical maybe...?.....To each his own maybe....?......
Well, you got me there, but the colors will wear off. I didn't make the choice on the casehardening on that gun, it was Doug Turnbull Restorations that did it.
I have a cordless drill and can fix up your LC's for "easy assembly" for you Doug.
Well, you got me there, but the colors will wear off. I didn't make the choice on the casehardening on that gun, it was Doug Turnbull Restorations that did it.
I have a cordless drill and can fix up your LC's for "easy assembly" for you Doug.
Sounds like the little choo-choo, "I think I can, I think I can".....you crack me up Chuck.......and the new millenium answer, "I didn't do it, honestly it's not my fault"........

Some folks just do things different ways, see page one of this thread.......Some folks like the ol' use your stomach, hold your tongue right, don't sneeze method........
and some folks like a real simple, easy, no rub mark, don't need the vise, no slipped screw driver, safety slide in place easily, answer the phone or use the bathroom with a no rush type approach to this re-assembly.......

I prefer the method I show on page one, using the tool I made....no pressure on the stock anywhere, no outside tool rubs or marks etc.....makes for a super clean, trouble free installation every time......
BTW, small holes-notches can be filled and completely invisible with matching saw dust and epoxy and stain if the internal hole-notch becomes a mental issue......
I tried various tools inserted in the threaded hole at the bottom of the shaft but nothing of the size that would fit could handle the force required to move the shaft into alignment - all of them bent, including pin punches, hex keys and hardened screws. All before the shaft was anywhere near where it needed to be. I believe I will make a threaded insert to fit the shaft that I can screw completely into the shaft with a shoulder that bear tightly against the shaft. It will have a larger diameter portion that I can push against with the modified screwdriver - close enough to the shaft that it should not bend. As far as drilling a hole in the wood goes, it is so thin there it really is not providing any strength to the stock and the hole will not affect anything and will not be seen when the gun is reassembled.
Thanks again for all your help!
Jack Rowe is right- but remember that our LC Smiths were not designed like the London bests he knows like Rosie O'Donnell knows the "Lezzie" Handbook-- the Smiths are back actioned sidelocks without an intercepting sear design, and the mating of the sidelock plates to the stock is a critical issue-- a bevel of the metal surface would have been better. I have at present 5 pre-1913 LC Smiths- two with Damascus Barrels, 3 with Nitro Steel (or Crown, London, all the same basically) all are 12 gauge, have double triggers, and two have ejectors, 3 have extractors- I always shoot RST 2.5" light target loads in them, nothing else, I have reinforced the stocks in the head areas with a skin coating of acra-glas, and I shoot them frequently- No cracks (yet) but another thing to possibly consider- as mine were all made before WW1- we had a better supply of good black walnut (or in the higher grades, English, French, Turkish- what have you may) the War to End All Wars used up a ton of walnut for gun stocks and aircraft- mainly propellers- so there you have it, just my opinion. LC Smith American made sidelock shotguns are like British: Boss, Purdey, Woodward, Churchill, Powell, Holland & Holland, Lang, etc as the German VW is to the Porsche- in that the air cooled engines used in each were designed by Dr. Ferdinand Porsche- after that, waaaaay different. But I can afford lower graded older Smiths in 12 gauge, as there were so many made, and I am an easy "fit" as far as stock dims are concerned- if it fits like a field grade Model 12, it fits me, and suits me right on down to the ground. And by rotating the guns I use almost year around, no one single shotgun gets over-heavy useage- Just my viewpoint of course--
Best solution I know of for this problem is to trade the Smith for a Lefever. One of the easiest Disassembling & Assembling Doubleguns known to man.
Doug,
If I knew you and AmarilloMike were gonna ride me like a rental horse about the case colors on that gun, I'd have given it to Ed Good. I swear I had no choice or fore knowledge...honest...really...seriously...
Instead of a pin punch, use a small nail set, it will not bend trust me.
If you had read my post about using a nail set or a pin punch to fit into the 4-40 hole, you would have read that it is only there to act as a fulcrum point for the notched "V" tool to push it over into the fit.
That spring is made for a 100lbs. pressure and there are not many things made .093 (3/32") that can handle that force without bending or breaking.
The workers to did this at Hunter Arms did it day in and day out and they knew how to do it. There are pictures of them doing so. Since I don't do this everyday I used a method that the late Russ Ruppel told me, and that is with the small hole drilled in the wood.
As to making the wood weak, no such thing in that area.
Make sure you release the top lever before you try this. If you haven't figured it out yet, there is a small plunger that the rib extension depresses as the gun is closed. You can push on this with a small tool and the top lever will be released to a neutral position. Then it takes much less force to align the screw hole.
I am a big fan of the wedge on a string trick and it leaves the stock intact as well as insuring you don't bugger the threads of the top lever pin. There aren't any vises or drills involved and it takes zero effort.
Rob.
Oh yeah, here is a photo of the hole drilling technique gone awry.
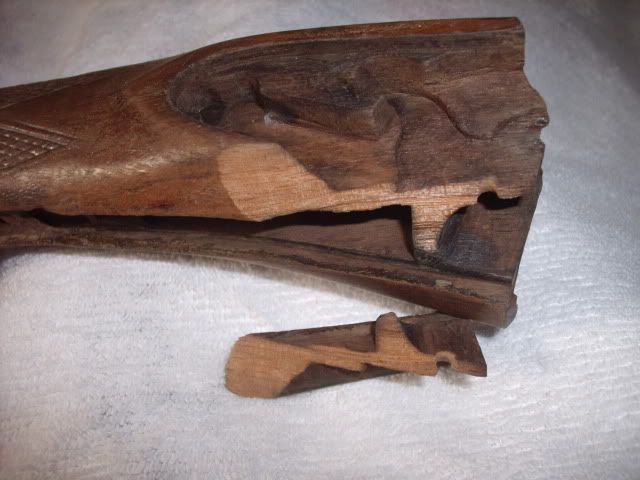
Oh yeah, here is a photo of the hole drilling technique gone awry.
Yup-- Murphy's Law prevails- that's why I coat all the internal wood areas with a skin coat of acra-glas before I locate and drill the access hole- but every piece of gunstock wood has its quirks and weak spots, and repairing such damage is possible, but time consuming and expensive--
The picture with the broken wedge, is from not supporting that area. That is why I recommended putting the lock plate on that side and putting the fixed jaw on the lock instead of the wood. Not a good idea to put the jaw on a slender piece of wood and not think it won't slip off and break or crack this piece.
I went back and just noticed that the broken piece is on the drilled side. The only way the break here could have occurred is that the pin going through the hole was not attached to the fixed jaw and it slipped off. If the pin was long enough, the jaw would not be close to the piece.
Words of wisdom indeed- and I forgot to add that advice- As i deal in LC Smith parts, over time I have both a R frame and a FW frame set of lock plates, stripped of all parts (sold) and from Field grade Smiths- that I use to fill in the open lock area of the stock-against the pressure of the small modified C clamp-- if you don't do this, and just rest the anvil of the C clamp against a bar or metal, which contacts the top and bottom of the inletted area- you are looking at a potential real problem-- Smiths are indeed tricky to re-assemble and they have their quirks--